Karel++ World is a simulator to accompany Karel++: a Gentle Introduction to the Art of Object-Oriented Programming by Bergin, Stehlik, Roberts, and Pattis. Karel++ World implements all aspects of the language as described in the text. It permits the user to build robot worlds and test robot programs within them. The Karel++ World works with IBM PC compatible computers running Windows Version 3.1, Windows 95, and Windows NT.
NOTICE. This program is largely obsolete. Starting with Windows 2000, Microsoft withdrew support for 16 bit programs and we were not able to rebuild it due to the difficulty and the nature of the tools used to first build it. It is being replaced by a different system that will allow you to translate Karel++ programs into Karel J Robot programs and then use the simulator of Karel J Robot to run the results. I will leave this program in place for those who still run older systems, but for most of you, visit the Karel++ Front Page to get the newer system.
I hope you enjoy using Karel++ World and that it helps you learn from the book.
To run Karel++ World, you need an IBM PC with Windows, of course. You will need about 2 megabytes of disk space to hold the files that come with the distribution and the files that you create yourself. You will also need an editor program that can be used to create text files. Any such editor will do, including the Note Pad, which comes with the Windows system software.
To use the World, you should create a new folder on your Hard Disk and name it something like Karel++. Then copy all files from the distribution disk to this folder. It would be a good idea to make and use a back-up copy of the distribution disk and keep the original in a safe place.
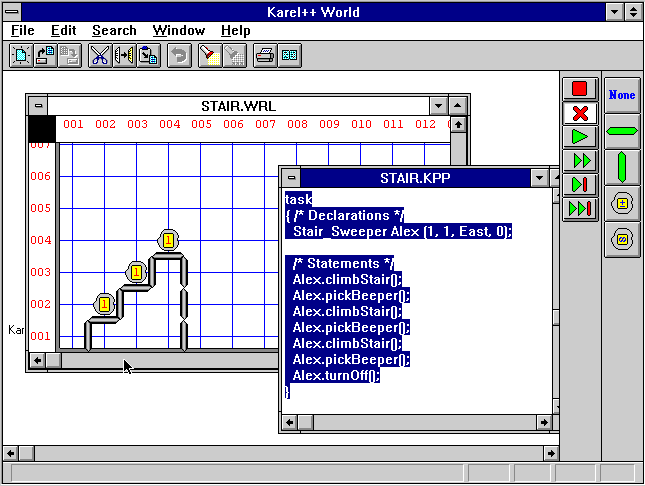
Here is a look at Karel++ World with an open world file and an open robot program. These come from Chapter 3 of the book. At the top of the screen we have menus and under them a palette of buttons that repeat menu selections for convenience. Along the right side we have two additional palettes: first the Control Palette and, at the far right, the Place Palette. The main part of the window contains the open files. We will discuss these elements as we go along. The snapshots here were done on a Macintosh running a Windows 3.1 simulator. The program, by the way, was built on a Macintosh using a Windows simulator also.

Figure 1. A View of Karel++ World for Windows.
You need two files in order to run a program. One file contains the robot program itself. The other describes the robot world with any walls and beepers. To run a program in a world when both of these have been prepared previously, you need to open both files in the Karel++ World. The program and world on page 11 of the text are with the distribution files. The program is called "First.kpp", and the corresponding world is named First.wld.
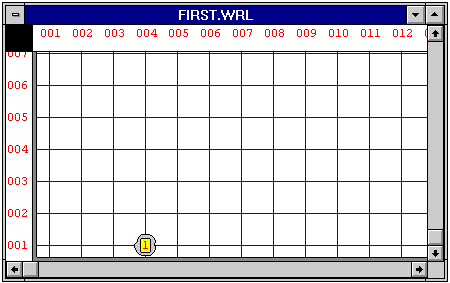
Figure 2. A World Window with one Beeper.
Find the file First.wld in your Karel++ folder. You can either double click this file (if the appropriate association has been made) or drag it onto the application Karel++ icon. This will start the simulator. You can also start the Karel++ World simulator by double clicking on its icon. You can then select Open from the File menu, or the second palette button from the left at the top of the screen, and navigate to the First.wld file in the file dialog and select and open it.
However you run the World, you should now see a page with the Street and Avenue grid, with a single beeper at 1st Street and 4th Avenue. This window is shown in Figure 2. Note the Street numbers to the left and the Avenue numbers across the top. This window can be scrolled and resized. There are 1000 streets and 1000 avenues in this world. If a robot moves outside this world it can't be seen.
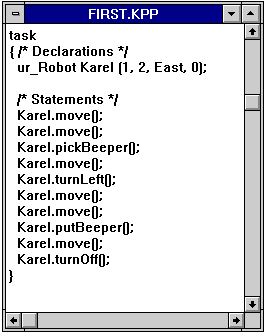
Figure 3. The Program Window
Next, you need to open a Karel++ program to be used within this world. You can go back to the desktop, without quitting the simulator, and double click on the file First.kpp, or you can select Open from the File menu and navigate to this file and open it. This will open another window after a few seconds while the World analyzes the program. This new window will contain the text of the program. You may need to resize this window, but it should look like Figure 3. The window can be moved so that it doesn't cover the world.
To run this program you use the controls in the Control palette. These controls
are graphical rather than textual, however. The Control palette is a near the
right side of the program window.
|
Figure 4. The Control Palette
The Control Palette is shown in Figure 4. It has six controls that are suggestive of the controls found on a VCR.
The first button will Pause a running program. It can be continued after a Pause. When this tool is selected, a left mouse button click will execute one Step of the program, just like the Step tool. A right button click will execute Step Over.
The second buttonwill Stop a running or paused program. A program can be restarted from the beginning after a Stop, but it cannot be continued. The escape key on the keyboard will also halt a running program.
The third button will Run a program automatically, executing one instruction after the other until the end. You can pause the program at any time by hitting the Pause button. You can also Stop it with the Stop button. While a program runs the instruction that is about to be executed next will be highlighted in the program window. When this tool is selected a left mouse click will Pause the program and a right click will Stop it.
The fourth button, Fast Run, will run a program as fast as you computer can execute it. You can also Pause or Stop the execution. The program window will not indicate the instruction being executed during a fast run, however. A short program like First.kpp will probably execute so fast in this mode that you won't have a chance to Pause it. When this tool is selected a left mouse click will Pause the program and a right click will Stop it.
The last two buttons are used to Step through the program. The fifth button will Step through a program, one instruction at a time, pausing at the end of a single instruction. Each instruction will be highlighted in the program window each time it is executed. This is often the most useful way to see what a program is doing in detail. It is also useful to step through a program that has execution errors. When this tool is selected, mouse clicks
The last button is the Step Over button. It will completely execute whatever is highlighted in the program window without stepping through the individual steps of whatever is highlighted. It will then Pause. Since the entire main task block can be thought of as an instruction, and it is initially highlighted at the beginning of an execution, hitting this button at that time will FastRun the entire program.
After you execute a program using the buttons on the Control Palette, you can execute it again and again until you close it or open another program. You can have several world windows open at the same time, but only one program window. With one program and several worlds, you can execute the same program in different worlds.
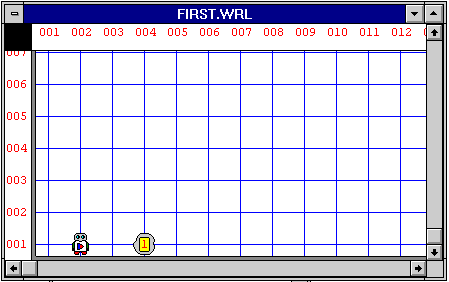
Figure 5. The World After a Robot has been Delivered
When a robot program is in execution, the robots will appear in it after their delivery specifications have been executed. The robot shows the direction it is facing in the world by the triangle shown on its chest, and, more subtly, by the direction that its eyes point. The robot in Figure 5 is at 1st Street and 2nd Avenue and it is facing East. After a robot executes a turnOff instruction, it will be shaded to indicate that it cannot execute more instructions.
You Do It. Run the First.kpp program in the First.wol world using each of the four run modes: Run, FastRun, Step and StepOver. In Step mode, you will need to hit the Step button several times. You can also go back and forth between the various modes. Try to Run the program with the Run button and then quickly Pause it. From there you can Step through it for example.
You Do It. Run the program Stair.kpp in the world Stair.wol. This is the program on page 31 of the text. It is a program that uses new instructions written by a robot programmer. You can find these files in your Karel++ folder also.
To write your own robot programs, you need a text editor. Any text editor will do, such as the Windows Notepad. You should be careful about indenting lines in your programs so that they are easy for you and others to read. The part of the simulator called the Parser that reads the program will ignore your indentation, however. If you use Wordpad instead of Notepad, or some other editor or word processor, be sure to save the file as a text (ASCII) file.
When you prepare a program with a text editor, you won't be able to open it in the Karel++ World by double clicking it unless it is a text file with extension .kpp and the appropriate file association has been made. This is because it will have the editor's document icon. You can open it from the File menu of the Karel++ World, or you can drag the file icon over the application icon and release it.
If you want to make a program file open automatically in the Karel++ World instead of in the editor, you can establish an association between the extension .kpp and the Karel World program. Windows Explorer will let you set these associations in its View/Options menu. The file will then get the Karel++ World document icon and will open in the World by double clicking. You should then use the kpp extension only after you are sure that you will be making no more changes to a file, since after doing so it won't open automatically in the editor. You will still be able to open it from the editor's File menu however, or by using drag and drop.
If you write a program that has lexical or syntax errors then Karel++ World will find these and report them to you when you try to open the program file. These must be corrected before you can continue. After you make corrections you can open the file containing the robot program again.
Karel++ World can be used to build robot worlds. To do so requires the use of the tools in the Place Palette. The Place Palette is shown in Figure 6.
|
Figure 6. The Place Palette
The tools in the Place palette are used to place wall and beeper objects in the world. You select a tool from the Place palette with the mouse. When a tool is selected, the cursor shape changes to indicate which tool is selected.
The first tool is None. It is not used to place anything in the world. Select this if you don't want to modify the current world by accident when you press the mouse down in a world window.
The second tool is used to place horizontal wall segments between Streets. When you select this tool, the cursor changes to a similar shape. You can then click the mouse (left button) between streets and across an avenue to place a single wall segment. Click several times in several places to create more wall segments. The right mouse button can be used to remove streets.
The third tool is used to place vertical wall segments between Avenues. It's use is similar to the horizontal wall tool.
The fourth tool is used to place single beepers at a corner in the world. Figure 6 shows a view in which this tool has been selected. The large + sign indicates that beeper numbers on a corner will be increased when the mouse is clicked there. To place a beeper click the mouse on a corner after selecting this tool. To place several beepers on one corner, click several times. The right mouse button can be used to remove beepers.
The last tool is used to place an infinite number of beepers on a corner. Its use is similar to the tools above it.
Sometimes you place a wall or beeper in the wrong place. Each of the tools can be used to remove objects as well as place them. To accomplish this you can click a second time on a tool in the Place Palette to change it to a tool that removes objects of that kind. The Place Palette changes to show the new use. For example, when you have selected the Remove Vertical Wall tool by double clicking, the Place palette looks like Figure 7. When the "removal" tools are used, the right mouse button acts like an "add" tool.
![]()
Figure 7. The Place Palette when the Remove Vertical Wall Tool is Selected.
By the way. The Remove Infinite Beepers tool will remove all beepers on a corner if there are several or if there are an infinite number.
Once you have built a world you can save it. You can either select Save or Save As from the File menu, or you can press Alt-FS from the keyboard. You will be prompted for a name with the standard file dialog.
You Do It. Build a world like Figure 2-5 in the book. It is on page 20. Don't forget to save your file.
You Do It. Build the worlds in Figure 1-4 in the book. They are on page 5.
Use a text editor to create the program on page 20 of the book. Then use the world you built above in which to execute the program. The program has errors, of course. Now use the text editor to correct the program.
Next you want to execute the corrected program. But you still have the old program open in the Karel++ World. To execute the changed version, you just need to open the program again. When you open a program file and you already have one open, you will be presented with a confirmation dialog. To avoid this, you can close the original program first, either by selecting Close from the file menu (assuming the program window is on top), or by clicking in the window's close box. Figure 1 shows a typical screen while the user is executing a Karel++ robot program.
You Do It. Correct the errors in the program on page 20 of the book and execute the changed program.
You can print a world if it is the top window. Currently only a single page is printed: the page that contains the lower-leftmost corner shown on the screen. You can print the program file that you opened if the top window is the Program Window.
If you write programs that use several robots, the Robot Window will be very helpful. It shows the class, name, and current position of all robots in the world, including the direction they face and the number of beepers in their beeper bags. This window is continuously updated as the Robot Program runs. Figure 8 shows three robots from two different classes. It is from a solution to Problem 5.27.
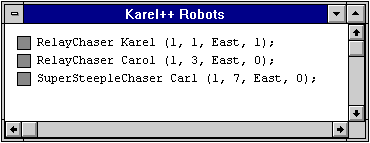
Figure 8. The Robot Window, showing three Robots.
The robot program files are read only when open in the world.
If you are using Windows 3.1 you are of course restricted to 8+3 character file names. There is no such restriction under Windows '95.
You probably need a screen resolution of at least 800x600. The program works at all resolutions, but the higher the resolution, the better. 1152x864 is really ideal.
Karel++ World for Windows was built on a Power Macintosh using the Virtual PC emulator and Borland C++. The code was ported from the Macintosh version which was written using Codewarrior.
Note that there is a restriction in the Karel++ language as currently implemented in its simulator. All robot declarations must come before any other statements in the main task block. I may be able to remove this restriction in the future.
Also note that the simulator runs poorly under Windows/2000. I believe that this is due to a change by Microsoft that make one of our DLL's fail. I don't currently have a fix. There is a new version available on the download page that may work better. Look for the 32 bit version.
Last Updated: March 8, 2005