Graphical User Interface Programming
for Multi-Platform Applications in Java 2.
or
GUI Programming in Java for Everyone
Part 2 Applets
(Version 3)
Introduction
In this paper we will see some elements of applet GUI programming.
The first part focused on applications and menus. It showed event handling for
action and mouse events as well as simple drawing, dialogs, fonts, and a few
other things. Now we are going to look at an applet that has many of the same
features of AllenApp, but illustrates some additional events and GUI elements.
The previous version of this paper
used the AWT, whereas this version uses the Java Foundation Classes and the
Swing components.
This applet consists of two files. In the first file we defines a single class,
AllenApplet, and seven inner classes to handle events. The second file will
contain a dialog box that we need to help us set user determined colors. Again
the running program will consist of about forty objects, though some of these
may come and go. As before, the code is almost entirely initialization and event
handling code.
You will probably not be able to view this applet in current browsers as most
are not up to the Java 2 standards yet. You can use the applet viewer that comes
with the Java JDK, and with most development environments, however.
Applet Principles
Applets are intended to run within the context of a web browser or similar
viewer. They are embedded in a frame created by their viewer. They may carry
on a limited conversation with the viewer (via the AppletContext) but may
obtain almost no information about the computer or environment that they run
in. If applets are to be built and compiled by persons unknown and downloaded
and run on your computer, you need confidence that they will not, indeed
cannot, harm your files or computing environment. Applets may not read or
write local files, and they may not connect via the web to any machine other
than the machine from which they were loaded. They may read and write files on
that machine, however, and if that source machine provides various servers,
then an applet may take advantage of them.
From a language standpoint, an applet is an object of a class with javax.swing.JApplet
as its superclass. The class JApplet is itself a subclass of Panel (actually
a subclass of java.applet.Applet which itself is a subclass of Panel), which
is a self contained region of a window that can hold other components. Restrictions
on applets, while known to compilers, are not enforced primarily by compilers,
but by the run time systems embedded in browsers and applet viewers. Therefore
the user need not worry that an applet was created by a rogue compiler and may
therefore be dangerous.
Applets don't need a graphic interface, though most applets have them. Here
we will show a fairly large window with four visible components: a JTextArea,
a JTextField, a JButton, and a JComboBox. A text area is a (possibly) large
region for displaying text. Here we will also give it a scroller so that it
may hold more text than can be displayed in a fixed window. A text field is
a single line of text, intended for user input. Buttons are used to let the
user initiate actions. A combo box is a "dropdown list" similar to what you
have probably seen in web forms.
The applet, named AllenApplet, also has an invisible JPopupMenu that can be
used for additional options.
The basic idea of this applet is that the user may enter text into the text
field and then either hit the enter key or the button. The text will then be
moved to the text area. The combo box is used to set font options in the TextArea
and the popup menu is used to set color choices for the background. We will
discuss the applet in detail. Here is the file AllenApplet.java, which defines
a single public class. Note that there is no main function anywhere in this
file. As before we put these classes into package jbgui and start with a long
list of imports detailing the dependencies on the basic libraries. Yes, we really
will use all of these things here. We will show the other file later.
package jbgui;

import java.awt.Container;
import java.awt.Component;
import java.awt.Frame;
import java.awt.Font;
import java.awt.GridLayout;
import java.awt.BorderLayout;
import java.awt.Color;
import java.awt.Event;
import java.awt.Graphics;

import java.awt.event.ActionListener;
import java.awt.event.ActionEvent;
import java.awt.event.ItemEvent;
import java.awt.event.ItemListener;
import java.awt.event.KeyAdapter;
import java.awt.event.KeyEvent;
import java.awt.event.MouseAdapter;
import java.awt.event.MouseEvent;
import java.awt.event.MouseListener;
import java.awt.event.InputEvent;

import javax.swing.JApplet;
import javax.swing.JButton;
import javax.swing.JTextField;
import javax.swing.JTextArea;
import javax.swing.JMenuItem;
import javax.swing.JPopupMenu;
import javax.swing.JDialog;
import javax.swing.JPanel;
import javax.swing.KeyStroke;
import javax.swing.JComboBox;
import javax.swing.Box;
import javax.swing.BoxLayout;
import javax.swing.JLabel;
import javax.swing.JScrollPane;


public class AllenApplet extends JApplet
{	public void init()
	{	resize(460, 460);
		Component ac = this;
		while(!(ac instanceof Frame)) ac = ac.getParent();
		Frame myFrame = (Frame)ac;
		Box topPane = new Box(BoxLayout.Y_AXIS);
		contentPane = getContentPane();
		contentPane.setLayout(new GridLayout(2,1, 10, 10));
		contentPane.setBackground(Color.yellow);
		contentPane.add(topPane);
		contentPane.add(controls);

		// Create a new popup menu to display our options
		popup = new JPopupMenu("Activities");

		// Add menu items to the menu.  Give each an ActionListener for its action.
		JMenuItem item = new JMenuItem("Cyan");
		item.setAccelerator(KeyStroke.getKeyStroke(KeyEvent.VK_C, Event.CTRL_MASK));
		item.setMnemonic(KeyEvent.VK_C);
		popup.add(item);
		item.addActionListener(new CyanListener());

		item = new JMenuItem("Yellow");
		item.setAccelerator(KeyStroke.getKeyStroke(KeyEvent.VK_Y, Event.CTRL_MASK));
		item.setMnemonic(KeyEvent.VK_Y);
		popup.add(item);
		item.addActionListener(new YellowListener());

		item = new JMenuItem("UserColor");
		item.setAccelerator(KeyStroke.getKeyStroke(KeyEvent.VK_U, Event.CTRL_MASK));
		item.setMnemonic(KeyEvent.VK_U);
		popup.add(item);
		item.addActionListener(new UserColorListener());

		userColorDialog = new ColorDialog(myFrame, controls);
		userColorDialog.setLocation(150, 50);

		controls.setBackground(Color.yellow);

		topPane.add(new JScrollPane(userText)); // Decorator pattern

		JLabel prompt = new JLabel("Enter text below and click \"Add It\".");
		topPane.add(prompt);
		topPane.add(userInput);

		JButton okButton = new JButton("Add It");
		controls.add(okButton, BorderLayout.NORTH);

		OkListener ok = new OkListener();
		okButton.addActionListener(ok);
		userInput.addActionListener(ok);

		fonts.addItemListener(new FontListener());
		fonts.addItem("Plain");
		fonts.addItem("Bold");
		fonts.addItem("Italic");
		controls.add(fonts, BorderLayout.SOUTH);

		userText.setFont(new Font("Serif", Font.PLAIN, fontSize));
		userText.setEditable(false);

		// Handle mouse clicks in our window.
		MouseListener mouser = new MouseWatcher();
		contentPane.addMouseListener(mouser);
		addMouseListener(mouser);  // Same listener for two components.

		JLabel instructions = new JLabel("Click anywhere in the colored region. Right click to get popup");
		controls.add(instructions, BorderLayout.CENTER);
		controls.addMouseListener(mouser);

		// Handle menu shortcuts in our popup menu.
		addKeyListener(new KeyWatcher());

		userInput.requestFocus();
	}

	private JDialog userColorDialog;
	private JPanel controls = new JPanel(new BorderLayout());
	private JTextArea userText = new JTextArea(15, 60);
	private JTextField userInput = new JTextField(60);
	private JPopupMenu popup;
	private JTextField red = new JTextField(6);
	private JTextField green = new JTextField(6);
	private JTextField blue = new JTextField(6);
	private JComboBox fonts = new JComboBox();
	private Container contentPane;
	private int fontSize = 14;

	// Inner Classes for handlers
	private class CyanListener implements ActionListener // Menu Cyan
	{	public void actionPerformed(ActionEvent e)
		{	Color lightCyan = new Color(200, 255, 255);
			controls.setBackground(lightCyan);  //pale Cyan (RGB)
			contentPane.setBackground(lightCyan);
			repaint();
		}
	}

	private class YellowListener implements ActionListener // Menu Yellow...
	{	public void actionPerformed(ActionEvent e)
		{	controls.setBackground(Color.yellow);
			contentPane.setBackground(Color.yellow);
			repaint();
		}
	}

	private class UserColorListener implements ActionListener // Menu UserColor
	{	public void actionPerformed(ActionEvent e)
		{	userColorDialog.setVisible(true);
			red.requestFocus();
		}
	}

	private class OkListener implements ActionListener // OK button for main window.
	{	public void actionPerformed(ActionEvent e)
		{	String s = userInput.getText();
			userText.append(s + '\n');
			userInput.setText("");
		}
	}

	private class FontListener implements ItemListener // Listener for font choice
	{	public void itemStateChanged(ItemEvent e)
		{	int i = fonts.getSelectedIndex();
			Font f = userText.getFont();
			switch(i)
			{	case 0: f = new Font("Serif", Font.PLAIN, fontSize); break;
				case 1: f = new Font("Serif", Font.BOLD, fontSize); break;
				case 2: f = new Font("Serif", Font.ITALIC, fontSize); break;
			}
			userText.setFont(f);
		}
	}

	private class KeyWatcher extends KeyAdapter
	{	public void keyTyped(KeyEvent e)
		{	if (! e.isMetaDown()) return;
			switch((int)e.getKeyChar())
			{	case KeyEvent.VK_C: setBackground(new Color(200, 255, 255)); repaint(); break;
				case KeyEvent.VK_Y: setBackground(Color.yellow); repaint(); break;
				case KeyEvent.VK_U: userColorDialog.setVisible(true); red.requestFocus(); break;
			}
		}
	}

	private class MouseWatcher extends MouseAdapter // Mouse click handler.
	{	public void mouseClicked(MouseEvent e)
		{	Graphics g = e.getComponent().getGraphics();
			int x = e.getX(), y = e.getY();
			if(e.getModifiers() == InputEvent.BUTTON3_MASK) // Right button (Ctrl click on Mac).
			{	Font font = new Font("Serif", Font.ITALIC, 10);
				g.setFont(font);
				g.setColor(Color.red);
				g.drawString("Right Click at:(" + x + "," + y + ")", x, y);
			}
			else // Other buttons.
			{	g.drawString("Left Clickat:(" + x + "," + y + ")", x, y);
			}
			g.dispose();
		}

		public void mousePressed(MouseEvent e)
		{	int x = e.getX(), y = e.getY();
			if (e.isPopupTrigger())
			{	popup.show(e.getComponent(), x, y);
			}
		}

		public void mouseReleased(MouseEvent e)
		{	int x = e.getX(), y = e.getY();
			if (e.isPopupTrigger())
			{	popup.show(e.getComponent(), x, y);
			}
		}
	}

}
Examining the Code
First, here is the overall look of our Applet window as shown in the applet
viewer. We are about to click the Add It button which will add the new line
of text as the second line of the TextArea at the top.
The instance variables of this Applet define the various elements that need
to be seen by more than one component. Note that, unlike C++, we can initialize
these variables as part of their declarations. Note that they are all private
to this class. Nevertheless, they can still be seen by the inner classes we
will use for our event listeners.
 	private JDialog userColorDialog;
	private JPanel controls = new JPanel(new BorderLayout());
	private JTextArea userText = new JTextArea(15, 60);
	private JTextField userInput = new JTextField(60);
	private JPopupMenu popup;
	private JTextField red = new JTextField(6);
	private JTextField green = new JTextField(6);
	private JTextField blue = new JTextField(6);
	private JComboBox fonts = new JComboBox();
	private Container contentPane;
	private int fontSize = 14;
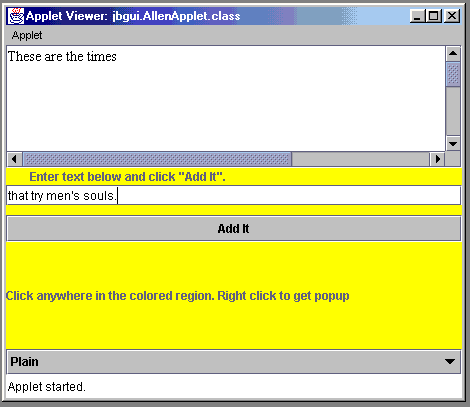
We give the userText TextArea 15 lines and about 60 columns (in the current
font), and the userInput TextField about 60 columns. We say "about" because
the font's aren't necessarily monospaced. The other three TextFields will
appear in the userColorDialog as we shall see.
After the imports we have a long initialization of the applet.
public class AllenApplet extends JApplet
{	public void init()
	{	resize(460, 460);
		Component ac = this;
		while(!(ac instanceof Frame)) ac = ac.getParent();
		Frame myFrame = (Frame)ac;
		Box topPane = new Box(BoxLayout.Y_AXIS);
		contentPane = getContentPane();
		contentPane.setLayout(new GridLayout(2,1, 10, 10));
		contentPane.setBackground(Color.yellow);
		contentPane.add(topPane);
		contentPane.add(controls);
We set the screen size to 460 by 460 pixels. Next we compute the Frame of
the browser or applet viewer that hosts our applet. We need this so that we
can change its background color later. We also want to create a dialog box and
need the host frame to do so. We compute this frame by walking upwards in a
containment list with getParent until we come to a Frame. We know that there
is a frame somewhere above us, since every application (even a browser) needs
a frame. We want to divide the content pane of this main window into two parts
so we next get the content pane and hold a reference to it and then give it
a layout with two rows and one column and set the background color to bright
yellow. Into the top of the content pane we put a new Box object that will eventually
contain the text area and the text field. The bottom of the content pane will
contain our controls panel that has our button and combo box along with a large
blank region. A Box is a component that contans other components and lays them
out in a horizontal or vertical grid. Here we use a vertical grid (Y_AXIS).
The contained components all then have the width of the Box and their own preferred
height.
Next we create a new popup menu and give it a name. Actually the name is never
displayed. A popup menu IS a menu, however, so the possibility exists that it
could be installed in a menu bar. Therefore it needs a name.
 		// Create a new popup menu to display our options
		popup = new JPopupMenu("Activities");
Next we create three menu items and add them to the popup menu. They each will
get a menu shortcut key (accelerator) and a mnemonic and each has an action listener
to handle the actions that must be taken when they are selected. This is the same
as what we have seen in AllenApp.
 		// Add menu items to the menu.  Give each an ActionListener for its action.
		JMenuItem item = new JMenuItem("Cyan");
		item.setAccelerator(KeyStroke.getKeyStroke(KeyEvent.VK_C, Event.CTRL_MASK));
		item.setMnemonic(KeyEvent.VK_C);
		popup.add(item);
		item.addActionListener(new CyanListener());

		item = new JMenuItem("Yellow");
		item.setAccelerator(KeyStroke.getKeyStroke(KeyEvent.VK_Y, Event.CTRL_MASK));
		item.setMnemonic(KeyEvent.VK_Y);
		popup.add(item);
		item.addActionListener(new YellowListener());

		item = new JMenuItem("UserColor");
		item.setAccelerator(KeyStroke.getKeyStroke(KeyEvent.VK_U, Event.CTRL_MASK));
		item.setMnemonic(KeyEvent.VK_U);
		popup.add(item);
		item.addActionListener(new UserColorListener());
Next we create the Dialog box that will be shown when the UserColor menu option
is shown.
		userColorDialog = new ColorDialog(myFrame, controls);
		userColorDialog.setLocation(150, 50);
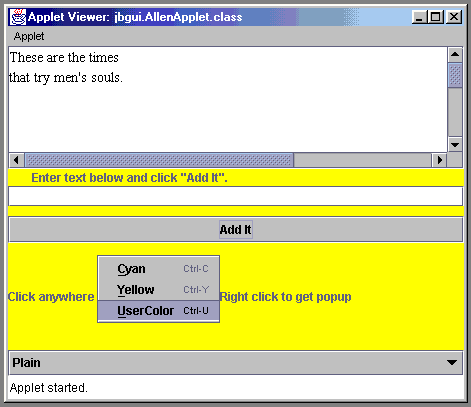
The popup menu is shown below. To make it pop up you need to activate the "popup
trigger." This may be a special button (generally the right button), or
you may need to press the left mouse button while holding down a (machine dependent)
key on the keyboard. On the Macintosh it is the control key. Note that you need
to press down in the background, outside of any of the other components. This
is because those other components have no event handler that will make the popup
appear. We are going to attach a MouseListener to several, but not all components,
to do this for us. In the next figure we are about to select UserColor from
the menu. Note that popup menus are much more convenient in applets than are
ordinary Menus. We can also simulate something similar to menus with combo boxes,
however. You make a selection by highlighting one of the listed strings and
releasing the mouse key. To make no choice at all, just move the mouse outside
the popup before releasing the mouse button.
The next block of statements create a dialog box that will be displayed when
the UserColor action is chosen from the popup menu or the equivalent command
key is used. These are all in a sepaparate file. They are in a separate file,
since a dialog that chooses a color might be generally useful in other projects.
Thus we factor it into its own file so that it is independent of this particular
applet.
 package jbgui;

import java.awt.Frame;
import java.awt.Component;
import java.awt.Container;
import java.awt.GridLayout;
import java.awt.Color;
import java.awt.BorderLayout;
import java.awt.event.ActionListener;
import java.awt.event.ActionEvent;
import javax.swing.JDialog;
import javax.swing.JPanel;
import javax.swing.JTextField;
import javax.swing.JButton;
import javax.swing.JLabel;

public class ColorDialog extends JDialog
{	ColorDialog(Frame frame, Component component)
	{	super(frame, "Color Choice",false);
		Container contentPane = getContentPane();
		this.component = component;
		setSize(200, 150);
		setResizable(false);
		JPanel dialogPanel = new JPanel(); // Layout the fields and labels
		contentPane.add(dialogPanel, BorderLayout.CENTER);
		dialogPanel.setLayout(new GridLayout(3, 2, 0, 2));
		dialogPanel.add(new JLabel("Red"));
		dialogPanel.add(red);
		red.setBackground(Color.red);
		dialogPanel.add(new JLabel("Green"));
		dialogPanel.add(green);
		green.setBackground(Color.green);
		dialogPanel.add(new JLabel("Blue"));
		dialogPanel.add(blue);
		blue.setBackground(Color.blue);
		blue.setForeground(Color.white);
		JPanel buttonPanel = new JPanel(); // Layout the buttons.
		contentPane.add(buttonPanel, BorderLayout.SOUTH);
		JButton yesButton = new JButton("Do It");
		yesButton.addActionListener(new YesListener());
		buttonPanel.add(yesButton);
		JButton noButton = new JButton("Cancel");
		noButton.addActionListener(new NoListener());
		buttonPanel.add(noButton);
	}

	private JTextField red = new JTextField(6);
	private JTextField green = new JTextField(6);
	private JTextField blue = new JTextField(6);
	private Component component;

	private class YesListener implements ActionListener // Yes listener for UserColor dialog.
	{	public void actionPerformed(ActionEvent e)
		{	int r = (red.getText().length()==0)?0:Integer.parseInt(red.getText());
			int g = (green.getText().length()==0)?0:Integer.parseInt(green.getText());
			int b = (blue.getText().length()==0)?0:Integer.parseInt(blue.getText());
			if(r<0) r = 0;
			if(g<0) g = 0;
			if(b<0) b = 0;
			Color currentColor = new Color(Math.min(r,255), Math.min(g, 255), Math.min(b,255));
			component.setBackground(currentColor);
			component.getParent().setBackground(currentColor);
			component.repaint();
		}
	}

	private class NoListener implements ActionListener // No listener for UserColor dialog.
	{	public void actionPerformed(ActionEvent e)
		{	ColorDialog.this.setVisible(false);
		}
	}

}
We first create the dialog, telling it the frame, label, and that it isn't
modal. We then give it a size and a location relative to its frame, and indicate
that the user may not resize it. We want a complex layout of the dialog, so
we are going to use two panels, one for the three labels and three text fields,
and another for the two buttons at the bottom. We create the first panel, dialogPanel
and add it to the dialog. We then give the new panel a layout which is a rectangular
grid of three rows and two columns. We also indicate that there is to be no
space between columns, but two pixels of space between rows. We then begin to
add components to the panel, by rows, first a label and then a corresponding
text field. We also give each text field a background color the same as the
color it is supposed to represent in an RGB color model.
Once we have all six elements of the dialogPanel, we create another buttonPanel,
add it to the dialog, and add two buttons to it. Each button gets a label. We
provide action listeners for the buttons as usual These buttons are then added
to the panel.
The Yes button, associated with the button labeled "Do It," creates
a new RGB color and sets the applet's background to it. It has to do some error
checking, however. The user might click Do It without entering any data for
a field. In this case the text in the box will have length zero. We check for
this and assume a zero value for the field in this case. We also need to be
sure that we don't try to create a color with values outside the range 0...255
for red, green, or blue. We have shown a few different techniques for these
tests, including the static function min of the class java.lang.Math. This class
has lots of other useful functions as well.
The grid layout is one of the more complex layouts that panels can have. In
general, Java applets don't give you precise control over layout of components.
The reason for this is that when you write an applet, you don't know much about
the user's environment. The user might have an extremely small screen, such
as a Palm Pilot. Indeed some pocket PDA's (Personal Digital Assistants) have
tiny screens and connections to the web. To specify a layout too carefully doesn't
give the user's browser the ability to show as much detail as possible by rearranging
elements.
It is possible to set components at specific pixel positions, however. To
do so, you set the layout to null, and then reshape each component to it location,
height and width. This is strongly NOT recommended, however as the resulting
GUI will be unusable in some environments.
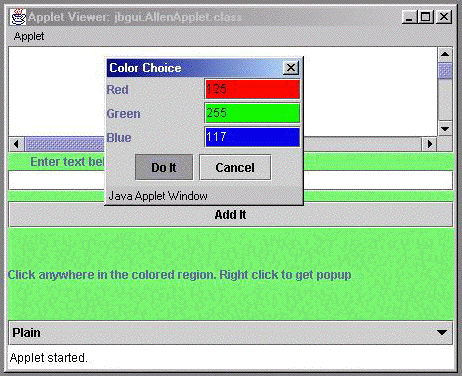
If we click the Do It button, the background color of the main window will change
to the RGB color indicated by the values in the dialog. Note that the dialog will
not be dismissed. We can't know that from looking at the construction code, however.
This is a function of the actionPerformed method for the button labeled Do It.
The button labeled Cancel will dismiss the box. This dialog is non-modal, however,
so it need not be dismissed. We can also drag it to any convenient location on
our screen.
Note that only some parts of the background of the content pane change color.
In fact we recolor the bottom panel in the overall content pane and the background
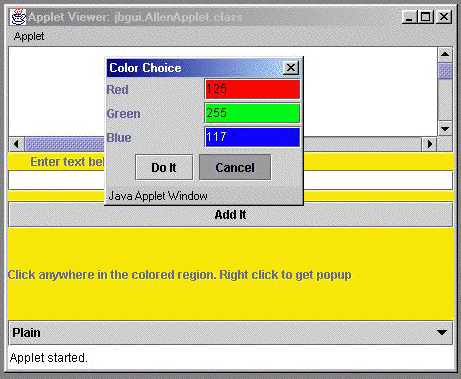
of the content pane iteslf, which is the parent of that lower panel. Below we
show what happens if you click Cancel. The Color Choice dialog will then be
dismissed.
Notice the similarities between the code shown in this file with that of the
main file. They after all are doing similar things: creating a GUI in a new
window. The main difference is that AllenApplet is hosted in the browser window,
and the ColorDialog is hosted in AllenApplet though it my never actually be
shown.
We now return to our discussion of the main GUI.
Next we add the various components of the main window and layout the parts.
First we set the background of the controls panel to yellow. Recall that this
is the lower of the two parts of the main content pane. Next we watt to add
the userText (text area) to the top pane. However, we first wrap it in a new
JScrollPane so that it will scroll if we put a lot of information into it. We
could just as well have added it directly to the topPane without a scroller
to get a fixed size window effect. This wrapping of the userText area with a
scroller is an example of the Decorator design pattern. You an learn more about
this by looking at the patterns material on the author's home page.
Then we create a prompt and add it as well as the user input text field to
the top pane as well. This completes the top pane.
The button has an ActionListener as usual. Note that we give the TextField
and the Add It button the same listener. Thus, when the Add It button is clicked
or the user hits the enter key while typing in the userInput TextField, the
effect will be the same. The button is added to the top (NORTH) of the controls
pane. This pane has a Border layout with four regions around the center. We
don't fill the EAST and WEST portions at all and we will later put only a label
into the CENTER. This leaves a large unused region that has our background color.
		controls.setBackground(Color.yellow);

		topPane.add(new JScrollPane(userText)); // Decorator pattern

		JLabel prompt = new JLabel("Enter text below and click \"Add It\".");
		topPane.add(prompt);
		topPane.add(userInput);

		JButton okButton = new JButton("Add It");
		controls.add(okButton, BorderLayout.NORTH);

		OkListener ok = new OkListener();
		okButton.addActionListener(ok);
		userInput.addActionListener(ok);
Next we will add three items to the Font combo box named fonts, which has
its own ItemListener. An ItemListener handles changes in selections in JComboBoxes,
Choices, and in Lists. Finally we add the fonts combo box to the bottom (SOUTH)
of the controls panel of the applet itself. If we don't do this last step, it
won't appear, nor will it be able to generate any events. We will show the FontListener
(subclass of ItemListener) in a bit.
 		fonts.addItemListener(new FontListener());
		fonts.addItem("Plain");
		fonts.addItem("Bold");
		fonts.addItem("Italic");
		controls.add(fonts, BorderLayout.SOUTH);
Next we set the font in the userText TextArea to be one of the fonts that we will
use when the user selects from the Choice. We then set the userText area to be
uneditable. This means that it will not accept keystrokes from the user.
		userText.setFont(new Font("Serif", Font.PLAIN, fontSize));
		userText.setEditable(false);
Now we add a mouse listener to AllenApplet. It will tell us where we press the
mouse key, though only when doing so in the background. It will have no effect
if we click inside userText or another component. We add it to both the content
pane and to the applet itself so that we can take mouse clicks in more than one
region of the GUI.
		// Handle mouse clicks in our window.
		MouseListener mouser = new MouseWatcher();
		contentPane.addMouseListener(mouser);
		addMouseListener(mouser);  // Same listener for two components.
Next we add a prompting label to the CENTER of the controls panel and also
let our mouse watcher take mouse clicks here.
		JLabel instructions = new JLabel("Click anywhere in the colored region. Right click to get popup");
		controls.add(instructions, BorderLayout.CENTER);
		controls.addMouseListener(mouser);
Note that the popup menu was given key equivalents. Those are not effective
for popup menus, however. We added them so that they would have a visual look
indicating the presence of command equivalents. We need to do some additional
work, however, to simulate the key equivalents. Therefore we add a KeyListener
to the applet. It will look for key presses in the background (but not the other
components) that correspond to our command keys combinations. Whether a key
press "counts" or not depends on which component has the focus. The user changes
the focus by clicking somewhere. That component then gets the focus. The program
can also request that the focus be given to a particular component, as we have
seen. We also request that the focus be given to the userInput field. This means
that the field will be initially active so that the user need not click in the
field before typing. It is ready to accept user input.
		// Handle menu shortcuts in our popup menu.
		addKeyListener(new KeyWatcher());

		userInput.requestFocus();
	}
Well, that is it for initialization. All that is left of the applet is the various
event handlers we have used within the applet. Some of these we have seen before.
Again, all of them are defined by inner classes.
The cyan and the yellow menu items are similar and are like we have seen before.
	private class CyanListener implements ActionListener // Menu Cyan
	{	public void actionPerformed(ActionEvent e)
		{	Color lightCyan = new Color(200, 255, 255);
			controls.setBackground(lightCyan);  //pale Cyan (RGB)
			contentPane.setBackground(lightCyan);
			repaint();
		}
	}

	private class YellowListener implements ActionListener // Menu Yellow...
	{	public void actionPerformed(ActionEvent e)
		{	controls.setBackground(Color.yellow);
			contentPane.setBackground(Color.yellow);
			repaint();
		}
	}
The UserColor menu item does put up a dialog; the userColorDialog we created
in init. It also requests that the text field red get the focus, so that the
user can immediately begin typing. Note that it doesn't try to handle any of
the input to the box. That is the job of the other listeners. In particular,
the listeners associated with the two buttons in the dialog.
 	private class UserColorListener implements ActionListener // Menu UserColor
	{	public void actionPerformed(ActionEvent e)
		{	userColorDialog.setVisible(true);
			red.requestFocus();
		}
	}
Back in the main window, when the user clicks the button labeled Add It, or
hits the enter key while the userInput field has the focus, we want the text
in the field to be moved to the text area. The Add button does this for both.
It works by getting the text from the field, appending a newline to it, appending
it to the text in the TextArea, and then clearing the text in the field. All
quite simple. In a more realistic applet, the text entered into a field could
be sent around the world or used to control some complex behavior.
	private class OkListener implements ActionListener // Add it listener for main window.
	{	public void actionPerformed(ActionEvent e)
		{	String s = userInput.getText();
			userText.append(s + '\n');
			userInput.setText("");
		}
	}
Our Font combo box extends JComboBox. It needs an ItemListener, different
from the ActionListeners we have seen above, to handle changes that the user
makes in the fonts combo box. When a user presses the mouse on the combo box,
it pops up the various choices available. The user selects one by highlighting
it and releasing the mouse. We want the action to occur at this point.
	private class FontListener implements ItemListener // Listener for font choice
	{	public void itemStateChanged(ItemEvent e)
		{	int i = fonts.getSelectedIndex();
			Font f = userText.getFont();
			switch(i)
			{	case 0: f = new Font("Serif", Font.PLAIN, fontSize); break;
				case 1: f = new Font("Serif", Font.BOLD, fontSize); break;
				case 2: f = new Font("Serif", Font.ITALIC, fontSize); break;
			}
			userText.setFont(f);
		}
	}
Since we have only one object that can generate ItemEvents we don't need to
ask the ItemEvent object which object generated the event, though we could if
necessary. We know it was the fonts combo box. So we ask that object which of
its choices is currently selected and create a new font accordingly. We then
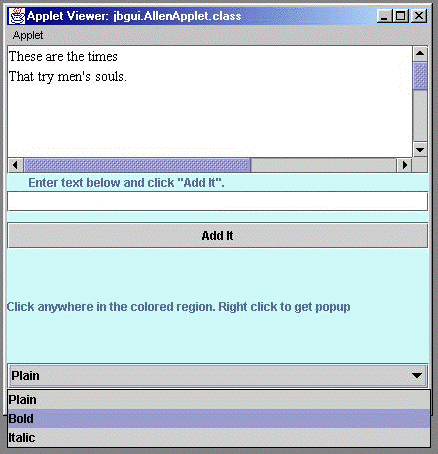
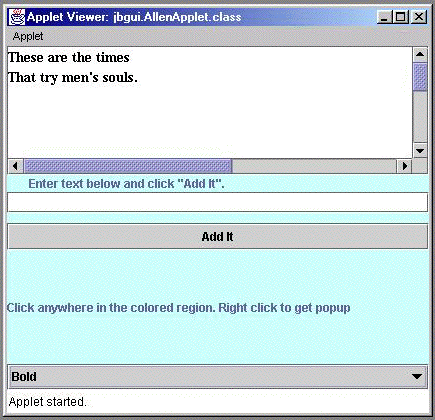
give the userText area this new font. The effect is shown below. First we show
the choice before the user selects Bold. Then we show the immediate effect.
To simulate command keys defined in the colors popup, we need a KeyListener
to watch for key presses when the background has the focus. The keys are C,
Y, and U respectively, but these should only cause an action if the "Meta" key
is also held down. On the Macintosh, this is the Command key, so there a Command-1
causes the background to switch to pale cyan. We ask the KeyEvent if the Meta
key was down when the event occurred and if not, we just return without doing
anything. Otherwise we check if the key was one of those of interest to us,
and if so, we do the right thing. Had we named some of the other listeners,
we could have sent them messages to cause these effects without rewriting them.
	private class KeyWatcher extends KeyAdapter
	{	public void keyTyped(KeyEvent e)
		{	if (! e.isMetaDown()) return;
			switch((int)e.getKeyChar())
			{	case KeyEvent.VK_C: setBackground(new Color(200, 255, 255)); repaint(); break;
				case KeyEvent.VK_Y: setBackground(Color.yellow); repaint(); break;
				case KeyEvent.VK_U: userColorDialog.setVisible(true); red.requestFocus(); break;
			}
		}
	}
The mouseClicked method of our MouseWatcher is identical to that of AllenApp,
but note that it is only effective when we click outside all of the components
of our window.
	private class MouseWatcher extends MouseAdapter // Mouse click handler.
	{	public void mouseClicked(MouseEvent e)
		{	Graphics g = e.getComponent().getGraphics();
			int x = e.getX(), y = e.getY();
			if(e.getModifiers() == InputEvent.BUTTON3_MASK) // Right button (Ctrl click on Mac).
			{	Font font = new Font("Serif", Font.ITALIC, 10);
				g.setFont(font);
				g.setColor(Color.red);
				g.drawString("Right Click at:(" + x + "," + y + ")", x, y);
			}
			else // Other buttons.
			{	g.drawString("Left Clickat:(" + x + "," + y + ")", x, y);
			}
			g.dispose();
		}
We need two additional methods, however, to get the popup displayed. When
the mouse is pressed while the machine dependent popup trigger is active we
want the popup menu to appear. The popup trigger is usually another key. On
the Macintosh it is the Control key. You will need to experiment to find it
on your machine. We get the x and y coordinates of the mouse press from the
MouseEvent so that we can display the popup at that location. We also pass the
show method the component in which the popup will appear. This is the applet.
Again, we can't just use the variable this, since it represents the MouseWatcher
object, not the Applet. But since the MouseWatcher is inner to the applet, we
can get the right thing with AllenApplet.this. We need to handle both mousePressed
and mouseReleased, however, since different platforms have different standards
for the popup trigger. For example, on the PC, it is different than on the Macintosh.
		public void mousePressed(MouseEvent e)
		{	int x = e.getX(), y = e.getY();
			if (e.isPopupTrigger())
			{	popup.show(e.getComponent(), x, y);
			}
		}

		public void mouseReleased(MouseEvent e)
		{	int x = e.getX(), y = e.getY();
			if (e.isPopupTrigger())
			{	popup.show(e.getComponent(), x, y);
			}
		}
	}

}
Applet Notes
As is true for any applet, this one needs an associated html file in which to
display it. A simple one for the AllenApplet follows.
<html>
	<head>
		<title>Allen Applet</title>
	</head>
	<body>
		<hr>
		<applet code="jbgui.AllenApplet.class" width=460 height=460>
		</applet>
		<hr>
	</body>
</html>
While I was first working on this, I noticed in the third edition of Core
Java (Core Java 1.1, Volume 1, Horstmann, and Cornell, Prentice-Hall, 1997),
a nice control that set the RGB color of an item by using sliders, actually
ScrollBars, to select the color values. I took the ideas there and created the
following ColorSliderDialog, that can be used to ask the user to select the
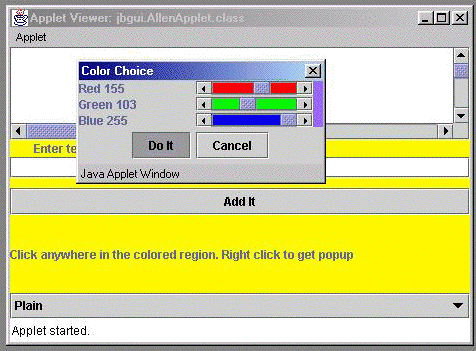
color of any component. Here is an example of how it looks embedded in an updated
AllenApplet. Instead of typing numbers, the user just slides the controls. The
numeric values in the labels are continuously updated as the sliders are moved
and the small color patch at the right edge of the dialog updates to show the
currently selected color. The Do It button is then used to set the background
of its component, here the applet, to the selected color.
In the code below we are going to show a slightly different way to implement
listeners. The pattern here is called Component Listens to Itself. This is presented
for contrast only, as this pattern is not recommended for general use as it
has limitations. These can be explored in a paper on Elementary Patterns available
from the author's home page.
package jbgui;

import java.awt.Frame;
import java.awt.Color;
import java.awt.GridLayout;
import java.awt.Dimension;
import java.awt.BorderLayout;

import java.awt.event.ActionListener;
import java.awt.event.ActionEvent;
import java.awt.event.AdjustmentListener;
import java.awt.event.AdjustmentEvent;

import javax.swing.JDialog;
import javax.swing.JPanel;
import javax.swing.JLabel;
import javax.swing.JButton;
import javax.swing.JComponent;
import javax.swing.JScrollBar;

public class ColorSliderDialog extends JDialog
{	/** Create a new color slider dialog.  The dialog will accept an rgb color from
		the user and when the "Do It" button is pressed the color of the component named
		in the initialization will be changed to this new color.
	*/
	public ColorSliderDialog(Frame frame, JComponent component)
	{	super(frame, "Color Choice",false);
		this.component = component;
		setSize(250, 125);
		setResizable(false);
		getContentPane().add(dialogPanel, BorderLayout.CENTER);
		dialogPanel.setLayout(new GridLayout(3, 2, 0, 2));
		dialogPanel.add(redLabel);
		dialogPanel.add(red);
		red.setValues(0, 0, 0, 255);
		red.setBackground(Color.red);
		dialogPanel.add(greenLabel);
		dialogPanel.add(green);
		green.setValues(0, 0, 0, 255);
		green.setBackground(Color.green);
		dialogPanel.add(blueLabel);
		dialogPanel.add(blue);
		blue.setValues(0, 0, 0, 255);
		blue.setBackground(Color.blue);
		JPanel buttonPanel = new JPanel(); // Layout the buttons.
		getContentPane().add(buttonPanel, BorderLayout.SOUTH);
		buttonPanel.add( new YesButton());
		buttonPanel.add( new NoButton());
		getContentPane().add(colorPanel, BorderLayout.EAST);
		colorPanel.setBackground(Color.black);
	}

	public Color getColor()
	{	return currentColor;
	}

	ColorPanel colorPanel = new ColorPanel();
	JPanel dialogPanel = new JPanel(); // Layout the fields and labels
	JScrollBar red = new ColorScroller();
	JScrollBar green = new ColorScroller();
	JScrollBar blue = new ColorScroller();
	JLabel redLabel = new JLabel("Red 0");
	JLabel greenLabel = new JLabel ("Green 0");
	JLabel blueLabel = new JLabel ("Blue 0");
	JComponent component;
	Color currentColor = Color.black;

	private class ColorPanel extends JPanel
	{	public Dimension getMinimumSize()
		{	return new Dimension(25, 50);
		}
	}

	private class YesButton extends JButton implements ActionListener // Yes button for UserColor dialog.
	{	public YesButton()
		{	super( "Do It");
			addActionListener(this);
		}

		public void actionPerformed(ActionEvent e)
		{	int r = red.getValue();
			int g = green.getValue();
			int b = blue.getValue();
			redLabel.setText("Red " + r);
			greenLabel.setText("Green " + g);
			blueLabel.setText("Blue " + b);
			currentColor = new Color(r, g, b);
			if(component != null)
			{	component.setBackground(currentColor);
				component.getParent().setBackground(currentColor);
				component.repaint();
			}
		}
	}

	private class NoButton extends JButton implements ActionListener // No button for UserColor dialog.
	{	public NoButton()
		{	super( "Cancel");
			addActionListener(this);
		}

		public void actionPerformed(ActionEvent e)
		{	ColorSliderDialog.this.setVisible(false);
		}
	}

	private class ColorScroller extends JScrollBar implements AdjustmentListener
	{	public ColorScroller()
		{	super(HORIZONTAL);
			addAdjustmentListener(this);
		}

		public void adjustmentValueChanged(AdjustmentEvent e)
		{	int r = red.getValue();
			int g = green.getValue();
			int b = blue.getValue();
			redLabel.setText("Red " + r);
			greenLabel.setText("Green " + g);
			blueLabel.setText("Blue " + b);
			colorPanel.setBackground(new Color(r, g, b));
			colorPanel.repaint();
		}
	}

}
To implement Component Listens to Itself, instead of just writing classes that
implement a listener interface, we write a class that extends one of the standard
components AND implements the required interface. Then, in the constructor of
this new class we do whatever other initializations are necessary and then add
the component itself as its own event listener. See the constructor for the
YesButton class for example. Then we just create a new button of this class
rather than JButton and it has its listener already installed. This pattern
only works well when we need only a single listener for a component and we don't
need to share listeners between components (though technically it works in both
these cases.)
Here we have simply replaced the text fields red, green, and blue with JScrollBar
objects. Scroll bars register AdjustmentListeners and generate AdjustmentEvents.
When the user slides the control, the adjustmentValueChanged message is sent
to its listeners. So, in addition to the ActionListeners for the buttons we
have our new ColorScroller class implement ScrollListener to listen for these
events. Note that each of the three scroll bars acts as its own listener.
When you create a scroll bar you say whether its orientation is horizontal
as here, or vertical. You also need to give it four additional integer parameters,
either in the constructor, or later in the setValues message. The first parameter
gives the initial value of the scroll bar and the last two give the range of
values that it returns as it is slid from left to right. The second parameter
is the size of the region that the scroll bar is scrolling or making visible.
Here we aren't scrolling a visible region at all, so we use zero. Since we use
zero for the initial value of all scroll bars that is equivalent to RGB black.
We then use getValue to retrieve the new value that the user sets.
We have also provided a getCurrentColor method in this class and made the
action routines aware that null might be sent for the component to be updated.
This control is then quite useful in any GUI program in which the user must
be asked to choose a color. The user even gets feedback as to the chosen color.
Notice how we use private inner classes for encapsulation here. These components/listeners
have no purpose in the wider application or applet than to work with this dialog
box. We therefore hide them inside the dialog box itself. This is one of the
best software engineering features that was added to Java 1.1. Too bad that
Microsoft seems reluctant to implement inner classes.
There are circumstances in which the listeners should not be the same as the
classes of the controls that they listen to. This is when you are trying to
build a general control that can be used to control different kinds of things.
A JFC JButton is such a control. If the listener is embedded within the class
of such a control then the only way to get different behavior is to build a
subclass of the control. This is not always desirable, as in the case of the
button. In such a case, we want the user to be able to attach a special listener
(or several) to the control to achieve the specialized behavior. In the ColorSliderDialog,
however, we always want the same behavior, so it is appropriate to put the listeners
inside as inner classes.
In more general circumstances, however, it is sometimes desirable to put a
listener inside of the control class, but provide for the user to supply an
alternate listener when appropriate. This can be done by making the listener
an instance variable of the control class and providing one or more constructors
for that class that supply substitute listeners. The details are discussed nicely
in the second edition of Graphic Java.
You can get all of the files for this applet from the files
directory.
In Part 3 we wil look at painting, printing and encapsulation.
Part 3
Last Updated: December 16, 2000


