This system is based on the work of my former student, Cathy Zura, who built the first version and is responsible for all of the core functionality. Joseph Bergin has provided the current version based on her excellent work. Cathy is now an independent consultant and has worked on some very important and difficult software.
Download the Karel Universe Editor.
Update: June 3, 2006. Version 2 is now available. Here is its FAQ-HowTo page, and here is its overview page. It is a big improvement over the original and now supports nearly everything in the book.
Update: March 9, 2006. Fixed bugs. It now should work properly after you "Stop Run". An incomplete test indicates it MAY run under Java 5. Let me know of any experience with this, please. Only the KarelUniverse jar file is new in this distribution.
Update: June 28, 2005. Fixes a show-stopping bug in the June 24 version and adds the option, on startup, to use true Java syntax instead of the simplified syntax.
Update: June 24, 2005. It is now possible to run robots in separate threads in this system. To set up a class for this, first create the class and then double click the class header in the class window. Select multi threading in the resulting dialog. Note that if you use this, you should not also try to manipulate the robots in the task, but rather in the individual robot class run method. When you run a program that has multi-threaded robots from within this universe, you will automatically get the speed dialog that lets you start and pause the threads. I have also much improved the help system. Note that the help files are moved to a subdirectory, since there are now a lot of them. If you are using this in a language other than English, you can change the text of the help files to suit your own language. Don't change the file names, however, or they won't be found. If you do provide a set of non-English help files, I'd like a copy to share with others.
Update: June 12, 2005. These changes are not yet reflected in the instructions below
Update: June 1, 2005. This is a slightly improved version over the original. A few things that should have been legal originally are now legal. There is still a pesky bug on the Macintosh (error in Java libraries). Teach Me is improved. There is now a way to stop an infinite program. Comments were added (only full line comments). Note that if you negate "true" by dropping "!" on it you get "false". Note (important) that when you change versions of this system, your old programs are still valid, but the class files that it writes may not be. This version notices the problem and tells you to find the old ones in your project folders and discard them (class files only). This version also writes out a valid Java version of the task.
This will work with Java JDK 1.4.2. It may not work with any other version and will probably fail with Java 5. It uses some version specific (and deprecated) features in that JDK. It might work with another recent 1.4 version, but with some additional diagnostic messages. I will try to update it to version 5 soon. Note that it uses a combination of Swing (javax) and AWT for various subsystems.
|
The distribution here includes a new version of the KarelJRobot jar file. It is the latest version of the jar and this one should work for all of your Karel J Robot needs. It has a few nice features, such as scaling the size of the robots as you change the size of your window. It now uses png graphics format for the robots, rather than the original gif files. Older versions will not works with this system, however. The tools.jar in the distribution is directly from the Sun distribution. It contains the version specific code we need. If you have several JDK versions on your computer, you may need to modify the bat (and sh) files to point specifically at your 1.4.2 bin directory.
To use this system obtain its zip (above) and unzip it into a new directory. Work from this directory. You can run the system using the supplied bat file or the equivalent unix shell (sh) file.
This system is an editor integrated with the Karel J Robot world. The editor does not require that the student know the syntax of Java, as almost all editing operations (other than naming and specifying parameters) is done by dragging valid fragments into a program being built. Once the code is built, it can be executed within this system, either in whole, or by stepping through it. A world builder is included so that you can build and save interesting worlds for your robots to play in.
The system is based on named projects and all code exists in a project. The project maintains all of its own code, including underlying Java and class files. There is no "save" or "compile" operation in this universe. When you edit, your changes are saved and compiled. The results are then immediately available for use. All of the code for classes you create will be put into the "default" package.
This Karel Universe editing system prevents the user from making most syntax and lexical errors. You can't type invalid data into the dialog boxes, for example. It will simply not be accepted as you type. The system does not, and cannot, prevent the user from making execution and intent (semantic) errors, however.
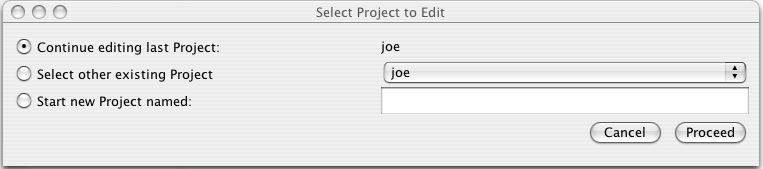
When you system from the command line (using the bat or sh files) you are presented with a dialog in which to select an existing project or name a new one. You should also be able to run the program by double clicking the kareluniverse.jar file.
The last project this user edited is named joe. Click proceed to select it. Or select another known project from the drop down menu, or create a new project with a name of your choice.
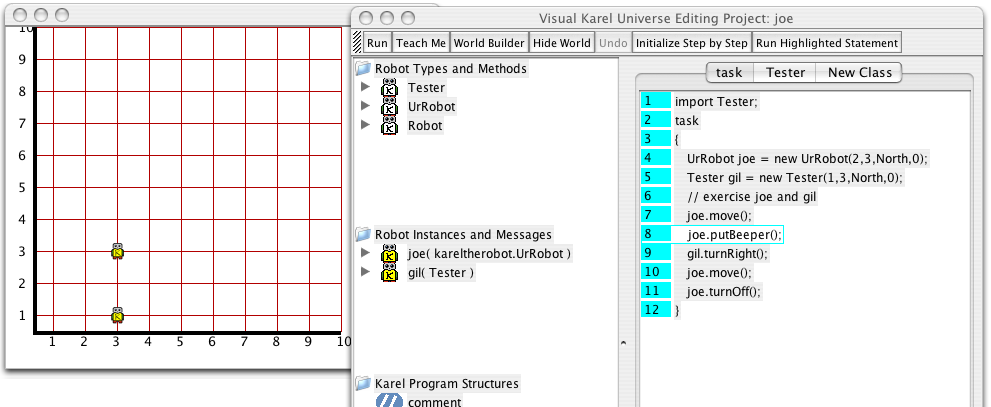
If all goes well, and all the necessary components are available in the working directory, you will be presented with the following universe view. Note that there are two independent windows. This was running on a Macintosh, under OSX. It will be similar on a PC.
There is also a task bar at the top of the main window. It has various options that will be explained below. At this time, the Teach Me button is very rudimentary.
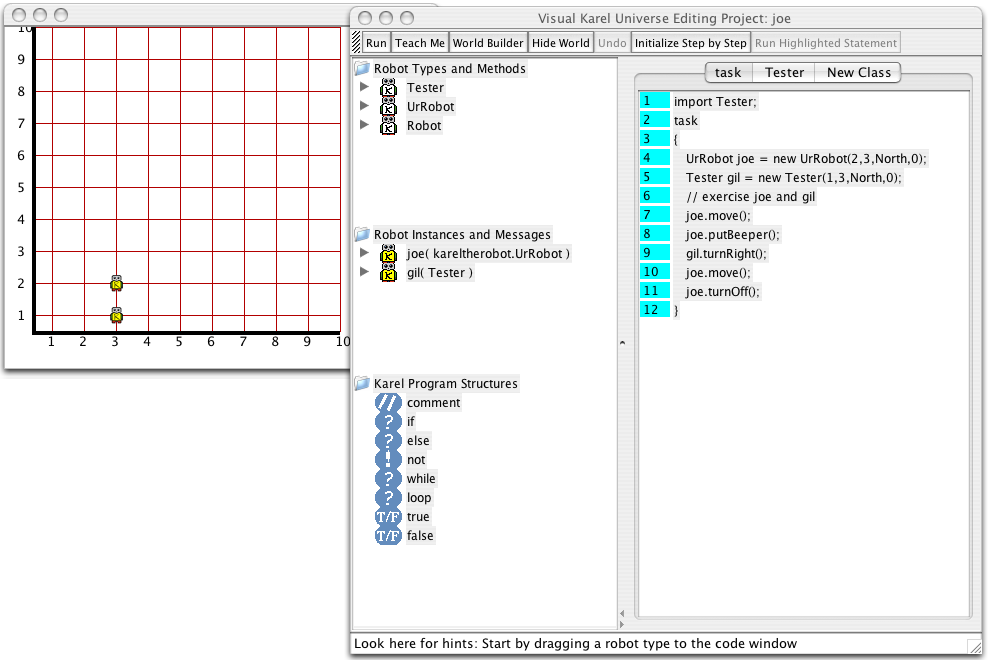
The window to the left is the standard Karel J Robot world simulator window. It may be resized and moved about. If you close it, it will simply be hidden and you can bring it back with a button on the tool bar. If you close the main window, however, the application will terminate. If the program is run or stepped through, the action will appear in the simulator window. Editing and control is done in the main (right) window.
The main window has two panes. The division between the two may be dragged to resize the panes independently. The small snap arrows at the bottom of the center divider will make one pane or the other fill the entire window.
Available resources are shown in the left pane and code is shown in the right. Editing proceeds by dragging things from the left pane to the right one. When the system starts up with an existing project you see the state the user left it in when he or she quit the system previously.
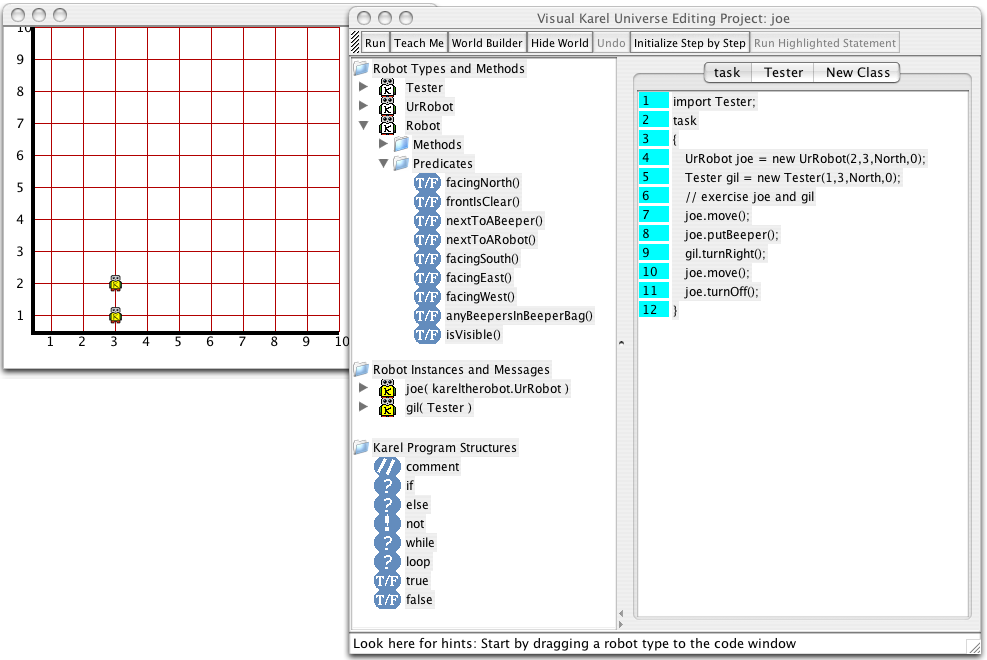
The left pane has three parts. At the top is a list of known robot classes, including the built-in UrRobot and Robot classes. In the figure above, the user has created a class named Tester as well. If you click the small triangle next to the class icon, you will see a list of the capabilities of that kind of robot. Below we show the results of opening the lists on the Robot class. This class has nine predicates. We did not also expand the methods list above the predicates list. The Robot class and the predicates are explained in Chapter 5 of the text.
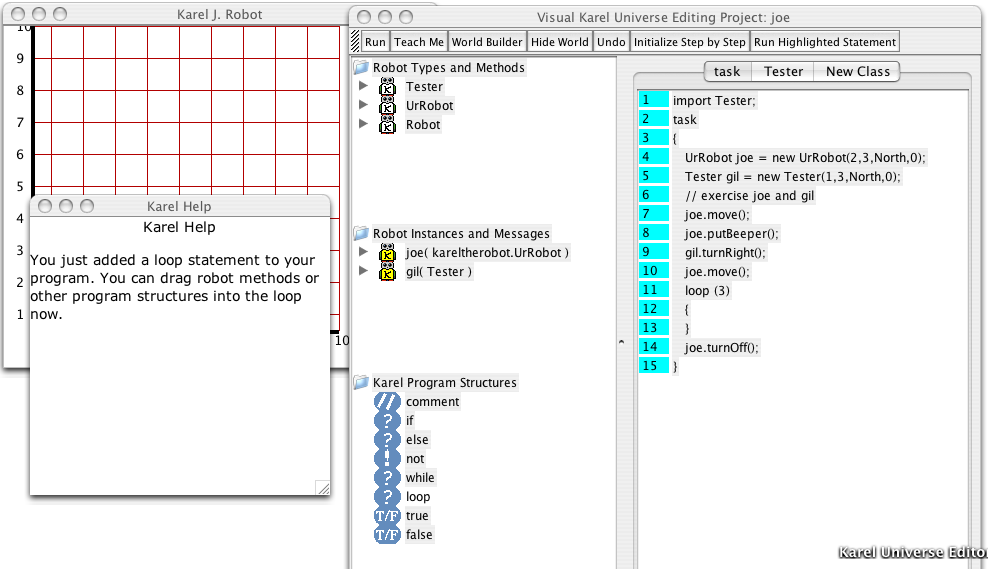
The middle part of the left pane is a list of all robot instances that have been created. The code window (right pane) shows that we have created an UrRobot named joe and a Tester named Gil on line 4 and 5, respectively. The middle part of the left pane shows icons for these two instances. If you click the triangle next to one of them, you will see its individual capabilities. We show this below for the UrRobot named Joe. Here we see the statement messages (corresponding to methods), but not the predicate messages:

Finally, the bottom part of the left pane shows the robot programming language features, other than messages and robot delivery instructions, that may be used in the program while in the current state. For example, you could drag a "while" construct or a one-line comment into the code pane. What is available here will depend on what you are doing in the right pane.
Now it is time to try an editing operation. Suppose you want joe to move again, after it puts a beeper, but before gil turns right. Expand the capabilities of the joe robot as we have done above. Press the mouse on the joe.move(); instruction in the list, and while holding the mouse button down, drag until you are just above the insert point for the new instruction and then release the mouse button. If your mouse is over a legal release point the instruction just above the insert point will be outlined in green. If you are over an illegal point, it will be outlined in red. In this case we want to drag the mouse until the joe.putBeeper(); instruction on line 7 is outlined in green, and then release. The program will be updated and can immediately be run with the run button in the toolbar. Your changes will also be saved automatically.
Note that this program has an error. The robot named joe has no beepers, since the last parameter in its delivery specification (number of beepers) is 0. We can fix that if we double click on that delivery specification. In that case you will se a dialog like the one below.
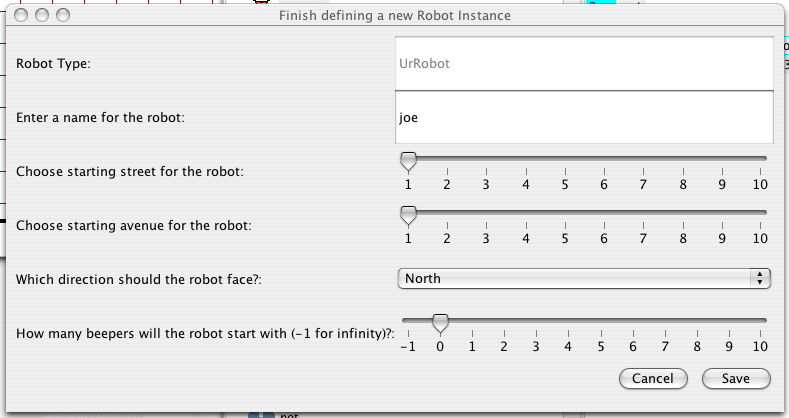
In this dialog you can drag the bottom slider to give the robot some beepers initially. Note that -1 here indicates that the robot should start with infinitely many beepers. You can also change the initial street, avenue, and direction with this dialog. You can even change the name of the reference variable (joe) that refers to the robot by using this dialog.
If you want a new robot in your program, drag the icon for the class of the desired robot from the top part of the left pane to the desired point of the task list in the right pane. The outlining in green/red will be as we described above. You will then be presented with the same dialog we just saw above, but you must also fill in a name for your new robot. We suggest you use a name that begins with a lower-case letter, in keeping with the usual Java style.
Initially, the right pane shows the Task window. This contains the main task block of the program: the task you want your robots to perform. In standard Java this would be a main function. To change this you may drag new robots (via their class icons) and new messages to robots (from the middle part on the left) into the task list as described above.
You may also delete statements from the task list. First select it with the mouse and then hit the delete key (on the PC). On other systems you will need to combine this with another "meta" key. On the Macintosh, it is the function key.
Additionally, if you drag something into the code pane and decide you made a mistake, the undo button is activated. Hitting this button will undo your most recent change. It is only activated when it knows how to back out of your change.
To run the code in your task, you can hit the run button in the task bar and it will be run entirely. You can also step through your code one statement at a time. To do this you first hit the Initialize Step by Step button in the task bar to enable the stepping button to its right. The first statement of your task will be highlighted. Then you can then hit the Run Highlighted Statement button repeatedly to execute incrementally. The effect will be shown in the simulator window. Below we show a stepping operation. We are about to send joe a putBeeper message (and crash the program, since joe has no beepers.)
If you want to run your program in a world that also has walls and beepers (and perhaps has a different viewable size) you can hit the World Builder button. This will bring up an additional window in which you can open, modify, and save worlds.
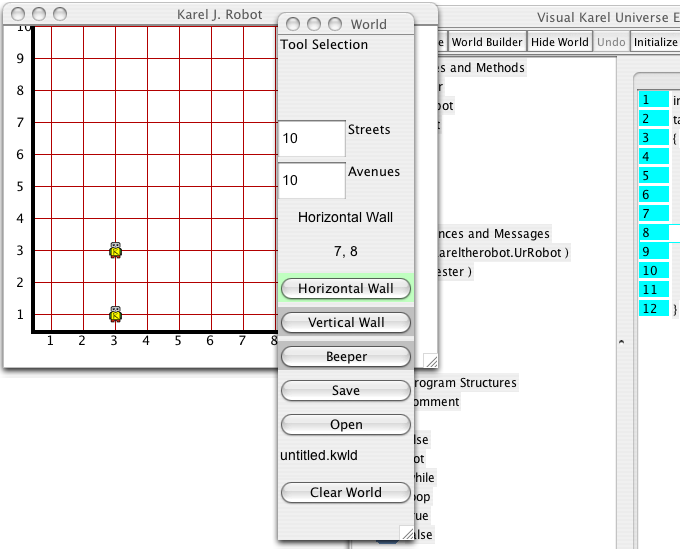
In this example we have selected the Horizontal Wall tool. Clicking with the mouse across an avenue will put a wall segment there. The other options are as in the standard Karel J Robot simulator. You can dismiss this dialog by clicking its close box without terminating the execution. The tool selection will be cleared. You can open it again later if needed. You can open existing worlds and save worlds as well, including a world modified by the execution of a robot program. The open and save buttons will present you with a standard file dialog.
To use Karel J Robot effectively, you need to create new classes that extend existing ones. To create a new class, click the New Class tab at the top of the right pane. You will be presented with the dialong below.

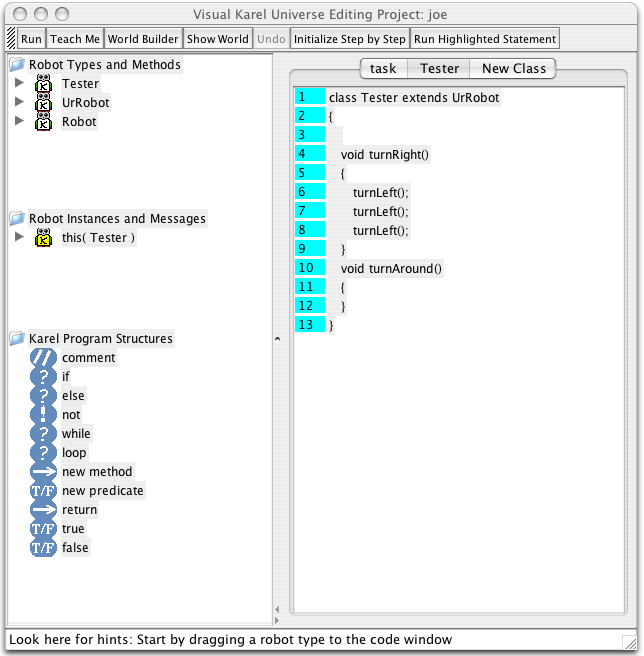
You need to name your new class and select the robot class it will extend. This was previously done to create the Tester class. You will then be shown a class window in the right pane with your new class outline, but no methods. Below we show the window for the Tester class, which has been under edit for a while. When you create a new class, its icon is placed in the Robot Types list at the top of the left pane as well as receiving a tab in the code pane.
When you are editing your class, the Robot Instances section on the left shows a special instance: this. It has the usual dropdown lists of predicate messages and statement messages, but they apply to this robot (the one being created as an instane of this class). You can, however, drag another robot into the class as an instance variable. This is described in Chapter 4 of Karel J Robot. If you do this, the new instance will show up in the middle part on the left, as usual.
Below we have created a correct turnRight method in the Tester class but have not yet finished the turnAround method.
Note also, that the bottom section on the left has been modified as well. You now have additional options. We will describe some of these below, but you can modify existing methods, by dragging new messages as well as program structures, like if and loop, into them as usual.
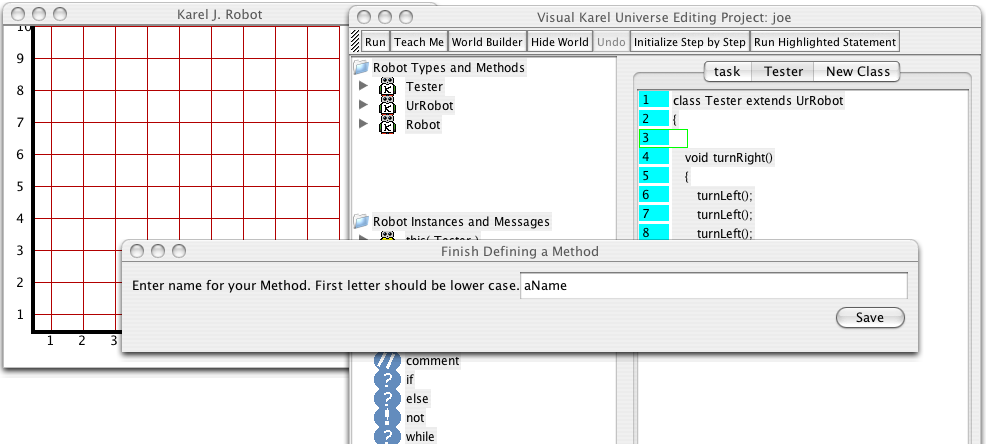
You can also rename a method if you like. If you want to change the name of the turnRight method above, just double click that line in the code pane (line 4 above) and the method creation dialog will reappear and you can enter a new name. You cannot rename classes in this way, however.
The main reason for creating a new class is to provide additional methods that were not provided by the class being extended. To create a new method, drag the New Method icon from the bottom part of the left pane into your new class, but outside any existing method (red/green highlighting as usual). You will then be presented with the following dialog in which to name the new method. This is how turnRight was originally created in the Tester class. Once you have a code skeleton for the new method, you can add statements to it by dragging as usual.
Sometimes you need to send a "super" message to a robot. For example, if you override turnLeft and want to use the superclass version of turnLeft within it (i.e. super.turnLeft();) then you first drag a turnLeft instrucion from the "this" list on the left into your program and then double click it. You will get a dialog that will permit you to modify it by toggling the "super" receiver. If you later change your mind and have a "super" message that you would like to be an ordinary ("this") message, then double click it again and the same dialog will appear. Check the checkbox before selecting OK to toggle the behavior.
You can drag a full line comment into your program in most places (Anywhere you could put a statement or a robot delivery specification). When you drag in the icon, you will get a dialog in which to enter your comment. It must begin with // and will take up a full line. It is not possible to have such a comment following a statement in this system, though it is legal in Java. If you later want to change the text in the comment, double click it and you will get the comment dialog again.
Note that this system is new, and may have a few bugs. The authors would like to hear about them and also about your experiences (positive and negative) in using this system. It may also change relatively rapidly for a while.
Note also, that this system does not permit the full range of robot programming, especially as described in Chapter 4 of Karel J Robot. It is intended as a way to get started quickly with simple programs. You will want to move on to something more sophisticated for much of your work after you get a feel for what a valid program looks like. While it does handle nearly everything in Chapters 5, 6, and 7, you are encouraged to move on by the time you reach Section 4.5, as that important material cannot be covered with this system. For purposes of teaching Object-Oriented programming, the author considers the last half of Chapter 4 to be the most important material in the book.
If you want to move on to other systems using code you have written here, you will find valid Java files for all of your classes in the projects folder and its subfolders. You can simply copy these into another environment.
Note that if you look in the projects folder for your project, you will find many files. The only ones needed for this system to work correctly are the .vkp file and all of the .r files. The others are generated as necessary.
You can get some hints as you go if you push the Teach Me button. This will bring up a small window in which hints are displayed depending on what you have done recently.
When you write a program it is possible to write one that runs and never completes. You can do this with either iteration (Chapter 5) or recursion (Chapter 6). If this occurs and you run such a program, you need a way to stop it. Because of this problem, when you run a program, a new button appears next to the Run button with the label Stop Run. Don't push this to stop programs in general, since if you push it you will then need to quit this system to preserve your work. This is a last resort Panic Button to prevent a program running forever, but it will put this system into an inconsistent state. There is no problem, but you will lose your work if you try to continue use of the program after pushing the Stop Run button without quitting and then restarting.
Sometimes the program will simply hang. This seems to happen most often if you edit a class (say, add a method), then go immediately back to the task window (hit the task tab) and then immediately drag something into the task. If you can help me diagnose the exact situation in which this occurs, I'd appreciate it. The solution is to force a quit and restart. You are not likely to use your work, since the system saves as you go. This seems to happen on the Macintosh and is a bug in the system libraries.
Sometimes when you start up the program finds itself in an inconsistent state. It can sometimes rebuild its data and tries to do so (and gives a message). Sometimes it is not able to do this. The solution is to look inside the projects folder for a folder with the name of your project. Look inside that folder for any file with an extension of ".class". Throw these files away and the system should restart itself. It will rebuild these files. Note that this happens if some other program (another installed JDK) tries to compile any of your code.
Very occasionally the program will write an incorrect java file into the project directory. Very occasionally it will write an incorrect robot code (.r) file. These might have to be edited outside the system to recover your work. I'd like feedback on such problems. perhaps I can find a solution. The system now writes backup files (very) dynamically. If you quit immediately after a program and find your ".r" file trashed, look in the corresponding ".bak" file. Note that the backup file is not the one that existed before you began the program. This system is much too dynamic for that. It is constantly writing files and backups. This is due to the fact that there is no explicit save function in the program, so it writes when it detects a (potential) change in the code. Consequently, if you try to continue after a failure, the bakup file may itself get the bad code.
Stepping doesn't currently step "into" methods. If you try to change tab panes in the middle of a stepping process the program will get confused and won't be able to continue.