Contents
Introduction
Getting Started with Authorware
Creating a title
Creating text via the Toolbox
Creating Graphics via the Toolbox
Shading, Coloring and Grouping
Setting up the file
Choosing a Monitor size
Displaying a menu bar and title
Adding Icons
Importing Graphics and Erasing
Moving and drawing objects in the Design Window
Erasing a display icon
Erasing the title
Grouping Icons
Glossary of key terms
Welcome to the Authorware Professional 2.01 Tutorial designed
for the Fall '95 CIS 3630 class.
The tutorial assumes that you are familiar with operating a PC
in the Windows environment. Therefore you should know how to manipulate
dialog boxes, make menu selections, use the mouse, and open and
save files. If you feel you need help with these fundamentals,
you may wish to consider doing a preliminary class in PC operation
BEFORE attempting this course.
Authorware is widely recognized as being one of the more efficient
multimedia packages available. Its interfaces are friendly, but
must be practiced to gain proficiency.
The aim of this tutorial is for you to work with an already existing
application, drawing its elements from a variety of sources and
combining them into a single project. Among other things, you
will be guided on the following:
- Identifying the elements of the Authorware Window
- Creating text and graphics using the toolbox
- Importing graphics into your presentation
- Structuring the interaction between elements of your presentation
- Creating responses
- Designing on-screen menus
- Refining and 'personalizing' your presentation
At the end of the tutorial, you will have built an interactive
application that simulates how a 35mm camera works.
The tutorial is divided into six sections, and you are advised
to budget about ¾ hour to an hour to complete each section.
Although you can do the sections in random order, we strongly
suggest that you follow the sequence as this affords you the most
efficient learning curve.
Above all else, mastering Authorware or any other multimedia tool
is not merely a matter of pasting text, images and sound together
on a background. It requires thought, planning and more than a
little trial and error. We encourage you to experiment!!
At the end of each section is a mini-glossary of terms which you
will begin to rely on as you develop skill in Authorware. You
will be responsible for knowing these terms, since many of them
may appear in your examination.
After this occurrence, every time you see this icon,  it indicates that if you click on it you will open an image that
illustrates the concept(s) closest to it. The images were designed
as an aid to your understanding the Authorware interface. You
will find that as we progress through the tutorial they will become
less and less, until they disappear altogether.
it indicates that if you click on it you will open an image that
illustrates the concept(s) closest to it. The images were designed
as an aid to your understanding the Authorware interface. You
will find that as we progress through the tutorial they will become
less and less, until they disappear altogether.
The Basics -- Text & Graphics
1. Ensure that you have a formatted, 3.5" High density
diskette. Please make sure that the diskette is appropriately
formatted. If you're using a DOS machine, use a DOS-formatted
disk. If you're using a MAC, ensure the disk is MAC-formatted.
It is important that you use the appropriately-formatted medium,
since if your format is incorrect, you will not be able to save
your work.
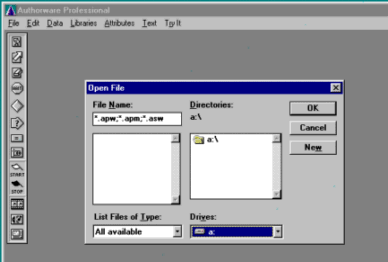
2. Insert your disk into the appropriate drive on the computer.
If you are using the computers in Room 433, there is only one
floppy drive and it is designated drive A.
3. Open the Authorware program group and double-click the icon
labeled Authorware.
The
main Authorware window opens, and you are offered the choice of
either opening an existing file, or creating a new file. Since
this is the first project you are undertaking click on "New."
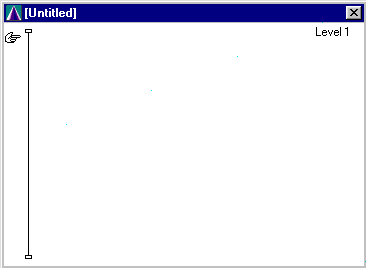
The Authorware Design window opens up, with the caption "Untitled."
A few items to note about the Design window:
The pointing hand that you see at the top of the flowline is called
the Paste hand.
It displays the current position for the purposes of pasting items
into the flowline. The Level 1 indicator at the upper right-hand
corner of the Design window displays the current level of hierarchical
organization that this window is displaying. As you develop in
using Authorware, you will see that you can organize your application
by grouping and sub-grouping portions of it as a means of maintaining
control as it grows larger.
You are now ready to begin your first Authorware application.
The Icon Palette
What do the Icons do?
- DISPLAY ICONS: place graphics and text on
the screen.
- ANIMATION ICONS: move the objects of a preceding
display from one point to another in a given amount of time or
at a specified speed.
- ERASE ICONS: erase objects from the screen.
- WAIT ICONS: stop the execution of a file
for a specified amount of time or until a key-press or mouse-click
event.
- DECISION ICONS: are branching icons that
determine which path to follow.
- INTERACTION ICONS: are branching icons that
present text and/or graphics. Based on the user's response, Authorware
determines which path to follow.
- CALCULATION ICONS: calculate and evaluate
expressions, execute system functions or custom code and jump
to other files or applications.
- MAP ICONS: organize and modularize the file.
Each map icon has its own flowline on which you can place more
icons, including other map icons.
- START & STOP FLAGS: allow you to run
and edit segments of your file during creation.
- MOVIE ICONS: present frame animations and
Quick Time movies.
- SOUND ICONS: play digitized sounds in your
applications.
- VIDEO ICONS: play still frames or video sequences
in your application.
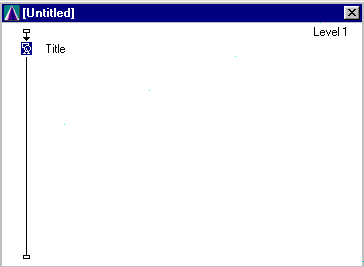
1. Drag the Display icon from the icon palette to the flowline
and release the mouse
The display icon "snaps" into place on the flowline.
You should notice the highlighted word "Untitled" to
the right of the display icon.
2. Type the word "Title"
Before typing, make sure the display icon is selected. If it
isn't, click once on the icon to select it then type "Title."
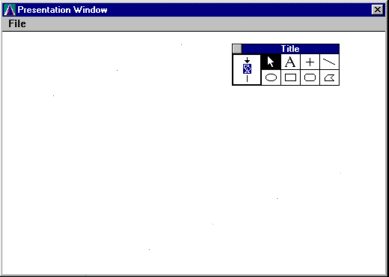
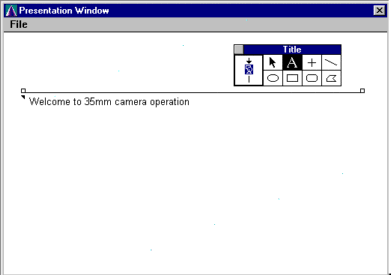
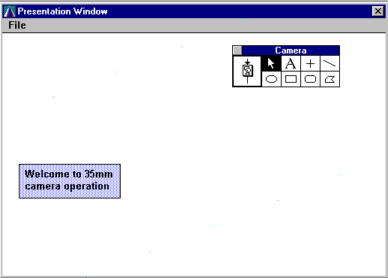
3. Double-click the Display icon.
This
opens up the "Presentation Window" as seen by a viewer.
The graphics toolbox contains the tools for creating text and
graphics for your presentation Notice the word "Title"
that appears at the top of the graphics toolbox.
1. Select the text tool from the toolbox
2. Choose "Font" from the Text menu, and select Arial
from the offered sub-menu.
Note: If you choose a font with the text tool selected
but with no text selected, this changes the "default font"
and all text you create from this time on will use this font.
3.
Place the I-Beam cursor (insertion point) where you want the text
to begin in the drawing space. Click the left mouse button once,
then type "Welcome to 35mm Camera Operation" or some
similar title of your choice.
The line that shows up above your text indicates the width of
your margins, Like with a good word processor, if the words you
type don't fit on a line they "wrap" to the next line.
You do not need to press the carriage return (Enter) key at the
end of each line. However, you should click on the pointing tool
in the toolbox to exit text-entry mode.
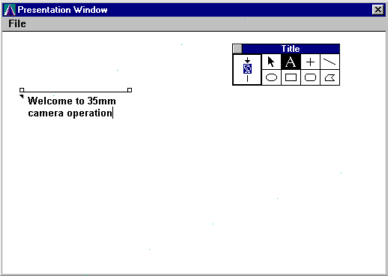
4. Change the size of the text. Using the left mouse button,
select the text you just typed. Choose size from the Text menu,
then select 14 from the Size sub-menu.
5. You can also alter the Style (appearance) of the text. Choose
Style from the Text menu and choose Bold from the Style sub-menu.
Mix and match fonts, styles and sizes to create the effects you
want. Don't go overboard!! The project still has to adhere to
the rules of good screen design.
6. Make the text margin narrower.
Move the I-beam cursor to one of the margin handles at any end
of the margin line. (The cursor will change to an arrow.) Click
the handle and drag it towards the other end of the text. Release
the mouse button when the line is about half its original length.
This may require a few tries before you get the text margin just
right. But remember, this is your project, and the aesthetics
are entirely up to you.
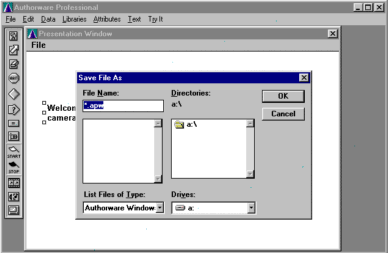
7. SAVE YOUR PROJECT
Since this is the first time you are saving your application,
observe the following procedure carefully.
- From the File Menu, choose Save. This offers you the "Save
As" dialog Box.
- From the Save As dialog box, choose a: from the Drives pull-down
menu.
- In the File Name text box, you should see *.apw. Delete
the asterisk and type the word camera. The entry should read camera.apw.
- Click on OK. Notice that camera.apw replaces Untitled
in the caption of the design window.
- Your application is now saved.
FYI: The extension .apw indicates that the file
is being designed in Authorware Professional
for Windows.
1. To draw a rectangle around the text title, select the rectangle
tool from the toolbox and position the cursor at the top, left
hand corner of the text.
2. Holding the left mouse button down, drag diagonally across
the text until a rectangle surrounds it. Release the mouse button.
To fill the newly-created rectangle with color, you will have
to select a "fill" pattern and color.
3. From the Attributes menu, choose Fills.
Select a pattern from the palette. (Gray recommended).
The rectangle on the screen changes pattern to reflect your choice.
4. Close the Fills Palette
5. From the Attributes menu choose color.
Select a color from the color palette that appears. (Light color
recommended). Close the color palette.
You will notice that the words are invisible - the shaded and
colored rectangle has literally been superimposed on the words.
6. To move the rectangle behind the text object, make
sure that the rectangle (not the text) is selected, and, from
the Attributes menu, choose 'Send to Back.'
Now the text appears superimposed on top of the shaded and colored
rectangle, obscuring the color behind it. This can be resolved
by making the text object transparent.
7. Select the text object by clicking on it. (When the
text object is selected, the 'handles' immediately surrounding
it are shown. Be careful to select the text object and not the
rectangle. This may take a few tries to get it right.)
Choose Modes from the Attributes menu, then select Transparent
from the palette that appears. Close the palette.
As long as you have done this correctly, the color of the rectangle
will now show through the text - which has become transparent.
If you try to move either the text object or the rectangle, you
will notice that they can each move independently. To make it
easier to resize and reposition these objects, you will now group
them so that they behave like a single object.
8. Position the pointer outside the top left corner of the
rectangle. Holding down the left mouse button, drag a selection
rectangle diagonally across the objects until they are completely
enclosed. Release the button.
You will notice that both the rectangle and the text are enclosed
with handles.
9. From the Edit menu, choose Group.
Notice that there is now only ONE set of handles - around the
rectangle. The rectangle and the text objects are now grouped
as a single object
10. Run the file
Choose Run from the Try It menu. You should see all of the changes
you made reflected in the presentation.
11. To return to 'Author' mode, choose Jump to Icons from the
Try It menu.
SAVE YOUR WORK
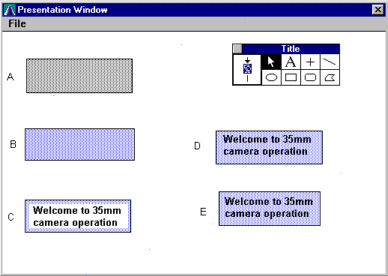
In the illustration:
A: shows the text box obscured with the "filled"
rectangle;
B: shows the rectangle after color has been added;
C: shows the image after the rectangle has been
"sent behind" the text;
D: shows the image after the text has been made
transparent; and before they have been grouped; and
E: shows the image after the text and rectangle
have been grouped.
A large part of the effectiveness of any multimedia presentation
is screen design. In addition to content, the success of most
presentations depends on the aesthetic appeal of the screens.
In the next few steps, you will learn how to control the way that
the Presentation window will appear to a user who is running your
finished product.
NOTE: It is probably best to select these options right
at the start of creating your file. One of the most important
considerations is the type of monitor on which the user will run
the application. Clearly if it's not a color monitor, then color
selection does not arise as a major criterion. In general, however,
the application looks more attractive if it is designed with the
monitor's characteristics in mind.
There are two elements to this part of our exercise: 1)
choosing the monitor size; and 2) Displaying a Menu bar
and title.
1. From the File menu, choose File Setup
The File Setup dialog box appears
2. From the Presentation Window Size pop-up menu, select Variable.
To do this, click on the downward-pointing arrow in the drop-down
combo box in the Presentation Window Size pop-up menu. You may
need to experiment a little to determine the best presentation
size of various projects. For this project however, we recommend
that you use Variable.
Like many other Windows-based applications, Authorware has the
flexibility to provide users with menu bars. The settings in the
User Menu Bar and Title Bar options of the File Setup dialog box
determine whether a menu bar and/or a title bar appear in the
application.
If the entire File Setup dialog box is not visible, you may have
to move it to a more convenient screen location to get to it in
its entirety. In case you have to do this, point into the title
bar, click and hold the left mouse button, and drag the box to
the desired location. Release the mouse button and proceed with
your work.
1. Turn off the User Menu Bar and then click OK.
To do this, you should un-check the User Menu checkbox in the
displayed window. NOTE: An 'X' or a check-mark in a checkbox usually
indicates that the item is 'ON' or selected.)
2. From the Try It Menu, choose Run.
This is the way the file will look to the user. Notice that no
menu appears in the presentation. However, since the Title Bar
option was left On, the title bar appears. While in 'Author' mode,
the title "Presentation Window" appears in the title
bar. In your final presentation, however, the title that you enter
in the File Setup dialog box will appear in the title bar.
4. From the File menu, choose File Setup once again. In the
File Setup dialog box, turn the User Menu bar On, turn the Title
Bar Off, then click OK.
5. From the Try It menu, choose Run.
Note that with the settings switched the author menus appear,
but the title bar in the Presentation window is no longer visible.
You may choose to reset the title bar, so that it appears in your
presentation. That's entirely up to you - it is, after all, your
presentation.
6. To return to Author mode, from the Try It menu, choose Jump
to Icons.
SAVE YOUR WORK
1. From the Try It menu, choose Jump to Icons.
This opens the Design window. The Design window is the
work area in which you plan your presentation, while the Presentation
Window is the area in which you display it. (FYI: It is possible
that with a large enough monitor you can display these windows
(Design and Presentation) side by side, so that you can jump between
them at will.
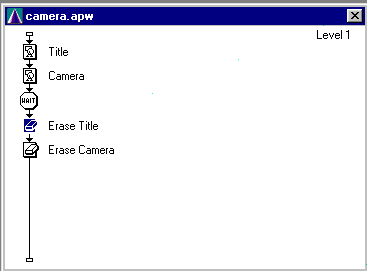
2. Place a display icon on the flowline below the "Title"
display icon which you had created earlier. Name this new display
icon "Camera."
3. Place an erase icon below the two display icons.
The function of the erase icon is to remove the contents of one
or more display icons from the screen.
4. Insert a wait icon between the second display icon and the
erase icon.
(Notice that you do not have to manually position this icon. It
automatically snaps into place, and the other icons are adjusted
on the flowline.)
A wait icon suspends execution of a file until one of three events
takes place:
- the user initiates a key-press event;
- the user initiates a mouse-click event; or
- a pre-specified amount of time elapses. NOTE:
Unlike other icons, wait icons do not require a title.
5. Select the erase icon and title it "Erase Camera."
SAVE YOUR WORK
1. Run the file.
Authorware runs along the flowline, carrying out in sequential
fashion the instructions denoted by the icons. The first display
icon ("Title") is encountered, and its contents are
displayed. When the second icon ("Camera) is encountered,
the system pauses and presents you with the graphics toolbox,
since you have not yet attached an instruction body to this display
icon (Notice that the toolbox is titled "Camera.")
2.
To import an image into the display icon, choose Import Graphics
from the File menu.
This command allows you to preview graphics before importing them
into your
presentation.
3. Using the offered dialog box, locate the file named camside.bmp
from the 'tutorial' sub-directory of the directory 'apw.' Click
View to see a preview of the graphic. While you're at it, you
may want to browse through the other graphics files in the directory
so that you will later be able to associate a graphic with a name.
4. Click on 'Paste'
This brings the camside.bmp graphic directly into your
presentation window.
The graphic appears with handles that allow you to resize it
and reposition it anywhere in your presentation window as desired.
1. Move the camera to the lower right hand corner of the display.
Leave about 1½ - 2 inches clearance on the bottom and on
the right side.
2.
Double-click the text item you had previously created ("Welcome
to 35mm Camera Operation"). This opens the title for editing.
You will see the rectangle bracketed with handles. (You
cannot move the text box without this step.)
3. Move the "Title" display beside the camera.
4. From the Try It menu, choose Proceed.
The next item encountered on the flowline is the wait icon. When
Authorware
senses a wait icon, it automatically places a "Continue"
button on the screen. (See diagram on following page.) This default
method is provided so that the user can continue running the file.
5. Choose Pause from the Try It menu, and if it is not already
there, drag the "Continue" button to the lower right
corner of the window. You should have enough space to place the
button if you positioned the camera graphic correctly. Notice
that if you pause the application while it is running, you can
manipulate objects in the presentation window.
1. From the Try It menu, choose Proceed, and then click the
continue button.
This tells Authorware to move on the next item on the flowline,
which in this case is the "Erase Camera" erase icon.
A dialog box appears so that you can specify which of the two
objects in your presentation (the Title Display, of the Camera
Display) you wish to erase. At this time, you want to erase the
camera display.
2. Begin by clicking on any part of the camera.
Notice that the camera disappears from the Presentation window,
and the icon and title "Camera" now appear in the lower
portion of the dialog box.
3. From the Effect pop-up menu, choose an appropriate effect
you would like to see as the camera is disappearing from the screen.
Be adventurous..... Try as many as you like.
Every time you choose an effect, the camera reappears and then
disappears from
the screen in the manner you have chosen.
4. Click OK in the dialog box
SAVE YOUR FILE
1. From the Try It menu, choose Jump to Icons.
2. Drag an erase icon from the icon palette, insert it below
the "Camera" icon and title it "Erase Title."
This erase icon will erase the title from the screen.
3. From the Try It menu, choose Run
Authorware now encounters the "Erase Title" erase icon,
and once again you are offered the Erase Options dialog box so
that you can choose which display to erase.
4. To choose which display to erase, click the Title text.
The text is erased from the screen, and its icon and title appear
in the lower portion of the Erase Options dialog box.
5. From the Effect pop-up menu, choose an appropriate effect
(e.g. Mosaic).
Once again you will see a preview of the effect you have chosen.
6. Click OK in the Erase Title dialog box.
7. Save your file
8. From the Try It menu, choose Run. When the "continue"
button appears on the screen, click it. Like the results?
1. From the Try It menu, choose Jump to Icons.
2. To select all icons, place the cursor in the upper left-hand
corner of the Design window, hold down the left mouse button and
drag diagonally until the selection rectangle surrounds all of
the icons. Release the mouse button.
Notice that all of the icons are now highlighted, but the text
is not.
3. From the edit menu, choose Group.
This groups all of the selected icons and places them within a
'map' icon.
4. Type "Introduction" as the title of this map icon.
5. Double click the map icon to open it.
The entire flowline you have created so far now is contained within
this single icon.
6. To close the "Introduction" map, click on the
graphic in the top left-hand corner of the window titled "Introduction"
and choose Close from the pull-down menu. (Alternatively, you
may double-click on the graphic, and the window will close.)
7. Run the file.
The title and camera appear, then the title fades out in the mosaic
pattern. The continue button appears on the screen. When you click
it. the camera is erased using the effect you specified.
SAVE YOUR WORK
application           graphic               palette

author                grid                  Paste hand

Display icon          icon                  Presentation Window

flowline              level                 title

font                  Menu bar              Toolbox