Creating Basic HTML Files
Hypertext Markup Language is the standard for documents
for the World Wide Web. The HTML file contains:
-
The text that appears.
-
Formatting instructions for the text.
-
Definitions of hyperlinks (pieces of text, sometimes called
hot words or images, that, when you click on them take you to another document,
located on the same computer or a different computer).
-
Instructions for inserting images and sounds.
-
Programs or calls to programs.
HTML files reside on what is termed a server computer
and are interpreted by a browser program such as Netscape Navigator
or Microsoft Internet Explorer on the users computer. This computer is
called the client. These notes will describe how to create a simple
HTML document.
Overview of Common Tags
An HTML file consists of text, that is, the words that
you want to appear in your document and embedded instructions called HTML
tags. The tags give the browser instructions that include formatting,
display of images, and hyperlinks. The technical name for the type of data
in an HTML file is ASCII text. We first go over some basic tags, and then
there will be an exercise using NotePad. HTML tags begin with the
< symbol and end with />. For example, an HTML file begins
with <html> and ends with </html>. The letters inside
the tags may be in either lower or upper case.
The tags, <html> and </html>, are examples of paired
tags. The second one is like the first one except that it begins with a
/ symbol. A pair of tags affects how a browser will display the
text between the first tag and the second tag. Leaving out the second tag
usually changes the display of the rest of the document.
The standard format for an HTML file consists of the head
and the body. The tags for these are:
<html>
<head>
The document
title and other information used by search engines.
</head>
<body>
all the
text and instructions for the document
</body>
</html>
The most common tag for the head part of an HTML file
is the title tag. It is used to put information about the document
in the title bar. Note: it is common to include a big, showy heading in
an HTML document that you may refer to as the title, but in the technical
language of HTML, the title is the text that shows up in the title bar
at the top of the browser.
<title> My First HTML File </title>
In this example, the phrase My First HTML File will
show up in the title bar.
We now describe four common types of HTML tags that go
in the body section of the file.
-
The <h> tags govern text size (h stands
for heading).
-
The <img src> tag is used for including images.
-
The <p> tag creates a new paragraph.
-
The <a> tag indicates a link to another part of
the same document or to another document (a is for anchor).
You can control the size of the text by placing a piece of
text between one of the heading tags as in the following example:
<h1> News Stories </h1>
The tags, <h1> and </h1>, will make the text large.
Some browsers may even use a different font. H1 creates the largest
text and H7 the smallest. Please be aware that the system does not
expect or check for any consistency. There are not automatic line breaks
after a heading change. You may nest different headings.
To insert an image, you use the single img tag
as in the next example:
<img src = "name.ext">
Here name.ext is the file name and extension of the image
file. The ext will be either .jpg or .gif. These are two
types of images. You can also create your own images using products such
as Paint Shop Pro or Adobe Photo Shop. You just have to save the file as
a .gif or a .jpg. Similarly, you can use these tools as well as Microsoft
Photo Editor to crop or resize an image.
To produce what appears to be a new paragraph,
use the single tag <p>. There is also a tag, <br>,
that creates a line break. In some browsers, they may have the same
effect. In others, the paragraph tag will insert a blank line while the
line break tag will not.
The <a> tag produces a link to another document
or website. These come in pairs. The text between the <a> and
the </a> forms the clickable part. If the URL for the
site to be linked to is http://www.nytimes.com, then
the format to use should be:
<a href = "http://www.nytimes.com">
A well-known newspapers online site.</a>
Notice that the text following href is surrounded
by quotation marks. You also use the <a> tags for linking to
local files or to HTML files in the same directory on the server.
The format is
<a href = "secondfile.htm"> more information </a>
where secondfile.htm is the name of the other file.
If the browser does not read the http:// then it knows to go to
the same directory as the HTML file to find this new file. One more use
of an <a> tag is for marking and also linking to different parts
of the same document. This is done as follows:
<a name = "details"> Details </a>
This use of the <a> tag gives a name to a position
in the HTML file. At any other point in the file, you can use
<a href = "#details"> Go to Details </a>
to go to a previously marked point in the file.
These tags are the most important, but there are many
others. You can look at the underlying HTML of any document by clicking
on View and then Page Source in Netscape. You can use this
to learn about new tags.
Using NotePad
An HTML file can be created using any text editor. NotePad
is such an editor and is part of the typical installation on Windows computers.
Here is a simple example based on favorite or best Web sites for some special
hobby or task. Before doing this exercise, you should select a topic and
find two or three Web sites for the topic. You also need to download an
image from each site. Images can be copied from a Web site to your own
machine by positioning the cursor over the image and then clicking on the
right mouse button. You will get a dialogue box with one option,
Save Image As. You then get a chance to rename the image and also
locate it in a specific folder.
-
Start NotePad. This can usually be done by clicking
on the Start button, then on Accessories and then on NotePad.
-
Immediately put in what can be called the basic template
by typing the following into the editor. You skip lines by hitting the
enter key. Make sure it looks exactly like this and that you havent forgotten
one of the < or > symbols.
<html>
<head> <title> </title>
</head>
<body>
</body>
</html>
-
Your example is going to require more than one line in the
body portion of the file, but you can always insert new lines. Type in
a title between the <title> and the </title> tags.
It can be My First HTML File.
-
We can make the body of this example begin with a large heading.
(The temptation to use the term title is strong, but we will not,
because this would confuse the html document title with the title inside
the text.) Directly under the <body> tag, type in
<h1> The Best Web Sites for ...</h1>
Replace the three dots after the word, for, by
the topic that you are using for this assignment.
-
At this point, you should compose a general paragraph on
your topic and then a paragraph about each of the sites you have found.
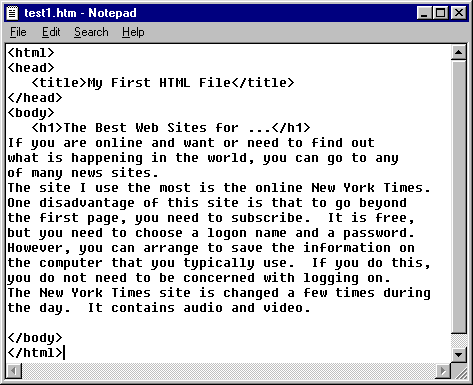
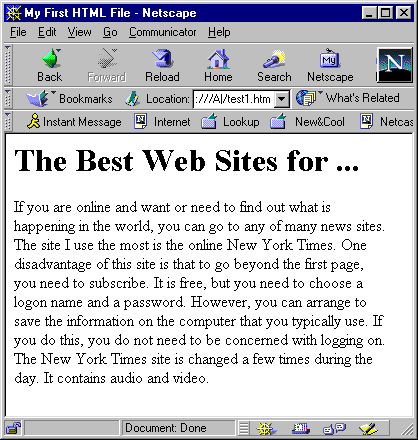
Enter the text below the heading. Here is a short example:
If you are online and want or need to find out what
is happening in the world, you can go to any of many news sites.
The site I use the most is the online New York Times.
One disadvantage of this site is that to go beyond the
first page, you need to subscribe. It is free, but you need to choose a
logon name and a password. However, you can arrange to save the information
on the computer that you typically use. If you do this, you do not need
to be concerned with logging on. The New York Times site is changed a few
times during the day. It contains audio and video.
-
 The example we
have given above will work as an HTML file. However, it can be improved
in several ways. First of all, even though the text as written appears
to have a paragraph break after the first sentence and another one before
One disadvantage.., the browser will display this as one continuous piece
of text. For the most part, browsers ignore spacing and line breaks.
The example we
have given above will work as an HTML file. However, it can be improved
in several ways. First of all, even though the text as written appears
to have a paragraph break after the first sentence and another one before
One disadvantage.., the browser will display this as one continuous piece
of text. For the most part, browsers ignore spacing and line breaks.
-
To put in a break, use the <p> tag in your example
to break up the text into paragraphs. In terms of content, describe the
type of owner of each of your examples and the business purposes, if any,
for your site.
-
We want hyperlinks in our example. To do this, we put the
phrase Online New York Times between an <a> tag and an </a>
tag:
<a href="http://www.nytimes.com">
Online New York Times </a>
Insert <a> tags for each of your sites. What
you put in-between the <a> and </a> tags is up to you.
But you need to put in something! It can be the official name or something
descriptive.
-
Now decide where you want to put your images. Use the img
tag. Note: you can insert the same image more than once.
-
You are now ready to try out your HTML file. Click on File
in NotePad and then Save As. Now give your file a name and also
change the extension from .txt to .htm. Let us say you named
it test1.htm
-
Minimize NotePad (by clicking on the underscore in the upper
right corner of the window). Open up Netscape or whatever browser you use.
Note: you can do this even in situations where you usually dial-in to an
Internet Service Provider (such as Pace) first. You may get a message from
the browser that it has failed to locate the home page. If you are doing
this in a computer classroom or in the open labs, the computer is [almost]
always online.
Click on OK to close that dialogue box. Now (assuming
you are using Netscape), click on File and then Open Page
and Browse. You are opening a local file instead of going
to a Web site. Use the operating systems procedure for finding the file
you just saved. Click on it and then click on Open. Your HTML file
should be displayed in the browser. Notice any problems and fix them in
NotePad. When you get back into the browser, you will have to click on
ReLoad to get the newest version. If reload does not work, hold
down the shift key while clicking on ReLoad. (In Internet Explorer,
use the control key.)
-
One other change you may make to your file is to adjust the
size of the images. You can do this by adding parameters to the img
tag. For example,
<img src="picture.gif" align = left width = 100>
will align the image to the left. It will also change
the width of the image to 100 pixels and make the height whatever size
that will preserve the proportions of the original image. You can use both
width and height parameters to set both values.
-
Lastly, return to the browser and reload your local file.
You can now check to see that your links work correctly.
Other Tools
Several products exist for producing HTML. The advertising
for these tend to give the impression that producing HTML is difficult
and these products will make it easy. The real situation is that writing
evocative text is a challenge and so is designing layouts and choosing
(and producing) appropriate images. Putting in the right HTML tag is not
the hard part. With that caveat, here are comments about a few of these
tools.
Using Specialized HTML Editors
Several specialized editors exist for producing HTML.
The so-called HTML editors help to produce the HTML source and show it
on the screen. For example, you select text and then click on Heading 1
on the toolbar and what you have selected is now between <h1> and </h1>
tags. These editors also allow you to click on image and then go to a series
of dialogue boxes to select the image. These tools are not what
you see is what you get editors (WYSIWYG) because you need to go to
a browser to see the results. One example in this class is HTML Assistant
Pro.
Using Netscape Composer
You can also edit your HTML document using Netscape Composer,
a component of Netscape Communicator. To edit an existing file, open the
file in Netscape Navigator the usual way and then go to File and
then Edit page. To start a new file, you can invoke Netscape Composer
directly. In Composer, click on New. For existing files, what you
will see is very like the display form of the HTML. There is a toolbar
for putting in tags. This includes icons for inserting images and links.
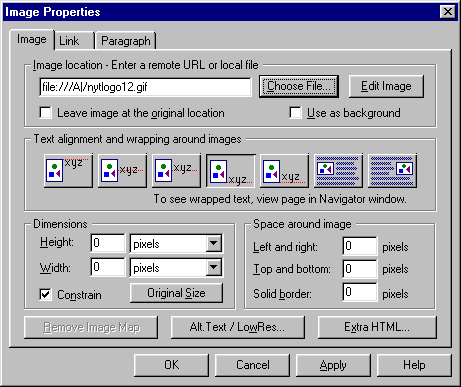
When you choose to insert an image, the following box will appear. You
can find the image using the button marked Choose File... You can
also make other changes, if you wish.
It can sometimes get tricky to do what you want in Composer
and you may decide to return to NotePad where you can see all the tags.
Another problem to be aware of is that Composer may put file addresses
in a different form than you want. For example, it may insert the local
drive name. This will prove problematic if and when you move the project
to a server. Composer can be helpful for producing tables. The set of tags
required here can get messy (not difficult, just complex).
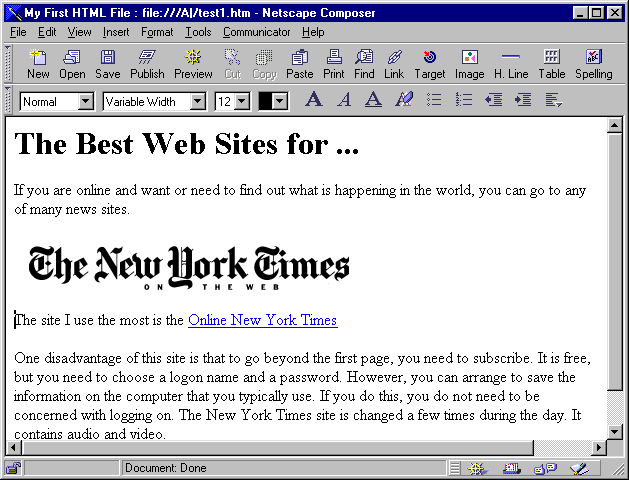
After the image of the NY Times Logo has been inserted,
the picture will show up in Composer much the same as it will appear in
a browser. Composer will have inserted the html tag used to link to an
image. In this example, it would appear as
<P><IMG SRC="nytlogo12.gif" HEIGHT=54 WIDTH=350>
You can see this for yourself by clicking on View and then on
Page Source.
The following picture shows what the document will now look like in
Composer.
Using Word
Microsoft Word has an option to Save As HTML. This
produces a reasonable version of the Word document. When you look at the
HTML document, you will probably notice a lot of seemingly extra tags.
The file will also contain special symbols such as for
non-blank space. If you are really in a hurry and have put a lot of formatting
into the Word document, this is an option. However, another option is to
simply copy-and-paste the text in the Word document into NotePad and then
proceed. This will make it easier to plan and then design the document
specifically for Web publication.
Using PowerPoint
Microsoft PowerPoint also has a facility to turn a presentation
into HTML form for publication on the Web. When you click on File
and then Save As HTML, this facility produces a large set of files
appropriately linked so that the PowerPoint presentation can be viewed
using a browser. You, the author, are asked several questions on the design
of the viewing and also background information to go on the first page,
which is similar to a table of contents. You should put all the files in
a brand new folder (directory) just for this presentation.