Appendix A
The Apache Tomcat Server
The Apache Software
Foundation[1] is
a group of developers that create free, open-source software. One of their products is a web server called
Tomcat. It is available for download at http://archive.apache.org/dist/jakarta/tomcat-5/v5.5.7/bin/. In order to use it, you have to have version
5 of Java installed. This can be
downloaded from SUN at http://java.sun.com/j2se/1.5.0/download-netbeans.html. Both Tomcat and Java version 5 are available
on my website at http://csis.pace.edu/~wolf/documents/.
Installation
Save both files on your hard
drive, and then click on the jdk executable file to
open and install Java. You can put it
anywhere on your hard drive, but remember where it is. Next unzip jakarta_tomcat
and extract the files into a folder.
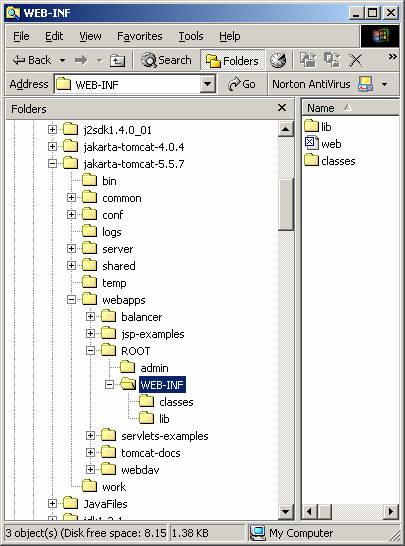
This produces a folder called jakarta-tomcat-5.5.7. This folder contains all the server
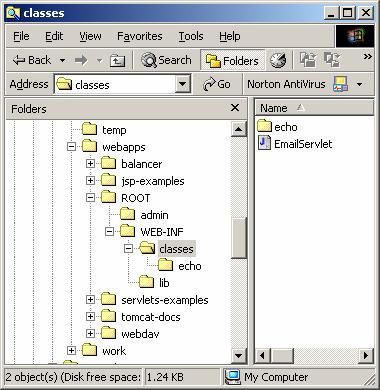
files. Under webapps/ROOT/WEB-INF create
a subfolder called classes as shown in the picture on the left.
The Environment Variables
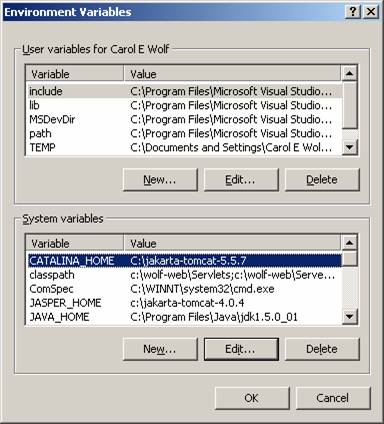
Next set the environment
variables. These are found in
Settings/Control Panel/System/Advanced.
Click on Environment Variables/New and enter the locations for both your
Java and your Tomcat files. The first is
listed under JAVA_HOME and the second under CATALINA_HOME.
Configuring Tomcat
Configuring this version of
Tomcat is relatively easy. Edit the
file, context.xml, in the conf directory. Change the line <Context> to <Context
reloadable="true">, so that the entire
file is as follows:
<!-- The contents of this
file will be loaded for each web application -->
<Context reloadable="true">
<!-- Default set of monitored resources
-->
<WatchedResource>WEB-INF/web.xml</WatchedResource>
<WatchedResource>META-INF/context.xml</WatchedResource>
<!-- Uncomment this to disable session persistence across
Tomcat restarts -->
<!--
<Manager pathname="" />
-->
</Context>
Version 5 is configured
initially to listen on port 8080. You
can leave it as 8080, or you can change it to 80, the standard port for
http. To change it, edit the file, server.xml, in the same conf directory. Find the number 8080 and change it to
80. This is in a section near the top
that reads as follows:
<!-- Define a non-SSL
HTTP/1.1 Connector on port 8080 -->
<Connector port="8080"
maxThreads="150"
minSpareThreads="25" maxSpareThreads="75"
enableLookups="false"
redirectPort="8443" acceptCount="100"
connectionTimeout="20000"
disableUploadTimeout="true" />
<!-- Note : To disable connection
timeouts, set connectionTimeout value to 0 -->
The first modification above
will allow you to recompile servlets while the tomcat server is open. This is helpful when developing a project but
unnecessary when the project is completed.
The second change means that the port number does not have to be
mentioned in the HTML form, since the browser defaults to port 80.
Using Tomcat as a Standalone Server
Tomcat is a full server and
can serve multiple clients on a machine connected to the Internet. But for development work it is useful to run
it as a standalone server on a single machine.
The IP (Internet Protocol) address for the local machine is
127.0.0.1. It is usually referred to as
the localhost. It is set the same way as the other
environment variables. In an HTML form you
can either use localhost or its equivalent, 127.0.0.1.
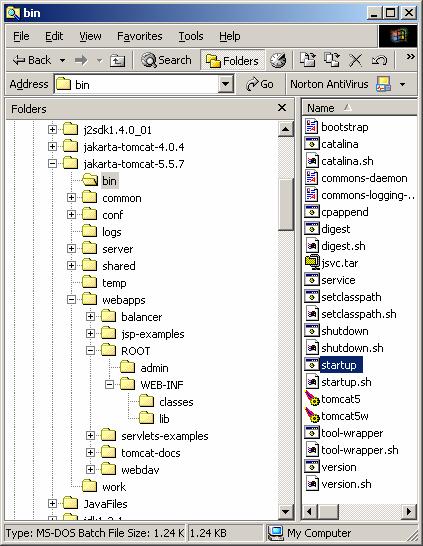
The server can be started and
stopped using the startup and shutdown batch files in Tomcat’s bin
directory. Double click on the startup
file or create a shortcut to the startup file on your desktop and click on
that. Either way starts the server.
Once the server has been
started, you can access the Tomcat web page using any browser. The URL is http://localhost:8080/. (If you changed the port to 80, the URL is
just http://localhost/.) If everything was set up correctly, you will
see the main Tomcat web page with the logo below.

You can browse the page and
look at the examples and notes.
To stop the server, either
click on shutdown.bat or as before create a shortcut
to it and use that. Do not close the
console window that Tomcat brings up. If
you shut down the server correctly, the window will close by itself.
Configuring the IDE, JCreator
If you are using JCreator to
develop Java servlets, it has to be configured so that it can find all the
packages needed. Java servlets must
import javax.servlet and javax.servlet.http. These are contained in the file, servlet.jar. You can download it from http://csis.pace.edu/~wolf/documents/. It should be saved in a subfolder of the Java
folder. The preferred folder is jre/lib/ext, shown in the screen shot below.

The IDE, JCreator, can be
configured by going into Configure/Options/JDK Profiles.
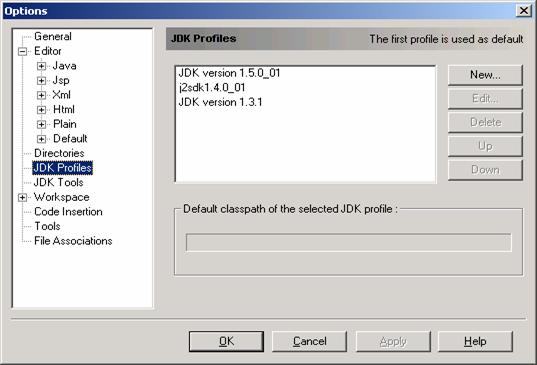
Select the compiler, here JDK version 1.5.0_01,
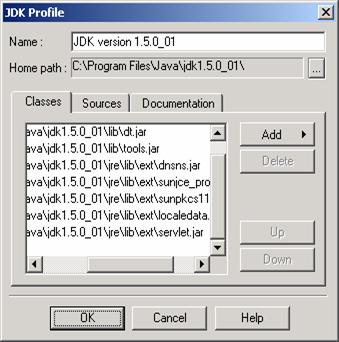
and then Edit. Click on Add/Add Package and
then navigate to the folder where you stored servlet.jar. When you click on servlet.jar, it will be
added to the JCreator classpath. When
done, it should look similar to the screen on the left. Once this is done, you should be able to use
JCreator to develop your web applications.
Location of
Files for Apache Tomcat
Tomcat requires that
different files be placed in specific folders.
HTML files belong in the ROOT directory under the webapps folder. The Web Application Deployment Descriptor,
web.xml, is stored in WEB-INF. And class
files belong in the classes subfolder.
In most cases, you will have to create the classes folder yourself. If you use a package for your files, it will
be a subfolder of the classes folder.
A picture showing all of this
follows. An HTML file, EmailForm.html,
is stored in the ROOT folder. Under
that, web.xml is in the WEB-INF folder.
And below that, EmailServlet.java is in the
classes folder. Since EmailServlet starts with the package statement, package
echo;, the class file is stored there.
Tomcat is set up so that
anything in the ROOT directory is open to clients. But anything under the ROOT is
protected. Only the server can access
files not in the ROOT. This means that
programs that access databases or other data files are not accessible by external
clients.
Web applications can also be
stored independently of the ROOT. They
are still stored in the folder, webapps, but they now have their own
folders. However, the directory
structure remains the same with the HTML files in the applications root folder,
the web.xml file for the application in WEB-INF, and the class files in the
classes folder.
References
1. Marty Hall, Configuring and Using Apache Tomcat,
http://www.coreservlets.com/Apache-Tomcat-Tutorial/.
2. Karl Moss, Java
Servlets Developer’s Guide, McGraw-Hill/Osborne, 2002.