Web Application Programming Using Java
Web applications are used for
a number of different purposes including e-commerce, on-line library access,
clubs and associations, and school classes.
They consist of a collection of programs and web pages written in
Hypertext Markup Language (HTML). The
programs can be in a number of computer languages including Java, Visual Basic,
Perl, PHP, Python, and more.
Hypertext Markup Language
(HTML) was developed by Tim Berners-Lee in 1992[1]
along with his invention of Hypertext Transfer Protocol (HTTP). Together HTML and HTTP created the World Wide
Web. Originally the web was designed to
display hypertext[2]
documents, i.e. documents containing links to other web pages. Consequently HTTP was designed for rapid
‘hops’ from one web page to another.
Because web users were
expected to remain a relatively brief time on any one page, HTTP does not
maintain a connection for more than a quick page request and server
response. It is said to be ‘stateless’. That means that the server does not store
information about recent requests. This
works very well for web surfing, but it is a problem for web applications that have
to track users doing business on a site.[3]
This document will consider
ways to create and manage a web application written using Java servlets and
Java Server Pages (JSP). We will see how
to get a request from the client, process it by either accessing or modifying a
database, and then create a response to send back to the client. Setup information for Java, the Apache Tomcat
server, and the JCreator IDE (Integrated Development Environment) can be found
in an Appendix.
The Client’s Web Page
There are many objects that
can be placed on a web page, but the only one of interest for web programming
is that of a form. A form is used to collect information from
the client and submit it to the server for processing. It contains an action attribute that tells
the server what program to use to process the data and a method attribute that
shows which method in the program should be called. An example of an action attribute is action="http://localhost:8080/servlet/client-server.EmailServlet/".
The form can collect data in
a number of different ways, but the first one we will consider is that of a
text box. A text box provides a box on
the screen that accepts text input.
Whatever the user types into the box can then be submitted to the server
by clicking a button.
An example of an HTML page
containing a single form is shown below.
<!DOCTYPE HTML PUBLIC
"-//W3C//DTD HTML 4.0 Transitional//EN">
<html>
<head><title>E-Mail
Form</title></head>
<body>
<h3>Enter your name and e-mail address.
<br />Then click the Send
button to send the data to the server.</h3>
<form method = "get"
action="http://localhost:8080/servlet/echo.EmailServlet">
<p><input type = "text" name =
"name" value = "" size = 30 /> Name </p>
<p><input type = "text" name =
"email" value = "" size = 30 /> E-Mail Address
</p>
<p><input type= "submit"
value="Send" /></p>
</form>
</body> </html>
The first line, <!DOCTYPE
HTML PUBLIC "-//W3C//DTD HTML 4.0 Transitional//EN">, is a
declaration[4] that
should begin web pages. There are three
types of declarations, Transitional, Strict, and Frameset. Strict pages must use Cascading Style Sheets[5]
(CSS) for all layout information.
Transitional pages may still have some tags with styles, such as
<body bgcolor="blue">. The Frameset declaration is for all pages
that contain a frameset.
The form contains a method
attribute, method = "get", and an action attribute,
action="http://localhost:8080/servlet/echo.EmailServlet"
The method attribute tells
the server what method to run in the Java servlet given by the action
attribute. The method, get, means that the server is to run the
doGet method in the servlet. The action attribute tells the server where
to find the servlet that will do the processing.
The example action attribute
says that the servlet is located on the localhost[6]. It is to be accessed using port 8080. The name, servlet, in the path tells the server
to look in its webapps/ROOT directory.
All servlet classes are stored in the classes folder under that folder,
but in addition, this servlet is in a package called echo. Finally the name of
the servlet is EmailServlet.
The form also contains two text
boxes, one called name and the other
called email. They are initially empty and have space for
30 characters. The names used for the
text boxes must agree exactly with the parameters used in the servlet. Case differences between the form and servlet
are a common cause of error. Finally the
form has a button with the caption Send. It is used to submit the data in the form to
the server.
When the user clicks the
submit button, the browser creates a URL string that looks like the following:
http://localhost:8080/servlet/echo.EmailServlet?name=Alice+Lee&email=alee@aol.com
The section that precedes the
question mark (?) is taken directly from the action attribute. The rest of the string consists of the data
typed in by the user. In this case, the
user typed “Alice Lee” into the box for the name and “alee@aol.com” into the
box for the email address. (Spaces are
replaced by the ‘+’ sign in the string.)
The Servlet
When the form is sent to the
server, the servlet named in the URL string is executed. It can request
the data from the client and then formulate and send a response. A servlet is a
subclass of the abstract class, HttpServlet. [7] HttpServlet is contained in the Java packages
javax.servlet and javax.servlet.http. These both must be imported into the
program. They can be found in an archive
called servlet.jar.[8]
HttpServlet has several
methods that can be over-ridden. The two
most important ones are doGet and doPost.
They both have the same parameters, HttpServletRequest
and HttpServletResponse. The first of these is used to get the request
from the client’s form. The second is
used to return a response to the client.
The methods, doGet and doPost, throw an IOException
and a ServletException. These exceptions must either by caught or
re-thrown.
The servlet has to create a
response page to send back to the client.
This is done using a PrintWriter object. Some of the HTML required is standard and is
used in every web page. These lines have
been separated out into two methods, createHeader and
createFooter.
They can either be added to any servlet or put into a separate
class. An example of a servlet to echo
back the email data is shown below.
package echo;
/* EmailServlet
processes a request from a web page. It
responds to the request by echoing back the name and email address that was
sent in. */
import java.io.*;
import javax.servlet.*;
import javax.servlet.http.*;
public class EmailServlet extends HttpServlet
{
protected void doGet (HttpServletRequest
request, HttpServletResponse response)
{
try
{
// Set the content type for the output and then
get a PrintWriter object.
response.setContentType
("text/html");
PrintWriter out = response.getWriter ();
// Get the form data from the request.
String name = request.getParameter
("name");
String email = request.getParameter
("email");
// Write
the output header, the output data, and the footer.
createHeader (out,
"Test Data");
out.println
("<h3>Hello.</h3>");
out.println
("<h3>" + name+ "</h3>");
out.println
("<h3>Your email address is " + email +
"</h3>");
createFooter (out);
}catch (IOException e) {System.out.println ("Servlet Exception");}
} // doGet
// createHeader adds standard HTML
lines to the beginning of the output page.
protected void createHeader (PrintWriter out, String title)
{
out.println
("<!DOCTYPE HTML PUBLIC '-//W3C//DTD HTML 4.0
Transitional//EN'>");
out.println
("<html>");
out.println
("<head>");
out.println
("<title>" + title + "</title>");
out.println
("</head>");
out.println
("<body>");
} // createHeader
// createFooter adds standard HTML
lines to the end of the output page.
protected void createFooter (PrintWriter out){out.println
("</body></html>");}
} // EmailServlet
The Web Application Deployment
Descriptor
The Web Application
Deployment Descriptor, web.xml, is an XML[9]
document that tells the server where to find the servlets mentioned in the
action attributes in HTML forms. Various
versions of web.xml come with Apache Tomcat.
They are already stored in the directory, ROOT/WEB-INF. However, the simplest one that works is the
following:
<?xml version="1.0"
encoding="ISO-8859-1"?>
<web-app>
<servlet>
<servlet-name>EmailServlet</servlet-name>
<servlet-class>echo.EmailServlet</servlet-class>
</servlet>
<servlet-mapping>
<servlet-name>EmailServlet</servlet-name>
<url-pattern>/servlet/echo.EmailServlet</url-pattern>
</servlet-mapping>
</web-app>
The <servlet> tag gives
the name of the servlet and its class file.
The <servlet-mapping> tag provides a short pattern that can be used to find the class file. For example, instead of
< url-pattern>/servlet/echo.EmailServlet</url-pattern>
we could have
< url-pattern>/servlet/email</url-pattern>.
We would also have to change
the action attribute in the form to
action="http://localhost:8080/servlet/email"
The Web Application
Deployment Descriptor will be discussed in more detail later.
The three files are stored in
separate locations in the Tomcat directory structure.[10] The HTML file should be placed in the ROOT
directory, the web.xml file in the WEB-INF folder, and the servlet in the
classes folder. Once the servlet has
been compiled, its class file will be deployed into a subfolder called echo.
At this point you can start
the server and run the application. The
server is started using startup.bat found in the bin
folder. The HTML form is accessed using
a web browser such as Internet Explorer or Firefox. Type http://localhost:8080/EmailForm.html
into the browser window. When the form
is displayed, fill it out and click the Send button. You should see the following response from
the server.

Finding an Email Address in a
Database
Echoing the input is not very
interesting. A more useful application
gets the email address from a database given the name. An Access database that stores names, email
addresses, and telephone numbers is shown below.[11]
To connect to the database,
we have to get a jdbc-odbc driver. This is done using the Java code
Class.forName ("sun.jdbc.odbc.JdbcOdbcDriver");
Connection con = DriverManager.getConnection
("jdbc:odbc:addresses");
Then the program creates a
SQL (Structured Query Language) statement, queries the database, and gets a
ResultSet. If the ResultSet is not
empty, it will contain the address. In
order to use SQL, we have to import java.sql into the program. There are also several exceptions that must
be caught or re-thrown.
A web application involves three
parts, the HTML file, the Java servlet, and the deployment descriptor. Examples for finding an email address given a
name follow. The HTML file,
FindEmail.html, comes first.
<!DOCTYPE HTML PUBLIC
"-//W3C//DTD HTML 4.0 Transitional//EN">
<html>
<head><title>E-Mail
Form</title></head>
<body>
<h3>Enter a name to find an email address.</h3>
<form method = "get"
action="http://localhost:8080/servlet/find">
<p><input type = "text" name =
"name" value = "" size = 30 /> Name </p>
<p><input type= "submit"
value="Send" /></p>
</form>
</body> </html>
Next we have the Java
servlet, FindEmail.java. It uses a class called Page. This class contains the methods createHeader and createFooter
used before. It can either be stored in
the same file as the servlet or in a separate file. If it is stored separately, it should be made
public.
package address_book;
/* EmailServlet
processes a request from a web page. It
responds to the request by echoing back the name and email address that was
sent in. */
import java.io.*;
import javax.servlet.*;
import javax.servlet.http.*;
import java.sql.*;
public class FindEmail extends HttpServlet
{
protected void doGet (HttpServletRequest
request, HttpServletResponse response)
{
try
{
// Get a jdbc-odbc
bridge and connect to addresses.mdb.
Class.forName ("sun.jdbc.odbc.JdbcOdbcDriver");
Connection con = DriverManager.getConnection
("jdbc:odbc:addresses");
// Set the content type, get a PrintWriter object, and write the header.
response.setContentType
("text/html");
PrintWriter out = response.getWriter ();
Page.createHeader
(out, "Address Book");
// Get the name parameter from the HTML form.
String name = request.getParameter
("name");
/* Create a statement and execute the query. Since the parameter, name, is a string, it
must
be enclosed in quotation marks. */
Statement stmt = con.createStatement
();
String query = "Select * From AddressTable Where Name = '" + name + "'";
// Execute the query and return a ResultSet.
ResultSet rs = stmt.executeQuery (query);
// If the ResultSet is not empty, get the email
address and write it to the output page.
if (rs.next ())
{
String email = rs.getString
("Email");
out.println
("<h3>The email address for " + name + " is " + email
+ "</h3>");
}
else out.println
("<h3>The name was not found in the database.</h3>");
Page.createFooter
(out);
} catch (ClassNotFoundException
e){System.out.println ("Class Not Found
Exception.\n");}
catch (SQLException e){System.out.println
("SQL Exception");}
catch (IOException e) {System.out.println
("IO Exception");}
} // doGet
} // FindEmail
// The Page class contains
standard lines needed for the HTML output page.
class Page
{
public static void createHeader (PrintWriter out, String title)
{
out.println
("<!DOCTYPE HTML PUBLIC '-//W3C//DTD HTML 4.0
Transitional//EN'>");
out.println
("<html>");
out.println
("<head>");
out.println
("<title>" + title + "</title>");
out.println
("</head>");
out.println
("<body>");
} // createHeader
public static void createFooter (PrintWriter out){out.println
("</body></html>");}
} // class Page
Lastly, we have to add the
new servlet into web.xml. In the HTML
form, the action attribute was
action="http://localhost:8080/servlet/find"
This means that the url pattern to use is /servlet/find. The new lines to be added to web.xml are
shown below.
<servlet>
<servlet-name>FindEmail</servlet-name>
<servlet-class>address_book.FindEmail</servlet-class>
</servlet>
<servlet-mapping>
<servlet-name>FindEmail</servlet-name>
<url-pattern>/servlet/find</url-pattern>
</servlet-mapping>
Creating
a Self-Contained Web Application
Web applications are not
usually stored in the ROOT directory of Tomcat.
Instead, they are contained in a separate subfolder of webapps. A simple example would be for the preceding
address book application. It can be
stored in a folder called addresses with subfolders WEB-INF and classes.
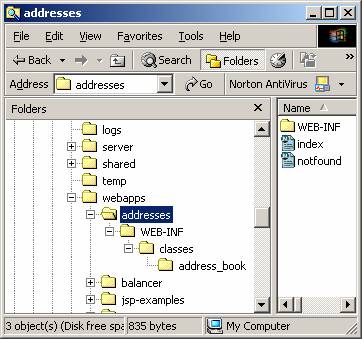
This application has a
welcome page called index.html. If http://localhost:8080/addresses/ is
typed into the browser, the deployment descriptor will send it to
index.html. It also has an error page
called notfound.html. It will come up
when the server returns a 404 code. This
code means that the requested page was not found.
The index page can contain
several forms. The action attributes in
them now look like
action="../addresses/display" and
action="../addresses/ find"
This tells the server to
start at webapps/addresses. Then it is
to use web.xml to find the servlets for find and display. The index file follows.
<!DOCTYPE HTML PUBLIC
"-//W3C//DTD HTML 4.0 Transitional//EN">
<html>
<head><title>E-Mail
Form</title></head>
<body>
<h3>Click on the Send button to see all the
address.</h3>
<form method = "get"
action="../addresses/display">
<p><input type= "submit"
value="Send" /></p>
</form>
<h3>Enter a name to find an email address.</h3>
<form method = "get"
action="../addresses/find">
<p><input type = "text" name =
"name" value = "" size = 30 /> Name </p>
<p><input type= "submit"
value="Send" /></p>
</form>
</body> </html>
As you can see, we have
dropped most of the URL in the action attribute and have just left the most
important information. Now we have "../addresses/find",
which gives a location relative to the location of the index page rather than a
full URL.
There are a number of useful
things that can be put into the deployment descriptor. Many are optional, as you saw from the stripped
down version above. We can start with a
display name to be used by management tools.
<display-name>Address Book
Application</display-name>
Next can come a description
of the application.
<description>
An application that manages and address book.
</description>
Context parameters are
sometimes useful. The example here just
provides author information.
<context-param>
<param-name>Author</param-name>
<param-value>Carol
Wolf</param-value>
<description>
</context-param>
We have already seen how to
include tags showing the servlet names and mappings.
<servlet>
<servlet-name>DisplayAddresses</servlet-name>
<servlet-class>address_book.DisplayAddresses</servlet-class>
</servlet>
<servlet-mapping>
<servlet-name>DisplayAddresses</servlet-name>
<url-pattern>/display</url-pattern>
</servlet-mapping>
An important feature is the
welcome file list. This can show just
one welcome page or several. If there is
more than one, the server tries to open them in order. So if the first is not available, it tries
the second, and so on.
<welcome-file-list>
<welcome-file>index.html</welcome-file>
</welcome-file-list>
Another useful feature is a
list of error pages. The only one shown
here is the one for code 404, file not found.
<error-page>
<error-code>404</error-code>
<location>/notfound.html</location>
</error-page>
XML files must be well-formed.[12] That is they must adhere to all XML
rules. They can also be valid.
This means that the document follows the description in either a
Document Type Definition (DTD) or a Schema.
Earlier versions of Tomcat used DTDs, but version 5.5.7 uses
Schema. The example of web.xml below uses
the declaration for Tomcat’s Schema. In
a future section we will see how to use the deployment descriptor for restricting
access to some servlets.
<?xml
version="1.0" encoding="ISO-8859-1"?>
<web-app
xmlns="http://java.sun.com/xml/ns/j2ee"
xmlns:xsi="http://www.w3.org/2001/XMLSchema-instance"
xsi:schemaLocation=
"http://java.sun.com/xml/ns/j2ee http://java.sun.com/xml/ns/j2ee/web-app_2_4.xsd"
version="2.4">
<!-- application display name -->
<display-name>Address Book
Application</display-name>
<!-- application description -->
<description>
An application that manages and address book.
</description>
<!-- context parameters -->
<context-param>
<param-name>Author</param-name>
<param-value>Carol
Wolf</param-value>
<description>
</context-param>
<!-- servlet mappings start -->
<servlet>
<servlet-name>DisplayAddresses</servlet-name>
<servlet-class>address_book.DisplayAddresses</servlet-class>
</servlet>
<servlet-mapping>
<servlet-name>DisplayAddresses</servlet-name>
<url-pattern>/display</url-pattern>
</servlet-mapping>
<servlet>
<servlet-name>FindEmail</servlet-name>
<servlet-class>address_book.FindEmail</servlet-class>
</servlet>
<servlet-mapping>
<servlet-name>FindEmail</servlet-name>
<url-pattern>/find</url-pattern>
</servlet-mapping>
<!-- servlet mappings end -->
<!-- welcome file list -->
<welcome-file-list>
<welcome-file>index.html</welcome-file>
</welcome-file-list>
<!-- error page list -->
<error-page>
<error-code>404</error-code>
<location>/notfound.html</location>
</error-page>
</web-app>
Java Server Pages and
Java Beans
Java server pages (JSP) and
Java beans[13] work
together to create a web application.
Java server pages are html pages that also contain regular Java
code. This code is included between
special tags that begin with ‘<%’.
Java beans are Java programs that follow some specific rules. Together they make up part of a web
application.
There are advantages and
disadvantages to using Java server pages and beans. The main advantage is that the JSP contains
the HTML code and not the bean. This
keeps the Java bean ‘clean’. The
disadvantage is that there are a number of conventions for Java server pages
that must be followed.
Java server pages are a
combination of HTML and Java code. They
have to be translated into a Java servlet, which is then compiled, before they
can be accessed. This is done the first
time that a page is requested. After
that, the compiled code resides on the server and can be used as is by any
succeeding requests. On a stand-alone
system, you can find both the servlet and the class file in the folder work/Catalina/localhost/_. Later we will see how to include these within
the application folder itself.
Java Server Pages
In a JSP file the Java code
is contained between tags that begin with <% and end with %>. These tags are also used in active server
pages (asp). There are several different
kinds of JSP tags depending upon their use.
- <%= …
%> is used for expressions.
- <%! … %>
is used for declarations.
- <% … %>
is used for straight Java code.
- <%@ … %> is used to include another file
such as an HTML file or a package such as java.sql.*.
There are some reserved words
that are used by JSP files without further definition. These should be familiar from similar terms
used with Java servlets.
- request – an instance of HttpServletRequest.
- response – an instance of HttpServletResponse.
- out – a PrintWriter
object for the response.
- session – the HttpSession
object associated with the session.
- application – an instance of ServletContext
Java Beans
Java beans are regular Java
programs with several specific restrictions.
The constructor may not have any parameters, and the variables all have
get and set accessor and mutator methods.
The Java server page uses the accessor and mutator methods of the bean
to send values to the bean and to get resulting data back from the bean.
In a Java bean, you can
instantiate other classes, access databases, create lists, tables, and anything
else you might want to do. You can also
have methods that receive request data from the JSP file. They have the usual request parameter as in
the following example:
public void processRequest (HttpServletRequest request) { … }
Java server pages are usually in the root folder, while class files go in the same classes folder as the servlet classes.
Simple Hello Example
The first example uses a JSP
file called hello.jsp, an HTML file called
hello.html, and a Java bean called HelloBean.java. The HTML file has a form that sends request
data to the JSP file. The JSP file in
turn sends the data on to the bean. The
bean uses its mutator methods (sets) to receive the data. The bean then stores the data in its instance
variables and returns the data to the JSP file using its accessor methods
(gets).
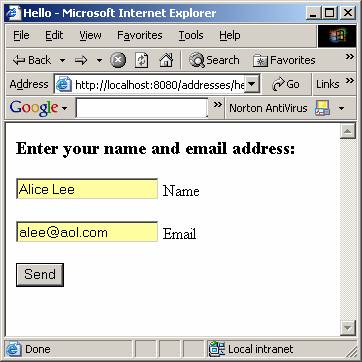
The following shows the HTML
file and the way it is displayed in a browser.
<!DOCTYPE HTML PUBLIC
"-//W3C//DTD HTML 4.0 Transitional//EN">
<html>
<head><title>Hello</title></head>
<body>
<h3>Enter your name and
email address: </h3>
<form
method="get" action="hello.jsp">
<p><input type="text" name="name"
value="" size="20"/> Name </p>
<p><input type="text"
name="email" value="" size="20"/> Email
</p>
<p><input type="submit"
name="Send" value="Send"/> </p>
</form>
</body></html>
The JSP file comes next. It could be made simpler, but as it is, it
demonstrates some JSP tags. The first
one is used for a declaration, here for two strings, name and email. This is followed by the line that tells the
server where to find the bean. This is
done with tags that follow XML syntax.
They are case sensitive and must have closing tags or a closing
‘/’.
<jsp:useBean id="hello"
scope="session" class="greetings.HelloBean"
/>
This says that the bean is
called HelloBean and it is in the package,
greetings. The id is used throughout the
JSP file to name this particular bean.
The request data from the
HTML file uses standard servlet code (JSP files are translated into servlets).
<jsp:setProperty
name="hello" property="name" value='<%= request.getParameter ("name") %>'/>
<jsp:setProperty name="hello"
property="email" value='<%= request.getParameter
("email") %>'/>
The name, hello, refers to
the bean. These say to set the bean properties,
name and email. The property names must
be the same as those in the bean, and the parameter names must agree exactly
with those in the HTML file.
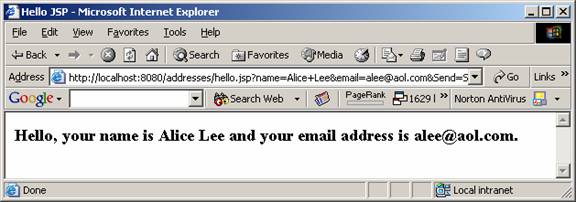
The rest of the JSP file just
echoes the data back to the browser. It
supplies the HTML code for the output page.
<!DOCTYPE HTML PUBLIC
"-//W3C//DTD HTML 4.0 Transitional//EN">
<html>
<head><title>Hello JSP</title></head>
<body>
<%! String name, email;
%>
<jsp:useBean
id="hello" scope="session" class="greetings.HelloBean"
/>
<jsp:setProperty
name="hello" property="name" value='<%= request.getParameter ("name") %>'/>
<jsp:setProperty
name="hello" property="email" value='<%= request.getParameter ("email") %>'/>
<%
name = hello.getName();
email = hello.getEmail();
out.println ("<h3>Hello,
your name is " + name);
out.println (" and your email
address is " + email + ".</h3>");
%>
</body></html>
The result looks like the
following in the browser.
Finally the bean for this
example is very simple. It just stores
the data using its mutator methods and returns it using the accessor methods. It does not have a constructor or any methods
other than the gets and sets. A more
realistic example would do something with the data before returning it.
public class HelloBean
{
private String name = "";
private String email = "";
public String getName() {return
name;}
public String getEmail() {return
email;}
public void setName (String n) {name
= n;}
public void setEmail (String e)
{email = e;}
} // HelloBean
Naming for the variables and
get and set methods is determined by rules for JSP and cannot be changed. The variables must all begin with lower case
letters. In the accessor and mutator
methods, the get/set must be followed by an upper case letter, as in the
example. If the variable contains upper
case letters further on, they are to be included as is. For example, if the variable was called eMail, the accessor method for it would be getEMail (). Similarly
if a variable is called firstName, the accessor method
would be getFirstName (). Not following this convention is a common
source of error.
Example for Finding an Address
A somewhat more realistic
example uses the name in the form to find the address in a database. The form is now even simpler, since it only
contains the name.
<!DOCTYPE HTML PUBLIC
"-//W3C//DTD HTML 4.0 Transitional//EN">
<html>
<head><title>Find
Address</title></head>
<body>
<h3>Enter the name :
</h3>
<form
method="get" action="find.jsp">
<input type="text" name="name"
value="" size="20" /> Name
<p><input type="submit"
name="action" value="Send" /> </p>
</form>
</body></html>
The JSP file, on the other
hand, is more complicated. The line
<jsp:useBean id="findBean" scope="session" class="address_book.FindBean" />
is similar to the one for the
hello example. However, the line
<jsp:setProperty name="findBean" property="*" />
is not. It provides a shorthand method for storing
data in the bean’s instance variables.
By using property="*", all the data in the HTML form is sent
directly to the bean. If you use this,
be very careful that the parameters in the HTML form are exactly the same as
the instance variables in the bean. Case
here is important. If you have
name="Name" in the form, but String name; in the bean, the parameter
will not be stored in the bean properly.[14]
The if-else statement is also a problem. The Java code must be carefully separated
from the HTML code. Getting all the tags
in the right place is tricky. All Java
code blocks must be included in curly braces ({}) whether or not his is
required by Java. Look carefully at the
example below to see how they should be arranged.
<!DOCTYPE HTML PUBLIC
"-//W3C//DTD HTML 4.0 Transitional//EN">
<html>
<head><title>
Find Address JSP</title></head>
<body>
<jsp:useBean
id="findBean" scope="session"
class="address_book.FindBean" />
<jsp:setProperty
name="findBean" property="*"
/>
<% findBean.processRequest();
%>
<% if (findBean.getFound
()) {%>
<h4>The requested address:
<br/><% out.println (findBean.getName());
%>
<br/><% out.println (findBean.getEmail());
%>
<br/><% out.println (findBean.getTelephone());
%>
</h4>
<%} else { %>
<h4>The name was not in the database.</h4>
<% } %>
</body></html>
If the name is in the
database, the output of the JSP file looks like that below.

Next is the code for the
bean, FindBean.java.
It contains a method called processRequest ()
that connects to the database and finds the address. This part is the same as with the similar
servlet.
package address_book;
import java.sql.*;
// FindBean
is a Java bean that is used to locate an address in a database.
public class FindBean
{
private String name, email, telephone;
private boolean found;
// The accessor methods.
public String getName() {return
name;}
public String getEmail () {return
email;}
public String getTelephone ()
{return telephone;}
public boolean getFound () {return
found;}
// The only mutator method needed.
public void setName (String n) {name
= n;}
/*
processRequest connects to the database, gets a
ResultSet, and stores the data in the instance variables. */
public void processRequest ()
{
try
{
// Get a jdbc-odbc
bridge and connect to addresses.mdb.
Class.forName ("sun.jdbc.odbc.JdbcOdbcDriver");
Connection con = DriverManager.getConnection
("jdbc:odbc:addresses");
// Create a query and get a ResultSet.
Statement stmt = con.createStatement
();
String query = "Select * From AddressTable Where Name = '" + name + "'";
ResultSet rs = stmt.executeQuery (query);
// If the name is in the database, store the
address in the instance variables.
if (rs.next ())
{
name = rs.getString
("Name");
email = rs.getString
("Email");
telephone = rs.getString
("Telephone");
found = true;
}
// If the address was not found, set the value
of the variable found to false.
else found = false;
} catch (ClassNotFoundException
e){System.out.println ("Class Not Found Exception.\n");}
catch (SQLException e){System.out.println
("SQL Exception");}
} // processRequest
} // FindBean
The servlet derived from the
JSP file, find.jsp, and its compiled version, are
stored in work/Catalina/localhost/org/apache/jsp. They are find_jsp.java
and find_jsp.class.
We can include them in the application by copying the org/apache/jsp folder to the classes folder.
The files in this folder are
either servlets or class files. They can
now be included in the web application deployment descriptor, web.xml. The lines to add are:
<!-- Define the jsp servlets.
-->
<servlet>
<servlet-name>org.apache.jsp.find_jsp</servlet-name>
<servlet-class>org.apache.jsp.find_jsp</servlet-class>
</servlet>
and
<!-- Define the jsp mappings.
-->
<servlet-mapping>
<servlet-name>org.apache.jsp.find_jsp</servlet-name>
<url-pattern>/find/*</url-pattern>
</servlet-mapping>
The mapping definition, <url-pattern>/find/*</url-pattern>,
can now be used in the index page in the usual way. The following form asks for a name and sends
the data to the server. The servlet, find_jsp, then executes and returns a response to the
browser.
<h3>Enter a name to find an email address.</h3>
<form method = "get"
action="../addresses/find">
<p><input type = "text" name =
"name" value = "" size = 30 /> Name </p>
<p><input type= "submit"
value="Send" /></p>
</form>
Grocery Store Database
A different example is that
of a grocery store. To begin with, the
store stocks only a few kinds of fruit.
A table is shown below.
 The table is called fruit, and it has four fields, id, name, quantity,
and price. Id and name are both strings,
quantity is an integer, and price is a double.
The table is called fruit, and it has four fields, id, name, quantity,
and price. Id and name are both strings,
quantity is an integer, and price is a double.
It is stored in a database called
grocery. There can also be tables for
vegetables, dairy, customers, and employees.
We will see some of these other tables later.
We can make changes in the
database using a SQL update statement.
If we want to change both the quantity and the price for some fruit, we
can use the following SQL statement.
String update = "Update fruit Set quantity = " +
quantity
+ ", price = " + price + " Where id =
'" + id + "'";
The variables, quantity and
price, are numeric, so they are not surrounded by quotation marks. However, id is a string, so it has to have
the single quotes inside of the double quotes.
The general form[15]
of the update statement is
"Update table Set Field1 = parameter1, Field2 = parameter2
Where Key = key"
An HTML file that can be used
to get the data follows. A more complete
form would ask the client to confirm the new data.
<!DOCTYPE HTML PUBLIC
"-//W3C//DTD HTML 4.0 Transitional//EN">
<html>
<head><title>Grocery
Store</title></head>
<body>
<h3>Change Quantity and
Price</h3>
<form method = "get" action="change.jsp">
<br/><input
name="id" type="text" value = "" size =
"10" /> Product ID
<br/><input
name="quantity" type="text" value=""
size="10" /> New Quantity
<br/><input
name="price" type="text" value = "" size =
"10" /> New Price
<p><input type="submit"
value="Change Quantity and Price" /></p>
</form>
</body></html>
The JSP file is a lot like
the one for finding an address.
<!DOCTYPE HTML PUBLIC
"-//W3C//DTD HTML 4.0 Transitional//EN">
<html>
<head><title> Change Quantity and Price JSP.
</title></head>
<body>
<jsp:useBean
id="changeBean" scope="session"
class="grocery.ChangeBean" />
<jsp:setProperty
name="changeBean" property="*"
/>
<% changeBean.processRequest();
%>
<% if (changeBean.getSuccess
() > 0)
{ %>
<h4>The changed values are:
<p>Id: <% out.print
(changeBean.getId()); %>
<br/>Name: <% out.print (changeBean.getName());
%>
<br/>Quantity: <% out.print (changeBean.getQuantity());
%>
<br/>Price: <% out.println (changeBean.getPrice());
%></p></h4>
<% } else { %>
<h4>The Id was not in the database.</h4>
<% } %>
</body></html>
The Java bean first connects
to the database and then updates the data.
If the update is successful, the method, executeUpdate,
will return a value greater than 0. If
the update fails, the value will be 0.
package grocery;
import java.sql.*;
import java.io.*;
// ChangeBean finds a specific product
and changes the quantity and price.
public class ChangeBean
{
private String id, name;
private int quantity, success;
private double price;
// The accessor methods.
public String getId() {return id;}
public String getName() {return
name;}
public int getQuantity()
{return quantity;}
public double getPrice() {return
price;}
public int getSuccess
() {return success;}
// The mutator methods.
public void setId (String i) {id = i;}
public void setQuantity (int q) {quantity = q;}
public void setPrice (double p)
{price = p;}
// processRequest connects to the
database and them executes the update.
public void processRequest ()
{
try
{
// Get a jdbc-odbc
bridge and connect to the grocery database.
Class.forName ("sun.jdbc.odbc.JdbcOdbcDriver");
Connection con = DriverManager.getConnection
("jdbc:odbc:grocery");
// Create an update statement. If the update succeeds, the value of success
will be positive.
Statement stmt = con.createStatement
();
String update = "Update fruit Set quantity
= " + quantity
+ ", price = " + price +
" Where id = '" + id + "'";
success = stmt.executeUpdate
(update);
/* If the update is successful, get the data
from the database and store it in the instance variables. */
if (success > 0)
{
stmt = con.createStatement
();
String query = "Select * From fruit
Where ID = '" + id + "'";
ResultSet rs =
stmt.executeQuery (query);
rs.next ();
id = rs.getString
("id");
name = rs.getString
("name");
quantity = rs.getInt
("quantity");
price = rs.getDouble
("price");
}
stmt.close ();
} catch (ClassNotFoundException
e){System.out.println ("Class Not Found
exception.");}
catch (SQLException e){System.out.println
("SQL Exception");}
}
} // class ChangeBean
Adding Security to an Application
Some applications are just
used by their developers, but others are made available to a number of
clients. These people may either be in
the same company or somewhere on the Internet.
For these applications, it is often useful to have levels of access or
at least a login involving a username and password.
There are several ways to
handle this. The best method is to
develop a custom login and use encryption, such as Secure Socket Layer
(SSL). Here usernames and passwords are
kept in a secure database with encryption.
And they are sent over a secure network.
This level of security is necessary for financial sites such as banks
and brokerage houses.
Other sites require security
only when final ordering information, including credit card numbers, is
gathered. Up until that point, shoppers
or other visitors are free to investigate the site. Some also have registration and login
requirements for visitors. These are
also usually custom designed.
But a web application can
also have levels of security so that, for example, managers could have greater
access to web pages than clerks. This
can be built into the application using web.xml, the web application deployment
descriptor. The Tomcat server can have roles assigned to different users so
that a manager’s role would have greater access than a clerk’s role.[16]
tomcat-users.xml
The file, tomcat-users.xml, is contained in the conf folder of Apache Tomcat.
It allows the manager of the server to set up roles for clients.
<?xml version='1.0'
encoding='utf-8'?>
<tomcat-users>
<user
username="tomcat" password="tomcat"
roles="tomcat"/>
<user
username="role1" password="tomcat"
roles="role1"/>
<user
username="both" password="tomcat"
roles="tomcat,role1"/>
</tomcat-users>
This file can be edited to
create other roles besides the examples provided. For example, there can be a store_manager role and a store_clerk
role.
<?xml version='1.0'
encoding='utf-8'?>
<tomcat-users>
<user
username="tomcat" password="tomcat"
roles="tomcat"/>
<user
username="role1" password="tomcat"
roles="role1"/>
<user
username="both" password="tomcat" roles="tomcat,role1"/>
<user username="Alice Lee" password="alee"
roles="store_manager"/>
<user
username="Diana Chen" password="dchen"
roles="store_clerk"/>
</tomcat-users>
This gives Alice Lee the role
of store manager with the password "alee" and Diana Chen the role of
store clerk with the password "dchen". Special code in servlets can make a
distinction between the two and, for example, give permission to the manager to
make changes to the database but not to the clerk.
Including JSP files in web.xml
Using the web application
deployment descriptor and security constraints with Tomcat 5.5 is somewhat
complicated. It is best done with Java
server pages and not servlets. JSP files
are compiled into servlets when they are first executed, and the resulting
servlet classes can be placed into the deployment descriptor. Note that Java beans and Java server pages by
themselves do not belong in web.xml, since they are not servlets.
As described for the address
example above, after the JSP file has been translated into a servlet and
compiled, the code can be copied to the classes folder. Once that is done, the deployment descriptor
can be modified to include definitions and mappings for these servlets. They cannot be included, however, until they
are finished, compiled, and tested. In
the example above that changes the price and quantity of a product, files will
be org.apache.jsp.change_jsp.java and org.apache.jsp.change_jsp.class. So the lines to add in web.xml are
<servlet>
<servlet-name>org.apache.jsp.change_jsp</servlet-name>
<servlet-class>org.apache.jsp.change_jsp</servlet-class>
</servlet>
and
<servlet-mapping>
<servlet-name>org.apache.jsp.change_jsp</servlet-name>
<url-pattern>/change/*</url-pattern>
</servlet-mapping>
The login.jsp
and error.jsp files
In the jsp
examples folder included with Tomcat 5.5, there are three files in the
subfolder security/protected. They are error.jsp, index.jsp, and login.jsp. We need
the first and the last. The error file
is used to direct the user back to the login page when an incorrect username
and password have been entered. The
index file is just an example, but the login file is very useful.
There are two kinds of login
configurations, FORM and BASIC. The
file, login.jsp, uses FORM authentication. That means that the application provides a
login form. This is the most useful,
since with this the form can be designed by the developer. If you use BASIC authentication, Tomcat
provides a form for you.
The names used in FORM
authentication are defined by the server.
The action value must be j_security_check, the
username, j_username, and the password, j_password. A
slightly modified version of the form in the Tomcat examples is:
<!DOCTYPE HTML PUBLIC
"-//W3C//DTD HTML 4.0 Transitional//EN">
<link rel='stylesheet'
type='text/css' href='grocerystyles.css'
/>[17]
<html>
<head><title>Login
Page for Grocery Store</title></head>
<body>
<form method="post" action='<%= response.encodeURL("j_security_check")
%>' >
<p>Username <input type="text" name="j_username">
<br/>Password <input
type="password" name="j_password"></p>
<p><input
type="submit" value="Log In">
<input
type="reset"></p>
</form>
</body></html>
Note that the method is post
and the action statement encodes the session ID in the URL for the response. The
resulting login form is shown below, after Alice Lee has entered her username
and password, but before she has clicked on the Submit button.
The code for the error page
also uses URL encoding. All it does is
redirect the user back to the login page.
<!DOCTYPE HTML PUBLIC
"-//W3C//DTD HTML 4.0 Transitional//EN">
<link rel='stylesheet'
type='text/css' href='grocerystyles.css'
/>
<html>
<head><title>Error Page For
Examples</title></head>
<body>
<h3>Invalid username and/or password, please try
<a href='<%= response.encodeURL("login.jsp")
%>'> again</a>.</h3>
</body>
</html>
Once these pages have been
executed and tested, the compiled code can be copied to org.apache.jsp
and the following lines added to web.xml:
<servlet>
<servlet-name>org.apache.jsp.login_jsp</servlet-name>
<servlet-class>org.apache.jsp.login_jsp</servlet-class>
</servlet>
<servlet>
<servlet-name>org.apache.jsp.error_jsp</servlet-name>
<servlet-class>org.apache.jsp.error_jsp</servlet-class>
</servlet>
and
<servlet-mapping>
<servlet-name>org.apache.jsp.login_jsp</servlet-name>
<url-pattern>/login.jsp</url-pattern>
</servlet-mapping>
<servlet-mapping>
<servlet-name>org.apache.jsp.error_jsp</servlet-name>
<url-pattern>/error.jsp</url-pattern>
</servlet-mapping>
After this, the actual JSP
files can be removed from the main application folder and stored elsewhere.
The security constraints in
web.xml
Lines can be added directly
to web.xml that define the privileges of tomcat users. The additions to tomcat-users.xml
in the conf folder give a store manager role to Alice Lee and a store clerk
role to Diana Chen. These follow.
<!-- Define the security
constraints for this application -->
<security-constraint>
<web-resource-collection>
<web-resource-name>Grocery Manager
Application</web-resource-name>
<description>Protects change.jsp</description>
<url-pattern>/change/*</url-pattern>
</web-resource-collection>
<auth-constraint>
<role-name>store_manager</role-name>
<role-name>store_clerk</role-name>
</auth-constraint>
</security-constraint>
<!-- Define the security roles
for this application -->
<security-role>
<role-name>store_manager</role-name>
</security-role>
<security-role>
<role-name>store_clerk</role-name>
</security-role>
<!-- Define the login
configuration for this application -->
<login-config>
<auth-method>FORM</auth-method>
<realm-name>Grocery Manager
Application</realm-name>
<form-login-config>
<form-login-page>/login.jsp</form-login-page>
<form-error-page>/error.jsp</form-error-page>
</form-login-config>
</login-config>
As mentioned before, Tomcat
will provide its own form if web.xml contains the following:
<login-config>
<auth-method>BASIC</auth-method>
<realm-name> Grocery Manager Application </realm-name>
</login-config>
Using this gives you less
control over the appearance of the page.
Both forms encrypt the username and password, but the encryption is very
weak.
A separate page for the manager
The discussion above applied
to a single JSP file, change.jsp. But it is more likely that protection would
be provided for a full manager page and set of servlets or Java server
pages. Again it is best to do this with
a JSP file rather than an HTML file.
However, the following example is really just HTML saved as JSP.
<!DOCTYPE HTML PUBLIC
"-//W3C//DTD HTML 4.0 Transitional//EN">
<link rel='stylesheet'
type='text/css' href='grocerystyles.css'
/>
<html>
<head><title>Grocery
Form</title></head>
<body>
<form method="post"
action="../grocery/display">
<p><input type="submit"
value="Display" /></p>
</form>
<hr/>
<form method="post"
action="../grocery/find">
<p><input type="text"
name="name" value =""size="20" /> Name
</p>
<p><input type="submit"
value="Find" /></p>
</form>
<hr/>
<form method="post"
action="../grocery/delete">
<p><input type="text"
name="id" value="" size="20" />Product
ID</p>
<p><input type="submit"
value="Delete" /></p>
</form>
<hr/>
<form method="post"
action="../grocery/insert">
<p><input
type="text" name="id" value=""
size="20" />ID </p>
<p><input type="text"
name="name" value="" size="20" />Name
<p><input type="text"
name="quantity" value="" size="20"
/>Quantity</p>
<p><input type="text"
name="price" value="" size="20" />Price</p>
<p><input type="submit"
value="Insert" /></p>
</form>
<hr/>
<form method="post"
action="../grocery/change">
<p><input type="text"
name="id" value="" size="20" />Product ID
</p>
<p><input type="text"
name="quantity" value="" size="20" />New
Quantity</p>
<p><input type="text"
name="price" value="" size="20" />New
Price</p>
<p><input type="submit"
value="Change" /></p>
</form>
</body> </html>
The web resource collection
now becomes:
<web-resource-collection>
<web-resource-name>Grocery Manager
Application</web-resource-name>
<description>Protects the Manager Servlets</description>
<url-pattern>/manage/*</url-pattern>
</web-resource-collection>
When manage.jsp
is translated and compiled, it too can be placed into web.xml using:
<servlet-mapping>
<servlet-name>org.apache.jsp.manage_jsp</servlet-name>
<url-pattern>/manage/*</url-pattern>
</servlet-mapping>
and
<servlet-mapping>
<servlet-name>org.apache.jsp.manage_jsp</servlet-name>
<url-pattern>/manage/*</url-pattern>
</servlet-mapping>
Now the index page for the
application can have the following form:
<form method="post"
action="../grocery/manage">
<p><input type = "submit"
value="Manager" /></p>
</form>
Differentiating between manager
and clerk roles
In addition to the security
constraint described above, web.xml allows you to designate particular servlets
that will be protected. While clerks may
be given permission to do a number of things, they might not be allowed to delete
products. We can put a constraint in the
web.xml file on the delete servlet.
<servlet>
<servlet-name>DeleteServlet</servlet-name>
<servlet-class>manager.DeleteServlet</servlet-class>
<security-role-ref>
<role-name>mgr</role-name>
<role-link>store_manager</role-link>
</security-role-ref>
<security-role-ref>
<role-name>clerk</role-name>
<role-link> store_clerk</role-link>
</security-role-ref>
</servlet>
The role-name and role-link
entries allow for different names to be used in the servlet and the
<auth-constraint>
entry. Here "mgr" and "clerk"
will be used in the servlet while "store_manager"
and "store_clerk" are used in the
authentication constraint entry. The
servlet can ask whether a user is in the role of a manager or a clerk. It can then differentiate between what each
has permission to do. Both will be
allowed to log into the manager page, but only the store manager will be able
to execute the delete servlet.
The code that checks for the
role is
boolean manager = request.isUserInRole
("mgr");
If the user that logged in
was listed as a store manager, the transaction will be allowed. Otherwise it will not be authorized. Here "mgr" is used rather than
"manager". The
<role-link> tag provided this connection.
The full delete servlet follows.
package manager;
import java.sql.*;
import java.io.*;
import javax.servlet.*;
import javax.servlet.http.*;
// The DeleteServlet
allows the store manager but not the clerk to delete a product from the table.
public class DeleteServlet extends HttpServlet
{
public void doPost (HttpServletRequest
request, HttpServletResponse response)
{
try
{
// Get a jdbc-odbc
bridge and connect to the grocery database.
Class.forName ("sun.jdbc.odbc.JdbcOdbcDriver");
Connection con = DriverManager.getConnection
("jdbc:odbc:grocery");
// Set the content type, get a PrintWriter object, and write the header.
response.setContentType
("text/html");
PrintWriter out = response.getWriter ();
MPage.createHeader
(out, "Fruit List");
// This checks whether the user is authorized
to make this transaction.
boolean manager = request.isUserInRole
("mgr");
if (manager)
{
// Create a query and get the ResultSet.
String keyId =
request.getParameter ("id");
Statement stmt = con.createStatement
();
String query = "Delete From fruit
Where id = '" + keyId + "'";
// Execute the update and check whether
or not it was successful.
int success = stmt.executeUpdate (query);
if (success != 0) out.println
("<h3>Product deleted.</h3>");
else out.println
("<h3>Error in deleting product.</h3>");
stmt.close ();
}
else out.println
("<h3>You do not have authorization for this
transaction.</h3>");
con.close ();
MPage.createFooter
(out);
} catch (ClassNotFoundException
e){System.out.println ("Class Not Found
exception.");}
catch (SQLException e){System.out.println
("SQL Exception");}
catch (IOException ex) {System.out.println
("IO Exception.");}
} // doGet
} // class DeleteServlet
Storing Usernames and Passwords
in the Database
There are only a few cases
where the usernames and passwords are stored in tomcat-users.xml. Most of the time, they are stored in a
separate (often encrypted) database table.
As an example, suppose that a club has members, who must login before they
may access the site. The following shows
an example in a table called Members.
The login can be handled by
an HTML file called login.html, a JSP file called welcome.jsp,
and a Java bean called VerifyBean.java. The HTML file is listed first.
<!DOCTYPE HTML PUBLIC
"-//W3C//DTD HTML 4.0 Transitional//EN">
<html>
<head><title>Login
Page for Club</title></head>
<body>
<form method="post" action="welcome.jsp" />
<p>Username <input type="text"
name="username" />
<br/>Password
<input type="password" name="password" /></p>
<p><input type="submit"
value="Log In" />
<input type="reset" /></p>
</form>
</body></html>
The action in the login page
is a Java server page, welcome.jsp. It could be a servlet as well. Using JSP allows you to keep the bean free of
HTML code. The JSP file is next.
<!DOCTYPE HTML PUBLIC
"-//W3C//DTD HTML 4.0 Transitional//EN">
<html>
<head><title>Welcome Page</title></head>
<body>
<jsp:useBean
id="verifyBean" scope="session"
class="members.VerifyBean" />
<jsp:setProperty
name="verifyBean" property="*"
/>
<% verifyBean.processRequest();
%>
<% if (verifyBean.getVerified
())
{ %>
<h3>Welcome to Our Club
<p><a href="events.html">List
of Events</a></p></h3>
<p><h4><a href="change-password.html">Change
</a> your password. </h4></p>
<% }
else
{ %>
<h4>Your username and/or password are not in the
database.
<br/><a href="login.html">Try
again.</a></h4>
<% } %>
</body></html>
As usual with JSP files, you
have to be very careful with opening and closing braces. Finally the Java bean accesses the database
and verifies that the password entered matches that in the database. If it does, it returns the boolean variable,
verified. Otherwise verified has the
value false.
/* VerifyBean
gets the username and password from the Java server page. It then checks to see if the password is
correct. If so, it returns the value
true. Otherwise, verified has the value
false.
*/
package members;
import java.sql.*;
public class VerifyBean
{
public String username, password;
public boolean verified;
public boolean getVerified ()
{return verified;}
public void setUsername (String u)
{username=u;}
public void setPassword (String p)
{password=p;}
public void processRequest ()
{
try
{
// Get a jdbc-odbc
bridge and connect to club.mdb.
Class.forName ("sun.jdbc.odbc.JdbcOdbcDriver");
Connection con = DriverManager.getConnection
("jdbc:odbc:club");
Statement stmt = con.createStatement
();
String query = "Select * From Members
Where username = '" + username + "'";
ResultSet rs = stmt.executeQuery (query);
if (rs.next ()
&& rs.getString ("password").equals
(password))
verified = true;
else verified = false;
con.close ();
} catch (ClassNotFoundException
e){System.out.println ("Class Not Found
exception.");}
catch (SQLException e){System.out.println
("SQL Exception");}
} // processRequest
} // class VerifyBean
Organizations with logins
usually allow members to change their passwords. This has been included in the file, welcome.jsp with the line
<p><h4><a href="change-password.html">Change
</a> your password. </h4></p>
This links to an HTML file
called change-password.html. This
follows.
<!DOCTYPE HTML PUBLIC
"-//W3C//DTD HTML 4.0 Transitional//EN">
<html>
<head>
<title>Change Password Page</title> </head>
<body>
<h3>To change your
password, type the new password followed by a confirmation.</h3>
<form method="post" action="change_password.jsp" />
<p> <input type="text"
name="username" /> Username
<p> <input type="password" name="newPassword" /> New Password
<br/> <input
type="password" name="confirm" /> Confirmation</p>
<p><input type="submit"
value="Change Password" />
<input type="reset" /></p>
</form>
</body> </html>
The form collects the
username, the new password and a confirmation of the new password. The JSP file is called change_password.jsp.
<!DOCTYPE HTML PUBLIC
"-//W3C//DTD HTML 4.0 Transitional//EN">
<html>
<head><title>Change
Password</title></head>
<body>
<jsp:useBean
id="changePassword"
scope="session" class="members.ChangePassword"
/>
<jsp:setProperty
name="changePassword"
property="*" />
<% changePassword.processRequest();
%>
<% if ( ! changePassword.getSame ())
{ %>
<h4>Your new password does not match the confirmation.
<br/><a href="change-password.html">Try
again.</a></h4>
<% }
else
{
if (changePassword.getChanged ())
{ %>
<h4>Your password has been changed</h4>
<% }
else
{ %>
<h4>An error has occurred in changing your
password.
<br/><a href="change-password.html">Try again.</a></h4>
<% }
} %>
</body></html>
Several errors could occur
here. The username could be wrong, the
password and the confirmation might not match, or the password might not be
correct. The Java bean checks for two of
them. If the confirmation is not the
same as the new password, the boolean variable, same, will be false. If the confirmation is correct, there still
may be an error if the update to the database fails. Both of these are checked for in the bean.
/* ChangeBean gets the new password and the
confirmation from the Java server page.
If these two match, it then updates the database with the new
password. If this fails, changed is set
to false. Otherwise changed is set to
true. Finally the booleans are returned
to the Java server page. */
package members;
import java.sql.*;
public class ChangePassword
{
public String username, newPassword,
confirm;
public boolean changed, same;
public boolean getChanged () {return
changed;}
public boolean getSame () {return
same;}
public void setUsername (String u)
{username=u;}
public void setNewPassword (String
p) {newPassword=p;}
public void setConfirm (String c)
{confirm=c;}
public void processRequest ()
{
try
{
// Get a jdbc-odbc
bridge and connect to club.mdb.
Class.forName ("sun.jdbc.odbc.JdbcOdbcDriver");
Connection con = DriverManager.getConnection
("jdbc:odbc:club");
if (newPassword.equals
(confirm))
{
same = true;
Statement stmt = con.createStatement
();
String query = "Update Members Set
password = '"+ newPassword
+ "' Where username =
'" + username + "'";
int success = stmt.executeUpdate (query);
if (success!=0) changed = true;
else changed = false;
}
else same = false;
con.close ();
} catch (ClassNotFoundException
e){System.out.println ("Class Not Found
exception.");}
catch (SQLException e){System.out.println
("SQL Exception");}
} // processRequest
} // class ChangePassword
As before, the files must be
listed in web.xml. The welcome-file will
be login.html, and JSP files, once compiled, are listed under servlets and
servlet mappings.
Session
Tracking Using HttpSession
HyperText Transfer Protocol (HTTP) was not designed to aid web
sites in tracking users’ activities.
When a user makes a request for a browser page, the server responds to
the request and then disconnects. The
server can store the IP (Internet Protocol) address, but it may not be
unique. Often several computers share the
same IP address.
Web sites need some way
besides the IP address to keep track of their visitors. This is especially true of on-line
stores. Users typically put something in
their shopping cart and then continue shopping on the site. And stores want to encourage this
behavior. They want customers to buy a
number of products when they visit.
There are two ways for web
sites to track user activity. One is by
depositing a cookie on the user’s
hard drive, and the other is URL rewriting.
There are several kinds of cookies, but the one that we will look at
just puts some text into temporary storage and deletes it when finished. URL rewriting involves adding an
identification number to the URL string.
This is actually less safe than storing a cookie, since the string is
sent unencrypted, and use of the back button on the browser can destroy it.[18]
HttpSession
Java supplies a session object[19]
that implements javax.servlet.http.HttpSession. It is created by the server when a browser
connects to it. It is associated with HttpServletRequest and can be accessed by a servlet using
HttpSession session = request.getSession (true);
The boolean parameter, true,
is used to tell the server to use the current session if there is one, or to
create a new session if no current session exists. If the parameter is omitted, the default is
true.
When a session is created, a
cookie containing a session ID is stored on the user’s hard drive. The name of the ID is JSESSIONID. It is a long string made up of a random
sequence of letters and digits. It is
probably not sufficiently random for very large web stores,[20]
but for smaller ones it is unlikely that two sessions would receive the same
ID. If the user’s browser does not
accept cookies, the server can use
String url = request.getRequestURI
();
String codedUrl = reponse.encodeURL (url);
The string, codedUrl is then added to the IP address that is used to
send a web page back to the browser.
Since this is shown in the browser’s window, it is not very secure.
Sessions have a
life-time. They begin when the user
first contacts the web-site and end when the user closes the browser. The server can terminate sessions after a
given number of minutes. This
information can be included in web.xml with the lines
<session-config>
<session-timeout>30</session-timeout>
</session-config>
If the time given is
negative, the session will not timeout.
Cookies
When the server gets a
session object, a cookie is created and stored on the user’s computer.[21] The server can also create cookies and
deposit them on the user’s computer. A
cookie is created by
Cookie cookie = new Cookie (name,
value);
where name and value are both
Strings made up of ascii alphanumeric values.
The following code will add a cookie to the user’s computer:
Cookie cookie = new Cookie ("Your
name", "Some value such as an ID");
response.addCookie (cookie);
Unless the server specifies
otherwise, the cookie will be deleted when the browser is closed. That can be changed by setting the maximum
age for the cookie. The code for this is
cookie.setMaxAge (time_in_seconds);
If you wish the cookie to be
available for an hour, use
cookie.setMaxAge (3600);
You can also set a comment
with cookie.setComment ("This is an example of a
cookie."). However, comments are
not returned to the browser. The
following servlet illustrates this. When
testing it, make sure that you add it to web.xml.
package http_session;
import java.io.*;
import javax.servlet.*;
import javax.servlet.http.*;
// MakeCookie creates a cookie, stores it,
and then checks for cookies on the user’s computer.
public class MakeCookie extends HttpServlet
{
protected void doGet (HttpServletRequest
request, HttpServletResponse response)
{
try
{
response.setContentType
("text/html");
PrintWriter out = response.getWriter ();
// Create a new cookie with a name and value.
Cookie cookie = new
Cookie ("Pace", "Computer Science");
cookie.setComment
("This is an example of a cookie.");
cookie.setMaxAge
(3600); // Set the maximum age to be an hour.
response.addCookie
(cookie);
// getCookies returns
an array of cookies.
Cookie [] cookies = request.getCookies
();
// Output the cookies on the computer.
Page.createHeader
(out, "Cookies");
if ((cookies == null) || (cookies.length
== 0))
out.println
("<h3>No Cookies Found</h3>");
else
{
out.println
("<h3>Cookies Found</h3>");
for (int count
= 0; count < cookies.length; count ++)
{
out.println
("<br>Name: " + cookies [count].getName ());
out.println
("<br>Value: " + cookies [count].getValue ());
out.println
("<br>Comment: " + cookies [count].getComment ());
out.println
("<br>MaxAge:
" + cookies [count].getMaxAge ());
}
}
Page.createFooter
(out);
} catch (IOException ex) {System.out.println ("<h3>IO
Exception.</h3>");}
} // doGet
} // MakeCookie
Session Attributes
The session object is
available to all servlets in the application.
Using this, session data can be passed from one servlet to another while
the session is active. Data is stored as
a session attribute. Attributes are
maintained in a hash table. This means
that you need a key (String) for each attribute. These strings can be constants in your
servlets.
Once the servlet has gotten a
session, it can set an attribute, such as a customer’s ID.
HttpSession session = request.getSession (true);
session.setAttribute (CustomerKey, customerId);
where CustomerKey
is a constant String used throughout the application to locate the customer’s
data.
Attribute data is retrieved
using getAttribute (key), as follows:
String customerId = (String) session.getAttribute (CustomerKey);
Note that this hash table
stores objects, so when the ID is retrieved, it must be cast to a String.
A very simple servlet
illustrates this.
package http_session;
import java.io.*;
import javax.servlet.*;
import javax.servlet.http.*;
// SessionAttribute stores a customer’s
ID in a session attribute.
public class SessionAttribute extends HttpServlet
{
static final String CustomerKey =
"SessionKey";
protected void doGet (HttpServletRequest
request, HttpServletResponse response)
{
try
{
HttpSession session =
request.getSession (true);
String sessionId = session.getId ();
// In this example, the customer’s id is just
the first 6 characters of the session id.
String customerId = sessionId.substring (0, 6);
session.setAttribute
(CustomerKey, customerId);
response.setContentType
("text/html");
PrintWriter out = response.getWriter ();
Page.createHeader
(out, "Session Attributes");
out.println
("<h3>Customer ID: " +
(String) session.getAttribute (CustomerKey)
+ "<h3>");
Page.createFooter
(out);
} catch (IOException ex) {System.out.println ("<h3>IO
Exception.</h3>");}
}
} // SessionAttribute
Session attributes can be
used to store any object including IDs, shopping carts, customer orders,
etc. There is a limit on the number, but
you are unlikely to exceed it.
Shopping Carts
On-line stores use shopping
carts to store customer purchases before they decide to check out. There are many ways to implement these, but
probably the simplest is as a vector of items.
The Item object can store information about the item ordered, such as
the product’s ID, name, quantity ordered, etc.
The shopping cart then maintains a vector of items. It also keeps track of the ID for the order,
the customer’s ID, and the running total cost of the order.
The cart can be created and
saved as a session attribute either when the customer first visits the web site
or when the customer first adds an item to the cart.
// Get the shopping cart from the session or create a new one
if none exists.
cart = (ShoppingCart) session.getAttribute (CartId);
if (cart == null)
// This is the first time an item is to be added.
{
String sessionId = session.getId ();
String orderId = sessionId.substring (0, 6);
String customerId = sessionId.substring (6, 12);
cart = new ShoppingCart (orderId, customerId);
session.setAttribute (CartId, cart);
}
// Before adding an item, check to see that there is enough in
stock.
if (quantityInStock >= quantity)
{
enoughStock = true;
Item item = new Item (id,
name, quantity, price);
cart.addItem (item);
}
else enoughStock = false; // The quanity in
stock was insufficient.
When the customer decides to
add something to the cart, it can be retrieved from the session. Since the cart is an object all that is
actually stored is a reference (pointer) to the cart, so adding an item changes
the contents of the cart.
ShoppingCart cart = (ShoppingCart) session.getAttribute
(CartId);
Item item = new Item (productId, name, quantityOrdered,
price);
cart.addItem (item);
If the customer then decides
to buy the items in the cart and check out, the cart can again be retrieved
from the session and the order processed.
HttpSession session = request.getSession ();
ShoppingCart cart = (ShoppingCart) session.getAttribute
(CartId);
The entire example is in
Appendix B.
Sharing
Data among Servlets
A Java application is usually
in the form of a tree, with a main class as the root. This class instantiates other classes and
often sends data to them as parameters in their constructors. The instance data in the main class act as
global data and can be shared by the other classes in the application. Instance data can also be made public (not
recommended) or made available using get and set methods.
A web application, on the
other hand, consists of a collection of web pages, servlets, and Java server
pages. These ordinarily do not
communicate. However, Java supplies an
interface called ServletContext.[22] It can be used by one servlet to store data
that can be accessed by other servlets.
The data is stored with a key, and any other servlet knowing that key
can access it.
Storing a Database Connection
A common use is to store a
database connection. Getting the driver
is a slow process, so storing it in a place accessible to all servlets can save
time. The ServletContext
is accessed using
ServletContext application = getServletContext ();
To store something in the ServletContext, you need a key. The method call is
application.setAttribute (ConnectionKey, con);
Finally, for another servlet
to access the connection, it uses a get method:
ServletContext application = getServletContext ();
Connection con = (Connection) application.getAttribute
(ConnectionKey);
Note that the result must be
cast (type changed) to a Connection.
An application can have a
servlet just for getting the connection.
It only contains an init method, since it does not interact with the
browser, but only with the database and the ServletContext. The deployment descriptor should list this
servlet and include <load-on-startup>1</load-on-startup>.
<servlet>
<servlet-name>ConnectionServlet</servlet-name>
<servlet-class>store.ConnectionServlet</servlet-class>
<load-on-startup>1</load-on-startup>
</servlet>
The tag, <load-on-startup>,
is used to tell the server to load (and execute) this servlet when the
application is loaded.[23] Thus the connection will be established
before any other servlet needs to use it.
Clearly, other servlets should not close the connection. That can be done by a second servlet when the
application is finished.
The following is an example
of a servlet that can be used to get the connection.
import javax.servlet.*;
import javax.servlet.http.*;
import java.sql.*;
/* The init method of the ConnectionServlet
gets a database connection and stores it in the ServletContext.
*/
public class ConnectionServlet extends HttpServlet
{
public final String ConnectionKey =
"estore.database";
public final String JDBCConnectionURL
= "jdbc:odbc:estore";
public void init ()
{
Connection con = null;
try
{
// Get a jdbc-odbc
bridge and connect to the database.
Class.forName ("sun.jdbc.odbc.JdbcOdbcDriver");
con = DriverManager.getConnection
(JDBCConnectionURL);
} catch (ClassNotFoundException
e){System.out.println ("Class Not Found
exception.\n");}
catch (SQLException e){System.out.println
("SQL Exception");}
ServletContext application =
getServletContext ();
application.setAttribute (ConnectionKey, con);
} // init
} // ConnectionServlet
A servlet that uses the ServletContext to get the connection follows:
/* DisplayServlet gets data from a
database and sends a copy
of the data to the client in a second web page.*/
package orders;
import java.sql.*;
import java.io.*;
import javax.servlet.*;
import javax.servlet.http.*;
/* DisplayServlet gets the data from the
database and displays it on the output page. */
public class DisplayServlet extends HttpServlet
{
public final String ConnectionKey =
"estore.database";
public void doGet (HttpServletRequest
request, HttpServletResponse response)
{
try
{
// Get the database connection from the ServletContext.
ServletContext
application = getServletContext ();
Connection con = (Connection) application.getAttribute (ConnectionKey);
// Set the content type, get a PrintWriter object, and write the header.
response.setContentType
("text/html");
PrintWriter out = response.getWriter ();
Page.createHeader
(out, "Products");
// Create a query and display the data.
Statement stmt = con.createStatement
();
String query = "Select * From
products";
ResultSet rs = stmt.executeQuery (query);
// Display the title for the table.
out.println
("<h3>Products</h3>");
out.println
("<table>");
// Display the column names in the first row.
out.println
("<tr><td>id</td><td>name</td><td>quantity</td><td>price</td></tr>");
// Display all the data in the table.
while (rs.next ())
{
out.println
("<tr><td>"+rs.getString("id")+"</td>");
out.println
("<td>"+rs.getString("name")+"</td>");
out.println
("<td>"+rs.getInt("quantity")+"</td>");
out.println
("<td>"+rs.getDouble("price")+"</td></tr>");
}
out.println
("</table>");
stmt.close ();
Page.createFooter
(out);
} catch (IOException ex) {System.out.println ("<h3>IO
Exception.</h3>");}
catch (SQLException es) {System.out.println
("SQL Exception");}
} // doGet
} // class DisplayServlet
References
1. Susan Anderson-Freed, Weaving a Website, Prentice Hall, 2002.
2. H.M. Deitel, P.J. Deitel, and T.R. Nieto, Internet
& World Wide Web, How to Program, 2nd Edition, Prentice
Hall, 2002.
3. Marty Hall & Larry Brown, Core Servlets and Java Server Pages, First Edition, Sun
Microsystems Press/Prentice-Hall PTR Book, 2003.
4. Elliotte Rusty Harold, Java
Network Programming, O’Reilly & Associates, Inc., 2000.
5. Karl Moss, Java
Servlets Developer’s Guide, McGraw-Hill/Osborne, 2002.
6. Dave Raggett , A History of
HTML, Chapter 2, Addison Wesley Longman, 1998, http://www.w3.org/People/Raggett/book4/ch02.html.
7. W3Schools Online Web Tutorials, http://www.w3schools.com.