or
GUI Programming in Java for Everyone
Part 1 Applications
Joseph Bergin, Pace University
Two of my colleagues, Susan Merritt and Allen Stix, recently wrote a technical report on programming in OWL 2.5 using C++ for Windows machines. They show the user how easy graphical user interface (GUI) programming can be in C++ using a library like Borland's OWL. I've been programming in Java for a while now, and I wondered how easy (or hard) it would be to do something similar in Java. This is the result of my investigation. The code shown here was written in one day, though I've spent another day trying to extend it in various ways.
Note that the figures shown here are in black and white. I used the same figures that will appear in the printed version. The application itself is in full color, of course.
The promise of Java is that it will let the developer program an application once, on any development platform that they choose, and deploy the compiled application so that users may use it on their own computers without modification or even recompilation.
Java further promises that the "look and feel" of the application will be familiar to the user, independent of the developer's platform. I'm using a Power Macintosh to develop (and write) this and will show some Macintosh Screen dumps in this paper. When you run the program on your IBM/PC, however, you won't get the same look. For example, on a Macintosh, all menus are placed in a single menu bar at the top of the screen. When you bring a document from a different application to the front, the menu bar automatically changes to one appropriate for that document. On the PC, however, menus are associated with windows and appear at the top of each window. Java preserves this behavior, without recompiling for different platforms.
This document will explore a few simple GUI elements, such as drawing, dialog boxes, and menus. I have attempted to keep the application as close to that of Dr's Merritt and Stix as I can. In the one place where it would have been difficult to do that, I've done something in place of it that is interesting in its own right. I hope the reader is pleased. It will also explore the Java 1.1 event model and show how the programmer takes care of handling events.
To use this you will need a Java 1.1 system. You can get a simple one for free by downloading it from the Sun Java site. It comes complete with a compiler and run-time system, but has no development environment. You don't need the compiler to run this. Just obtain the .class files from my web site and then execute the command
java AllenFrame
I developed this using an environment called CodeWarrior from MetroWerks. You can find them on the web also. The environment comes with Java, C++ and Object Pascal. The academic version is quite inexpensive, but it is a subscription product that has three editions per year. The current edition comes with three cdroms. There is no printed documentation with the academic version as it is all on one of the cds. You can purchase documentation if you like.
True to my model, developed by Merritt and Stix, this application doesn't do anything useful. It just illustrates the kind of things that can be done to give the user some ideas about how to proceed.
Java can build two kinds of executables: applications and applets. We are going to build an application here. You are familiar with applications. You run them from a command line or a windows icon. They can open and write files. They may or may not generate graphical views of themselves.
Applets are a little different. An applet is only part of an application. It needs a wider context in which to act and live. The usual container of an applet is a web browser and applets are usually downloaded from the web and displayed in the user's browser. As such, applets have a number of important security restrictions, such a the inability to read and write files on the user's system. We are going to do a number of things in this application that would make them inappropriate (and impossible) for an applet.
Java guarantees that you don't use a variable before you initialize it. It will never let you dereference null. It will never let you assign one kind of thing to a variable of another type without checking. It will never let you cast inappropriately. As we shall see, it does windows AND it takes out the garbage.
This application consists of two files: AllenFrame.java and AllenApp.java. Here is AllenFrame.java. It first imports information from three Java packages. Import is similar to C++'s #include, but doesn't imply textual inclusion. The Java compiler can read compiled versions of the classes in these packages and doesn't need to re-translate header files. The file AllenFrame.java declares a public class with the same name as the file: AllenFrame. This is required in Java.
- import java.awt.*;
- import java.applet.Applet;
- import java.awt.event.*;
-
- public class AllenFrame extends Frame
- { public static void start(String title)
- { Dimension size; // Just a width and a length
- AllenFrame f = new AllenFrame(title);
-
- AllenApp a = new AllenApp(f);
- a.init();
- a.start();
- size = a.getSize();
-
- f.add("Center", a);
- f.pack();
- f.setSize(size);
- f.setVisible(true);
- }
-
- public AllenFrame(String name)
- { super(name);
- addWindowListener(closer);
- }
-
- // Anonymous inner class extending WindowAdapter. Handles the window close event.
- WindowListener closer = new WindowAdapter()
- { public void windowClosing(WindowEvent e)
- { dispose();
- System.exit(0);
- }
- };
-
- public static void main(String args[])
- { AllenFrame.start("Allen App Java Application");
- }
-
- }
The AllenFrame class has two static methods, main (line 33) and start (line 6). There is also a constructor (line 21), and a single data declaration (line 26). There are no member functions. Among other things, AllenFrame is a code container. Java has no global functions so we must encapsulate each function in some class. Note that in Java, you don't need to declare something before you use it.
Every Java application (not applet) must have a function in some class with prototype:
public static void main(String args[])
When you run the program, this is the function that you actually call from your operating system. All our main function here does is to call the other function. To call a static function of a class you precede it by its class name and a period. Static method start is just our initialization function for this application.
	public static void main(String args[])
	{	AllenFrame.start("Allen App Java Application");
	}
When we create a new object we call a constructor. Each constructor must always begin with another constructor call, usually that of its superclass. Here AllenFrame is said to extend (line5) or subclass Frame. A Frame object is the basic application window. The string passed in becomes the name of the window. We also want to be able to close the window, when the user clicks in a close box or otherwise quits the application. This means that a "WindowEvent" will be created at the point of closing and must be handled by some object in the system. We let the AllenFrame object that we will create handle closing itself, by giving it a "WindowListener" that watches for window events and will handle this one. In the constructor we must add the WindowListener to the list of components maintained by the Frame.
	public AllenFrame(String name)
	{	super(name);
		addWindowListener(closer);
	}
The WindowListener object, closer, itself has the most complex declaration in this entire application (lines 27-32):
	WindowListener closer = new WindowAdapter()
				{	public void windowClosing(WindowEvent e)
					{	dispose();
						System.exit(0);
					}
				};
We are declaring closer to be a WindowListener, but creating it as a new WindowAdapter subclass object. WindowListener itself is an interface. As such it defines no code, but instead about six method prototypes. Class WindowAdapter implements all of these prototypes and therefore "implements" the interface itself. However, WindowAdapter implements all of these interface functions to do nothing. Not very useful, except that we don't want most of them to do anything. All we want is to watch for windowClosing events and handle them. We therefore extend WindowAdapter and override only the one method windowClosing.
This is an example of a Java anonymous inner class. We are defining a class but we are doing so within another class (AllenFrame). We aren't giving the new class a name, but just indicating that it extends WindowAdapter.
The body of this windowClosing method calls dispose, which is actually the dispose method of the Frame class (not the WindowAdapter class). It calls this method without any prefix because it is defined within an inner class and from inner classes you have access to all features of the "outer" classes that contain them. This function will be called automatically when the user closes the window. The AllenFrame knows who its closer is and will call the windowClosing method of its closer when the user generates a window closing event by clicking in the close box or quitting the application. Note that dispose is not like delete in C++. Java has no concept of deletion of objects since it uses a garbage collector to take care of unusable objects. Method dispose lets the Java runtime recover resources held by the window as well as removing the visual representation of the window from the screen.
Finally, the start method of the AllenFrame class creates a new AllenFrame, which is a Frame, of course, then creates a new AllenApp and initializes and starts the AllenApp. It then adds the AllenApp to the AllenFrame as one of its components. This component will be the main part of the frame, the window contents, as we shall see. We then pack the components of f, and give it a size equal to the size of the contained AllenApp. Then we set it to be visible.
When we add the AllenApp to the AllenFrame, we indicate that it is to be in the center. Since that is the only thing we add, it doesn't much matter, but we could add it to the top (North) or the bottom (South) or to the East or West, if we had more components to add.
We will examine the init method of AllenApp shortly. This sets up the GUI of the application. The start method just starts it in action so that user generated events can be handled. If you forget to set the size of an application, it might wind up as a very tiny window. Method pack rearranges the components of the Frame internally and squeezes out extra space.
Every application needs a frame and if it is to be a GUI application we must create the user interface and handle events in it. This we are deferring to the AllenApp class, rather than doing it directly in the AllenFrame class. This is a pretty typical programmer style.
Speaking of style: If you see a name in Java that starts with a lower case letter, it is probably a variable or function name. If it begins with a capital letter, it is probably a Class name. If it written in all capitals, it is most likely a constant. My personal style is to write Java (as well as C++) so that all grouping symbols such as braces and parentheses always match up either horizontally (on the same line) or exactly vertically. This helps me see where things begin and end.
The file AllenApp.java that defines the graphical user interface defines one public class AllenApp and eleven inner classes. These inner classes are all event handlers. Ten of them are very similar since they handle similar kinds of events. Most of the code is just initialization in the init method of AllenApp. There is also a constructor, one additional method, and a few data definitions for things that must be seen by more than one function or more than one object. Note that our application consists of exactly one AllenFrame object, exactly one AllenApp object and about forty other objects. There are a few MenuItem objects, one MenuBar, a few MenuShortcuts and a few ActionListeners. We will also create one new Color object and one new Font object. We will also use a few objects, like a Toolkit that we don't create ourselves, but which are part of the Java infrastructure.
import java.awt.*;
import java.applet.*;
import java.awt.event.*;
public class AllenApp extends Applet
{ public AllenApp(Frame myFrame){ this.myFrame = myFrame;}
private Frame myFrame;
public void init()
{ resize(640, 480);
setBackground(Color.yellow);
// Get a menu bar.
MenuBar mb = myFrame.getMenuBar();
if(mb == null)
{ mb = new MenuBar();
myFrame.setMenuBar(mb);
}
// Create a menu for the menu bar.
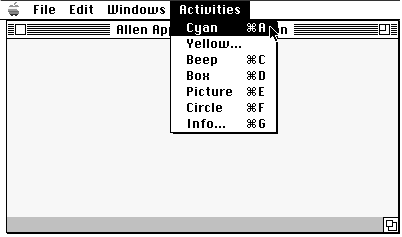
activitiesMenu = new Menu("Activities");
mb.add(activitiesMenu);
MenuItem item = new MenuItem("Cyan", new MenuShortcut(KeyEvent.VK_A));
activitiesMenu.add(item);
item.addActionListener(new CyanListener());
item = new MenuItem("Yellow...");
activitiesMenu.add(item);
item.addActionListener(new YellowListener());
item = new MenuItem("Beep", new MenuShortcut(KeyEvent.VK_C));
activitiesMenu.add(item);
item.addActionListener(new BeepListener());
item = new MenuItem("Box", new MenuShortcut(KeyEvent.VK_D));
activitiesMenu.add(item);
item.addActionListener(new BoxListener());
item = new MenuItem("Picture", new MenuShortcut(KeyEvent.VK_E));
activitiesMenu.add(item);
item.addActionListener(new PictureListener());
item = new MenuItem("Circle", new MenuShortcut(KeyEvent.VK_F));
activitiesMenu.add(item);
item.addActionListener(new CircleListener());
item = new MenuItem("Info...", new MenuShortcut(KeyEvent.VK_G));
activitiesMenu.add(item);
item.addActionListener(new InfoListener());
// Create a modeless dialog box with two buttons.
yellowDialog = new Dialog(myFrame, "Your Wish is our command.",false);
yellowDialog.setSize(200, 100);
yellowDialog.setLocation(50, 50);
yellowDialog.add("Center", new Label("Restore Yellow Background?"));
Panel dialogPanel = new Panel();
yellowDialog.add("South", dialogPanel);
Button yesButton = new Button( "Yes");
yesButton.addActionListener( new YesListener() );
Button noButton = new Button("No");
noButton.addActionListener(new NoListener() );
dialogPanel.add("West", yesButton);
dialogPanel.add("East", noButton);
// Create a modal dialog box with one button.
infoDialog = new Dialog(myFrame, "Data on Screen and Current ViewPort.",true);
infoDialog.setSize(250, 100);
infoDialog.setLocation(50, 50);
infoPanel = new Panel();
infoDialog.add(infoPanel);
//Define the panel that will show the info in this dialog box.
infoPanel.add("North", new Label("Size of the screen and the window in pixels:"));
myToolkit = getToolkit();
Dimension d = myToolkit.getScreenSize(); // Doesn't change as we run.
infoPanel.add("Center", new Label( "screen's length = " + d.width
+ ", screen's height = " + d.height));
windowSize = new Label(""); // Will show current window size.
infoPanel.add("South", windowSize);
Button okButton = new Button("OK");
infoDialog.add("South", okButton);
okButton.addActionListener(new OkListener());
// Handle mouse clicks in our window.
addMouseListener(new MouseWatcher());
// Get the image displayed by menu Picture.
image = myToolkit.getImage("JBergin.jpg");
}
public boolean imageUpdate(Image image, int flags, int x, int y, int w, int h)
{ if((flags & ALLBITS) != 0)
{ Graphics g = getGraphics();
g.drawImage(image, 100, 100, AllenApp.this);
g.dispose();
}
return true;
}
private Menu activitiesMenu;
private Dialog yellowDialog, infoDialog;
private Panel infoPanel;
private Label windowSize;
private Toolkit myToolkit;
private Image image;
// Inner Classes
class CyanListener implements ActionListener // Menu Cyan
{ public void actionPerformed(ActionEvent e)
{ setBackground(new Color(200, 255, 255)); //pale Cyan (RGB)
repaint();
}
}
class YellowListener implements ActionListener // Menu Yellow...
{ public void actionPerformed(ActionEvent e)
{ yellowDialog.setVisible(true);
}
}
class BeepListener implements ActionListener // Menu Beep
{ public void actionPerformed(ActionEvent e)
{ myToolkit.beep();
} // We could actually play an audio clip here.
}
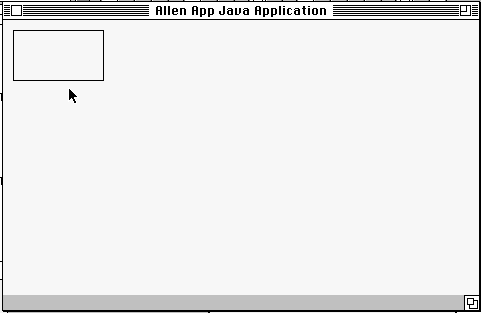
class BoxListener implements ActionListener // Menu Box
{ public void actionPerformed(ActionEvent e)
{ Graphics g = getGraphics();
g.drawRect(10, 10, 90, 50); // x, y, width, height
g.dispose();
}
}
class PictureListener implements ActionListener // Menu Picture
{ public void actionPerformed(ActionEvent e)
{ Graphics g = getGraphics();
g.drawImage(image, 100, 100, AllenApp.this);
g.dispose();
}
}
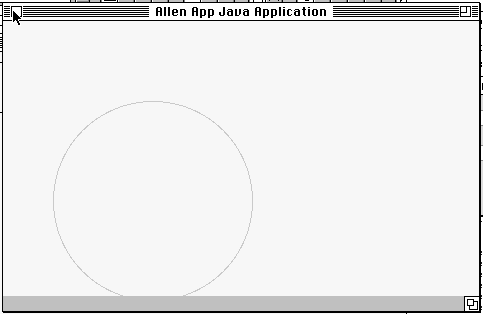
class CircleListener implements ActionListener // Menu Circle
{ public void actionPerformed(ActionEvent e)
{ Graphics g = getGraphics();
g.setColor(Color.green);
g.drawOval(50, 80, 200, 200);
g.dispose();
}
}
class InfoListener implements ActionListener // Menu Info
{ public void actionPerformed(ActionEvent e)
{ Rectangle r = getBounds();
windowSize.setText
( "window's length = "
+ r.width
+ ", window's height = "
+ r.height
);
infoDialog.setVisible(true);
}
}
class OkListener implements ActionListener // OK button for Info dialog.
{ public void actionPerformed(ActionEvent e)
{ infoDialog.setVisible(false);
}
}
class YesListener implements ActionListener // Yes button for Yellow... dialog.
{ public void actionPerformed(ActionEvent e)
{ yellowDialog.setVisible(false);
setBackground(Color.yellow);
repaint();
}
}
class NoListener implements ActionListener // No button for Yellow... dialog.
{ public void actionPerformed(ActionEvent e)
{ yellowDialog.setVisible(false);
}
}
class MouseWatcher extends MouseAdapter // Mouse click handler.
{ public void mouseClicked(MouseEvent e)
{ Graphics g = getGraphics();
int x = e.getX(), y = e.getY();
if(e.getModifiers() == InputEvent.BUTTON3_MASK) // Right button
// (Ctrl click on Mac).
{ Font font = new Font("Serif", Font.ITALIC, 10);
g.setFont(font);
g.setColor(Color.red);
g.drawString("Right Click at:(" + x + "," + y + ")", x, y);
}
else // Other buttons.
g.drawString("Left Click", x, y);
g.dispose();
}
}
}
The constructor of an AllenApp simply remembers who the containing frame is by saving it in a private instance variable.
	public AllenApp(Frame myFrame){ this.myFrame = myFrame;}
	private Frame myFrame;
The init method of an Applet is where you set up your GUI. We are going to create every GUI element here, though sometimes we would delay defining some of these until we knew that they were to be used. In particular, we will define two dialogs, since we are pretty sure that they will be used each time a user runs this application. In a more realistic situation, they might be created just before they were to be shown. They may or may not be discarded afterwards, depending on whether the programmer feels that they might be needed again soon or not.
We will set up a menu bar, a menu, seven menu items in that menu. Six of the menu items will have command key equivalents. All seven of the menu items will have action listeners that perform the action when the menu item is selected by the user. We will define two dialogs and their contents. Finally we will set up a MouseListener to watch for mouse clicks in the window and we will do some preliminary work to help one of the menu items perform its task. Let's look at the parts in detail:
	public void init()
	{	resize(640, 480);
		setBackground(Color.yellow);
		// Get a menu bar.
		MenuBar mb = myFrame.getMenuBar();
		if(mb == null)
		{ 	mb = new MenuBar();
			myFrame.setMenuBar(mb);
		}
Next we need a menu bar. We first check to see if our frame already has one and if not we create a new one and add it to the frame.
		// Create a menu for the menu bar.
		activitiesMenu = new Menu("Activities");
		mb.add(activitiesMenu);
Next we are going to create the seven menu items and install them in activitiesMenu.
		MenuItem item = new MenuItem("Cyan", new MenuShortcut(KeyEvent.VK_A));
		activitiesMenu.add(item);
		item.addActionListener(new CyanListener());
We create a new MenuItem by giving it a label and optionally as short cut key. Here we say that we want the A key to serve as the shortcut key for the "Cyan" menu. The constant VK_A is defined in the KeyEvent class. Once we have the menu item, we add it to the menu. We also give the item a new ActionListener by creating a new CyanListener. We will examine this (inner) class in a bit, but for now, just note that it will be used to carry out the actions defined by this item.
		item = new MenuItem("Yellow...");
		activitiesMenu.add(item);
		item.addActionListener(new YellowListener());
This is the same as above, except that we don't give it a key equivalent. The label is "Yellow..." to indicate that a dialog box will be shown if this option is selected. This use of ellipses (...) is just good interface design. The rest of the menu item construction is just like these. All the rest have menu short cuts associated with them.
		item = new MenuItem("Beep", new MenuShortcut(KeyEvent.VK_C));
		activitiesMenu.add(item);
		item.addActionListener(new BeepListener());

		item = new MenuItem("Box", new MenuShortcut(KeyEvent.VK_D));
		activitiesMenu.add(item);
		item.addActionListener(new BoxListener());

		item = new MenuItem("Picture", new MenuShortcut(KeyEvent.VK_E));
		activitiesMenu.add(item);
		item.addActionListener(new PictureListener());

		item = new MenuItem("Circle", new MenuShortcut(KeyEvent.VK_F));
		activitiesMenu.add(item);
		item.addActionListener(new CircleListener());

		item = new MenuItem("Info...", new MenuShortcut(KeyEvent.VK_G));
		activitiesMenu.add(item);
		item.addActionListener(new InfoListener());
Here the user has selected the Activities menu in the menu bar.
Now we need to create two dialog boxes for the "Yellow..." and "Info..." menu items. Each is defined to be a part of the current frame, given a label and tagged as either modal or non-modal. The yellowDialog will not be modal, which means that the user can ignore it when it is displayed. We then size the window of the dialog and place it relative to its frame.
		// Create a modeless dialog box with two buttons.
		yellowDialog = new Dialog(myFrame, "Your Wish is our command.",false);
		yellowDialog.setSize(200, 100);
		yellowDialog.setLocation(50, 50);
Now we add the components to the dialog. First we add a textual label to the dialog and center it. Then we create a new panel to hold two buttons and add it to the dialog. We add it at the bottom. A panel is just a convenient way to group elements and guarantees that I can keep the two buttons together in the GUI.
		yellowDialog.add("Center", new Label("Restore Yellow Background?"));
		Panel dialogPanel = new Panel();
		yellowDialog.add("South", dialogPanel);
Next we add two buttons to the panel. Each button is given an ActionListener that defines what will happen when the button is clicked.
		Button yesButton = new Button( "Yes");
		yesButton.addActionListener( new YesListener() );
		Button noButton = new Button("No");
		noButton.addActionListener(new NoListener() );
		dialogPanel.add("West", yesButton);
		dialogPanel.add("East", noButton);
This next dialog is similar except that it has only one button. We want to display three labels in this dialog, so we create a panel to hold the labels, rather than buttons. The first label is known to the programmer, so it is just text. The second is intended to be the size of the user's computer screen, which the programmer can't know. Therefore we get the applications default Toolkit, which contains some system information and extract the screen size from it.
		// Create a modal dialog box with one button.
		infoDialog = new Dialog(myFrame, "Data on Screen and Current ViewPort.",true);
		infoDialog.setSize(250, 100);
		infoDialog.setLocation(50, 50);
		infoPanel = new Panel();
		infoDialog.add(infoPanel);
		//Define the panel that will show the info in this dialog box.
		infoPanel.add("North", new Label("Size of the screen and the window in pixels:"));
		myToolkit = getToolkit();
		Dimension d = myToolkit.getScreenSize(); // Doesn't change as we run.
		infoPanel.add	(	"Center",
			      new Label	( "screen's length = " + d.width
					+ ", screen's height = " + d.height
					)
				);
		windowSize = new Label(""); // Will show current window size.
		infoPanel.add("South", windowSize);
		Button okButton = new Button("OK");
		infoDialog.add("South", okButton);
		okButton.addActionListener(new OkListener());
Next we need to set up a MouseListener to watch for mouse clicks. This is because we want the application to track user clicks of the left and right mouse buttons. On a Macintosh, which has a mouse with only one button, the Right button is achieved by clicking with the Command key held down. UNIX systems typically have three mouse buttons, however.
		// Handle mouse clicks in our window.
		addMouseListener(new MouseWatcher());
Finally, one of our menu selections will show a picture. We need to fetch it before it can be seen and this takes a bit of time so we fetch it immediately so it will be ready when the user needs it. It is a picture of the author at work, by the way. In an application, the Toolkit is used to get the picture. The picture is just a standard jpeg file. It could also have been a gif file.
		// Get the image displayed by menu Picture.
		image = myToolkit.getImage("JBergin.jpg");
	}
Once initialization is done and the "applet" started, it starts to accept events from the user. To handle these events efficiently, Java uses a registration system. When an object like a button or a menu item that might generate an event is created, it registers one or more listeners who are interested in that event. When the event occurs (button clicked) the button sends a message to all of its registered listeners. The protocols of these messages are defined in Java interfaces. For example, the ActionListener interface is
interface ActionListener
{ void actionPerformed(ActionEvent e);
}
To implement this interface, a class must both declare that it does so, and implement each of the member functions that have a protocol in the interface. Here it is just one function: actionPerformed. We will examine each of these classes in turn, as each does something interesting when its menu item is chosen. Note that all are inner classes (within AllenApp) so each can see the instance variables of that containing class. This is true even though these are private variables.
	private Menu activitiesMenu;
	private Dialog yellowDialog, infoDialog;
	private Panel infoPanel;
	private Label windowSize;
	private Toolkit myToolkit;
	private Image image;
	class CyanListener implements ActionListener // Menu Cyan
	{	public void actionPerformed(ActionEvent e)
		{	setBackground(new Color(200, 255, 255)); //pale Cyan (RGB)
			repaint();
		}
	}
When the user selects the Cyan menu item, we wish to set the background color to a pale cyan color. This is not one of the standard colors defined in Color, as Color.yellow was. Therefore we need to create a new color. The standard color system in Java (there can be others) is RGB (Red-Green-Blue). In the RGB color system, each color is a combination of three values between 0 and 255. The first is the Red intensity, the second is Green, and the last, Blue. Pure Red is therefore (255, 0, 0). Opposite Red in the color wheel is Cyan, so it is (0, 255, 255). This is Color.cyan, but it is too bright. A paler version adds more red, but keeps the others fixed. Likewise yellow is opposite blue and magenta is opposite green. We can get 16,777,216 different colors by mixing red, green, and blue in different amounts.
When the screen is repainted, the background will be cyan instead of the yellow that it is at startup.
	class YellowListener implements ActionListener // Menu Yellow...
	{	public void actionPerformed(ActionEvent e)
		{	yellowDialog.setVisible(true);
		}
	}
When the user selects the Yellow... menu option, we wish to display a dialog box and ask if the user really wishes to set the color back to yellow. We created this dialog in init, of course, and just need to display it here. Note that we don't do anything here about retrieving information about which button the user uses to dismiss this dialog. That is handled by the two action listeners of the buttons. This dialog is not modal, so the user could simply drag it aside and continue using the application in other ways, returning to it later if desired.
	class YesListener implements ActionListener // Yes button for Yellow... dialog.
	{	public void actionPerformed(ActionEvent e)
		{	yellowDialog.setVisible(false);
			setBackground(Color.yellow);
			repaint();
		}
	}
The YesListener was attached to the yes button of this dialog and if the user clicks this button, the actionPerformed method of this class will be called. This dismisses the dialog by setting its visibility to false, but then sets the background color back to yellow. The NoListener just dismisses the dialog but takes no other action.
	class NoListener implements ActionListener // No button for Yellow... dialog.
	{	public void actionPerformed(ActionEvent e)
		{	yellowDialog.setVisible(false);
		}
	}
	class BeepListener implements ActionListener // Menu Beep
	{	public void actionPerformed(ActionEvent e)
		{	myToolkit.beep();
		} // We could actually play an audio clip here.
	}
Sometimes an application needs to draw in a window. The Box menu item illustrates this. A simple rectangle is drawn. The upper corner is at the point (10, 10) as measured in pixels from the upper left corner. The width is 90, and the height 50. To draw in a window we need a Graphics object which sets a graphics context. We can get the current graphics object of an applet by calling its getGraphics method.
	class BoxListener implements ActionListener // Menu Box
	{	public void actionPerformed(ActionEvent e)
		{	Graphics g = getGraphics();
			g.drawRect(10, 10, 90, 50); // x, y, width, height
			g.dispose();
		}
	}
	class PictureListener implements ActionListener // Menu Picture
	{	public void actionPerformed(ActionEvent e)
		{	Graphics g = getGraphics();
			g.drawImage(image, 100, 100, AllenApp.this);
			g.dispose();
		}
	}

	public boolean imageUpdate(Image image, int flags, int x, int y, int w, int h)
	{	if((flags & ALLBITS) != 0)
		{	Graphics g = getGraphics();
			g.drawImage(image, 100, 100, AllenApp.this);
			g.dispose();
		}
		return true;
	}
The handling of the Circle menu is similar to that of Box except that we want to draw the circle in green rather than the standard black. To do this we can set the color of the graphics object to green, but then all subsequent drawing would be green. A better way is to get the current color, draw what we want to do, and then set the color back to the original.
	class CircleListener implements ActionListener // Menu Circle
	{	public void actionPerformed(ActionEvent e)
		{	Graphics g = getGraphics();
			g.setColor(Color.green);
			g.drawOval(50, 80, 200, 200);
			g.dispose();
		}
	}
The parameters to drawOval give the dimensions of the containing rectangle using coordinates (x, y, width, height). We could draw in any non-standard color simply by creating the color as we did with our light cyan earlier.
	class InfoListener implements ActionListener // Menu Info
	{	public void actionPerformed(ActionEvent e)
		{	Rectangle r = getBounds();
			windowSize.setText
			(	"window's length = "
				+ r.width
				+ ", window's height = "
				+ r.height
			);
			infoDialog.setVisible(true);
		}
	}
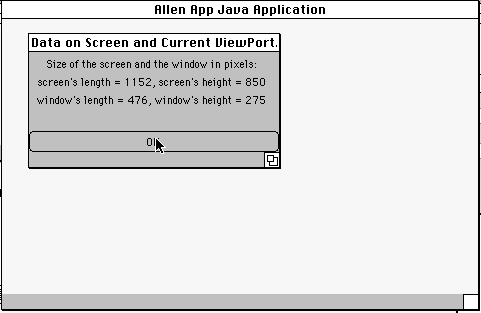
The OkListener attached to the OK button in this dialog simply hides the dialog.
	class OkListener implements ActionListener // OK button for Info dialog.
	{	public void actionPerformed(ActionEvent e)
		{	infoDialog.setVisible(false);
		}
	}
The right button, however, shows its clicks in a different font and color. It also shows the coordinates of the mouse click.


To handle mouse clicks we use one of two listeners. The usual MouseListener handles most mouse events. It does not handle mouse motions, however, as that alone generates a lot of event traffic. For this you need a MouseMotionListener. Here we use only a MouseListener attached to the AllenApp class. See the end of the init method for its creation. A MouseListener handles five different types of events of which we need only handle mouseClicked. Still, this is our most complex listener. This is because we need to distinguish right clicks from other clicks. It is also the only listener in which we need to examine the event object passed when one of the event handlers is called. We need to get the x and y coordinates of the click so that we can put our message at the right place on the screen. We also examine the modifiers of the event to see if they contain the constant BUTTON3_MASK. If so, we assume it is a right click, set the font and color after remembering the old values and then drawing a string with the required information at the required location.
	class MouseWatcher extends MouseAdapter // Mouse click handler.
	{	public void mouseClicked(MouseEvent e)
		{	Graphics g = getGraphics();
			int x = e.getX(), y = e.getY();
			if(e.getModifiers() == InputEvent.BUTTON3_MASK)  // Right button
							// (Ctrl click on Mac).
			{	Font font = new Font("Serif", Font.ITALIC, 10);
				g.setFont(font);
				Color oldColor = g.getColor();
				g.drawString("Right Click at:(" + x + "," + y + ")", x, y);
				g.setColor(oldColor);
				g.setFont(oldFont);
			}
			else // Other buttons.
				g.drawString("Left Click", x, y);
			g.dispose();
		}
	}
Note that none of the drawing in the window is permanent. If you cover the window in any way or cause it to repaint, everything in it is lost. If we wanted it to be permanent, we would attach a data structure such as a vector to AllenApp. Then each of the menu items that draws something, such as Box, would instead just put a simple object into this vector describing what should be drawn. The method called paint would then be overridden to read all of the objects in this vector and draw something in the window accordingly. Since this would be done at every repaint, the picture would be permanent. You might like an erase option, however, to get rid of some or all of the objects in the vector.
Susan Merritt, Allen Stix, A Bottom-up Jump-Start in Windows Programming with OWL 2.5 (in Turbo C++ for Windows 4.5) or Windows Programming in C++ for Everyone. Pace University Technical Report Number 119, Sept. 1997
David Flannagan, Java In A Nutshell, 2ed. O'Reilly & Associates, 1997.
David Geary, Alan McClellan, Graphic Java, Mastering the AWT, Prentice Hall, 1997.
Note that this book does NOT cover Java 1.1. The second edition, by Geary alone
does and is therefore recommended.
Note: In some ways the application shown here is atypical of what one normally does in Java. You can see some more typical examples in the web at http://www.gamelan.com, on my home site, http://csis.pace.edu/~bergin, and on the Pace sol site: http://sol.pace.edu/java. Most of this material is presented with source code.
Creating an Application with Code Warrior
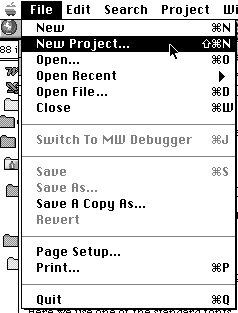
To build an application with Code Warrior, you must first create a project. Select New Project... from the application File menu.
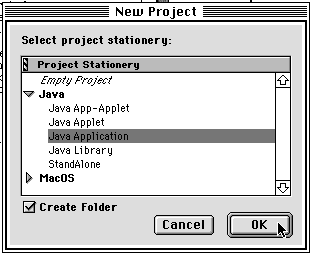
You will be given a New Project Dialog. Select the small triangle by the Java tab so that it scrolls down. Then select Java Application and finally OK.
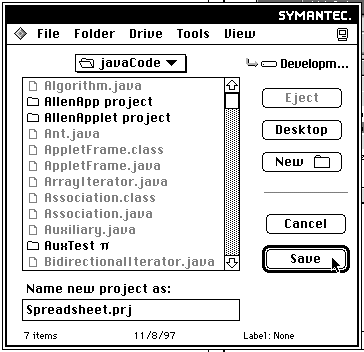
You will be presented with a file dialog in which to enter the name of a project. Here I have entered Spreadsheet.prj. Use the usual navigation tools on your computer to find the place at which you want the corresponding folder (directory) to be placed. Here we want it within the directory javaCode.
Code Warrior will then create the project and skeletons for the files and will show you the project dialog.
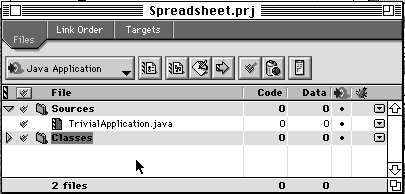
You can then open and modify the file TrivialApplicaton.java by double clicking on its name in the project dialog.
/*
	Trivial application that displays a string - 4/96 PNL
*/

public class TrivialApplication {

	public static void main(String args[]) {
		System.out.println( "Hello World!" );

		try {
			System.in.read(); // prevent console window from going away
		} catch (java.io.IOException e) {}
	}
}
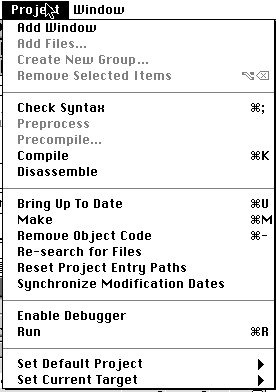
The Project menu has many options for building the application, including Compile and Make. You can also run it from here.
If you don't want the application to be called TrivialApplication, then you should change the name of the class to something more suitable and choose SaveAs under the file menu. Give the file the same name as its public class. The file will be saved, and the project file and dialog will be updated accordingly. If you do change the name, there is one additional step you need to take before your application will run, however.
In the project dialog, next to the pulldown Named Java Application there is a dialog for preferences. You can click this or, alternatively select Java App Settings... from the Edit menu. You will be given a multi-part dialog.
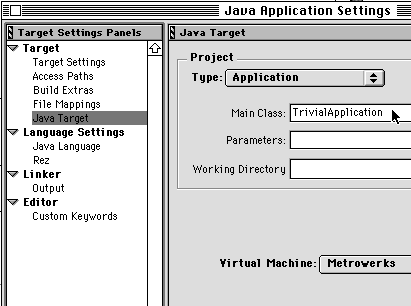
Select Java Target and change the name of the Main Class to whatever you have named it instead of TrivialApplication. You can also use this dialog to set additional options, such as whether the application class files are to be put into a Java archive or not, and which virtual machine to use to run the application. If you are working on a Windows machine, be sure to use the Sun JDK virtual machine, because the Microsoft version is incomplete.
Once you have written, and tested your application, you are ready to deploy it to the world. You can deploy it by sending compiled code and others with different machines will be able to execute it. It will look a bit different on their machines if they don't have the same machine that you used for development, but it will look like what they are used to on their machine. For example, the buttons shown here were ovals. If you run this code on a PC, they will be rectangular.
I hope you've learned that GUI programming in a modern language can be quite straightforward. There are a few new concepts to learn, but once mastered, you get great expressive power.
You can get all of the files for this application from the files directory on sol. The executables are in the jar file.
Enjoy.
Thanks to David Mossakowski, Pace student, and Peter Jones of the University of Western Australia for reading, commenting on, and bug finding an early version of this paper.
Note that in the MouseWatcher we create a new Font object for every right mouse click. It is automatically deleted at the end of the execution of the method. This is very inefficient and a poor use of objects. After all, it is the "same" font each time. Better would be to create this font in init and save a reference to it in an instance variable. Then we can just setFont for our graphics object in MouseWatcher.mouseClicked.
We could do the same for our light cyan color, but it is less critical, since mouse clicks are probably more frequent than menu selections.
Instead of menu bars, we could have made activitiesMenu into a popup menu. The work would have been the same. The user could then pop the menu up by clicking in a special way (platform dependent-- control click on a Macintosh). The disadvantage of this is that it wouldn't be so easy to add key equivalents for our menu options. We would have had to create a key watcher, similar to our mouse watcher. I left some scaffolding for popup menus in the source code on the web site, but didn't print it in the paper.
Note that the same menu item can't be in both the menu bar and in a popup. But you could have both, by creating duplicate menu items.
In AlanApp.init, we created a lot of MenuItems, but didn't store them in any permanent variables. We did install references to them in the menu itself, however, so they don't disappear when init concludes.
Class Vector was mentioned. You can find it in java.util. It is a self adjusting array-like structure that grows as you add to it. You can get a complete data structures library, functionally equivalent to the STL from ObjectSpace. It is free and is called JGL, the Java Generic Library.
A good book for learning GUI programming in Java is Core Java by Cornell and Horstman, Prentice-Hall, 1998. Be sure to get the Java 1.1 edition. It now comes in two volumes.
A good quickstart for the language itself is the Nutshell book mentioned in the bibliography. This is especially true if you already know C or C++.
Loading a picture from a local file is forbidden to an applet running within a browser or other applet viewer. If an applet downloaded from the net could read a file, it could send the information back to its source. You could however load a picture over the net from the source of the applet. If that machine is running a "picture server" (which could be written in Java) the server could deliver you a picture from any site in the world. Neither can an applet write a file on the local machine. If it could, it could destroy information there. Applications don't have these restrictions, because they aren't downloaded from the web and run on the local machine the way applets are.
I didn't do much with Fonts in the application. Java does quite a bit, however. You can retrieve various FontMetrics information. You can even ask a FontMetrics to tell you how many pixels wide a given String object is.
We could have put all the code in one file. In that case AllenApp would not be a public class, since AllenFrame needs to be since it has the main function. A file can have at most one public class. The way we did it is somewhat more general, since an AllenApp could be installed in a different type of frame than an AllenFrame and would still work correctly. Loose coupling between components is a good design strategy.
Java lets you overload function names but not built-in operators.
Every function in Java is "virtual" in the sense of C++ virtual.
The sample program used interfaces quite a lot, though it didn't show any explicitly. Interfaces are critical to Java and to the programmer's understanding of how to use it well.
In an applet, we couldn't have made all of our instance variables private, since the inner classes in applets (at least currently) can't see the private instance variables of outer classes. I think that this is an implementation bug in the current systems, however, and is scheduled to disappear.
A simple multi-threaded chat server can be written in Java in about 150 lines of code. An applet to interact with the server (and its other users, of course) is about 100 lines of code. This includes code for sending and receiving data across the net, and code for synchronizing access to a buffer of messages so that different threads can't accidentally destroy common data. See sol.pace.edu/java for details. The current implementation of the applet has not been updated to Java 1.1, however.
In Part 2 we wil look at Applet programming and look at a few more GUI elements.